Configuring Multi-Account Access
Scenarios
In addition to multi-VPC access, SFS Capacity-Oriented file systems also support cross-VPC access with different accounts.
If VPC IDs used by other accounts are added to the authorization list of a file system, and IP addresses or ranges of ECSs are added to the authorized address list, ECSs under different accounts can share the same file system.
For more information about VPC, see the Virtual Private Cloud User Guide.
Restrictions
- You can add a maximum of 20 VPCs for each file system. A maximum of 400 ACL rules for added VPCs can be created.
- If a VPC added to a file system has been deleted from the VPC console, the IP addresses or IP address ranges of this VPC can still be seen as activated in the file system's VPC list. But this VPC can no longer be used and you are advised to delete it from the list.
Procedure
- Log in to the SFS console.
- In the file system list, click the name of the target file system. On the displayed page, locate the Authorizations area.
- Click Tenant authorized to add VPC to add VPCs used by other accounts for the file system. See Figure 1.
Figure 1 Adding a VPC of an authorized tenant
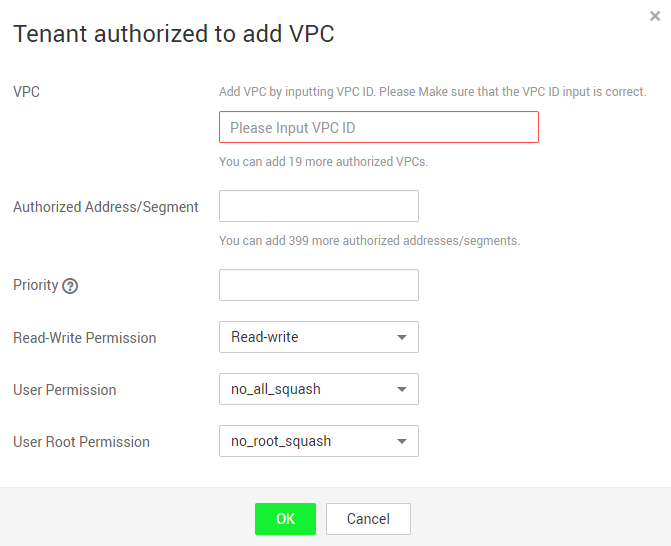
Table 1 describes the parameters to be configured.
Table 1 Parameter description Parameter
Description
VPC
Enter the VPC ID of the VPC to be added. You can obtain the VPC ID on the details page of the target VPC on the VPC console.
Authorized Address/Segment
- Only one IPv4 address or address segment can be entered.
- The entered IPv4 address or range must be valid and cannot be one starting with 0 except 0.0.0.0/0. If you add 0.0.0.0/0, any IP address within this VPC will be authorized for accessing the file system. Class D and class E IP addresses are not supported. Therefore, do not enter an IP address or address segment starting with any number ranging from 224 to 255, for example 224.0.0.1 or 255.255.255.255. IP addresses or address segments starting with 127 are also not supported. If an invalid IP address or address segment is used, the access rule may fail to be added or the added access rule cannot take effect.
- Do not enter multiple IP addresses (separated using commas) at a time. For example, do not enter 10.0.1.32,10.5.5.10.
- If you enter an IP address range, enter it in the format of IP address/mask. For example, enter 192.168.1.0/24. Do not enter in the format of 192.168.1.0-255 or 192.168.1.0-192.168.1.255. The number of bits in a subnet mask must be an integer ranging from 0 to 31. The number of bits 0 is valid only in 0.0.0.0/0.
Priority
The value must be an integer ranging from 0 to 100. 0 indicates the highest priority, and 100 indicates the lowest priority. In the same VPC, the permission of the IP address or address segment with the highest priority is preferentially used. If some IP addresses or address segments are of the same priority, the permission of the most recently added or modified one is used. For example, if the IP address for mounting is 10.1.1.32 and both 10.1.1.32 (read/write) with priority 100 and 10.1.1.0/24 (read-only) with priority 50 meet the requirements, the permission of 10.1.1.0/24 (read-only) with priority 50 is used. That is, if there is no other authorized priority, the permission of all IP addresses in the 10.1.1.0/24 segment, including 10.1.1.32, is read-only.
Read&Write Permissions
The value can be Read&Write or Read-only. The default value is Read&Write.
User Permission
Specifies whether to retain the user identifier (UID) and group identifier (GID) of the shared directory. The default value is no_all_squash.
- all_squash: The UID and GID of a shared directory are mapped to user nobody, which is applicable to public directories.
- no_all_squash: The UID and GID of a shared directory are retained.
This parameter is not involved when an authorized address is added for a CIFS file system.
User Root Permission
Specifies whether to allow the root permission of the client. The default value is no_root_squash.
- root_squash: Clients cannot access as the root user. When a client accesses as the root user, the user is mapped to the nobody user.
- no_root_squash: Clients are allowed to access as the root user who has full control and access permissions of the root directories.
This parameter is not involved when an authorized address is added for a CIFS file system.
- Click OK. The added VPC is displayed in the list.
- Click
 on the left of the VPC name to view details about the IP addresses/segments added to this VPC. You can add, edit, or delete IP addresses/segments. In the Operation column of the target VPC, click Add. The Add Authorized Address/Segment dialog box is displayed. Table 1 describes the parameters to be configured.
Verification
After another user's VPC is configured for the file system, if the file system can be mounted to ECSs in the VPC and the ECSs can access the file system, the configuration is successful.
- Scenarios
- Restrictions
- Procedure
- Verification