Managing SFS Turbo+OBS Storage Interworking
Overview
In scenarios like AI training and inference, high-performance data preprocessing, EDA, rendering, and simulation, you can use SFS Turbo file systems to speed access to your data in OBS buckets. After binding a directory in your file system with an OBS bucket, you can synchronize data between the file system and bucket through import and export tasks. You can enjoy the following benefits from SFS Turbo file caching: Before starting upper-layer training tasks, you can preload data in your OBS bucket to an SFS Turbo file system to speed up data access. Intermediate data and result data generated from upper-layer tasks is written to SFS Turbo file systems at a high speed. Downstream services can read and process the intermediate data, and you can asynchronously export the result data to OBS buckets for long-term low-cost storage. In addition, SFS Turbo allows you to configure a cache data eviction duration to delete data that has not been accessed for a long time to free up the cache space.
Notes and Constraints
- SFS Turbo file system types that support storage interworking: 250 MB/s/TiB, 125 MB/s/TiB, 40 MB/s/TiB, and 20 MB/s/TiB
- After you have configured storage interworking between OBS and a directory in SFS Turbo, operations like creating hard links, configuring directory quota limits, and renaming are no longer supported.
- You can configure a maximum of 16 interworking directories for a single SFS Turbo file system.
- Adding OBS buckets as storage backends depends on the OBS service, so you must have the OBS Administrator permissions.
- Files and directories with the same name cannot coexist in directories of the same level.
- The maximum supported path length is 1,023 characters.
- For import tasks, the length of a file or subdirectory name cannot exceed 255 bytes.
- If an OBS bucket has WORM enabled, you can only import data from OBS to SFS Turbo, but cannot export data from SFS Turbo to OBS.
- OBS parallel file systems and OBS buckets configured with server-side encryption cannot be added as storage backends.
Adding an OBS Bucket
- Log in to the SFS console.
- In the file system list, click the name of the desired file system to go to its details page.
- On the Storage Backends tab, click Add OBS Bucket.
Figure 1 Add OBS Bucket
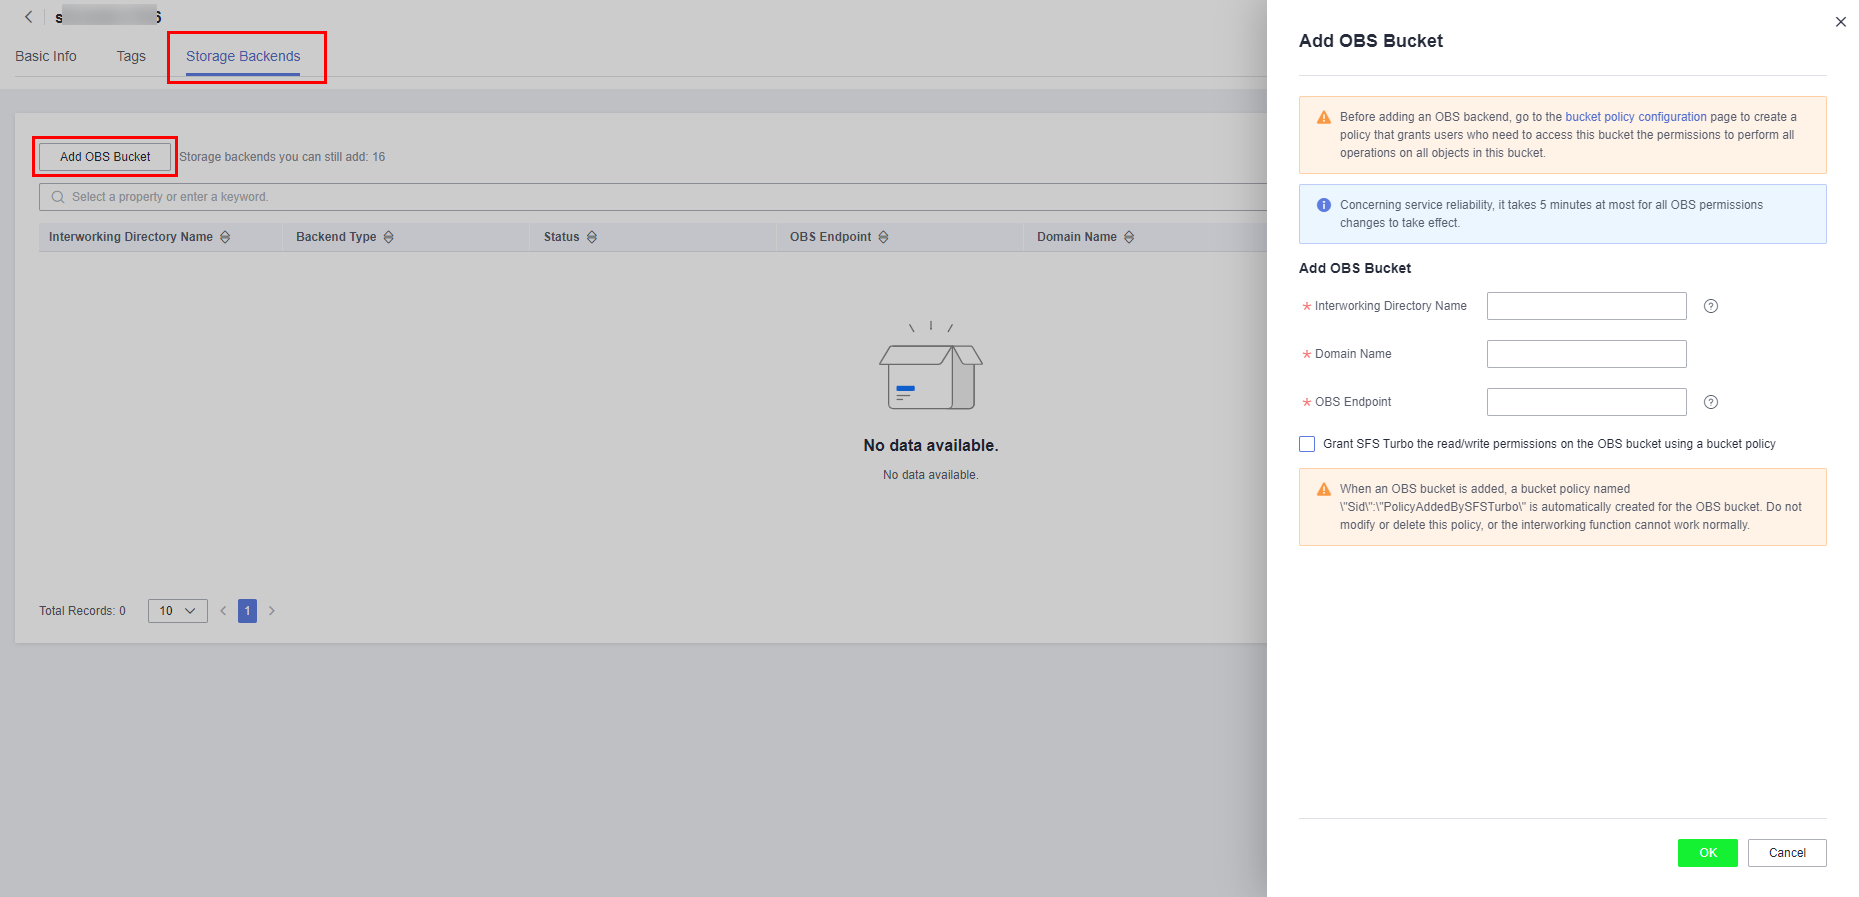
- On the displayed Add OBS Bucket page, configure the following parameters.
Table 1 Parameters required for adding an OBS bucket Parameter
Description
Constraints
Can Be Modified
Interworking Directory Name
SFS Turbo will create a subdirectory with this name in the file system root directory and bind this subdirectory with the specified OBS bucket, so this name must be unique.
- The subdirectory name must be unique.
- The subdirectory name must be a directory that cannot be found in the file system root directory.
- The subdirectory name cannot be a period (.) or two periods (..).
No
Domain Name
The name of an OBS bucket.
- The bucket to be added must be available.
- OBS parallel file systems and OBS buckets configured with server-side encryption cannot be added as storage backends.
No
OBS Endpoint
The OBS domain name of the region.
The OBS bucket and the SFS Turbo file system must be in the same region.
No
- Select "Grant SFS Turbo the read/write permissions on the OBS bucket using a bucket policy" and click OK.
- OBS parallel file systems and OBS buckets configured with server-side encryption cannot be added as storage backends.
- When you add an OBS bucket as the storage backend, a bucket policy will be automatically created for the bucket, with the policy Sid set to PolicyAddedBySFSTurbo. Do not modify or delete this policy, or the interworking function cannot work normally.
- If you have added an OBS bucket as the storage backend for one or multiple SFS Turbo file systems, before you delete any file system or remove the bucket, do not delete the bucket. Otherwise, the interworking function cannot work normally.
Metadata Import
After you add an OBS bucket as a storage backend, you can use metadata import.
Before using an SFS Turbo file system to access data in your OBS bucket, you need to use metadata import to import the object metadata (name, size, last modification time) from the bucket to the file system. You can only access the object data in the interworking directory after the metadata is imported. This operation only imports the metadata. The data will be loaded from the bucket and cached in the file system when it is accessed for the first time. When the same data is accessed later, it will be accessed from the cache, instead of the bucket.
SFS Turbo supports two metadata import methods: quick import and additional metadata import. After the metadata import is complete, you can view the imported directories and files in the interworking directory.
- Quick import: Use quick import if data in the bucket has not been exported from SFS Turbo before. A quick import only imports the object metadata (name, size, last modification time). After the import is complete, SFS Turbo will, by default, generate the additional metadata (uid, gid, directory permissions, and file permissions). Quick import is faster, so you are advised to use quick import.
- Additional metadata import: Use additional metadata import if data in the bucket has been exported from SFS Turbo before. With additional metadata import, both the object metadata (name, size, last modification time) and the additional metadata (uid, gid, mode) will be imported.
- Find the added OBS bucket and click Import Metadata in the Operation column.
Figure 2 Import Metadata
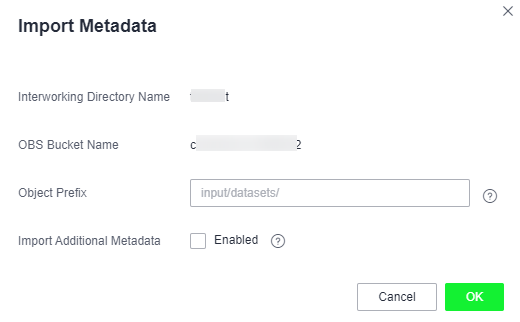
- Set Object Prefix to the prefix of objects in the OBS bucket. It can be a specific object name. To import metadata of all the objects in the OBS bucket, leave the prefix field empty.
- Select Import Additional Metadata to import additional metadata. If this option is not selected, the system will perform a quick import.
- Click OK.
- After you import data from OBS to SFS Turbo, if new data is written to the bucket or existing data is modified, you need to import the data to SFS Turbo again.
- The length of a file or subdirectory name cannot exceed 255 bytes.
Data Import
After you add an OBS bucket as a storage backend, you can use data import.
After a metadata import, data is not imported to the SFS Turbo file system. Instead, data will be loaded from the bucket to the file system when a file is accessed for the first time, which may take a long time. If your workloads are latency-sensitive and you know which directories and files need to be accessed, for example, AI training involves a large number of small files and is sensitive to latency, you can import specified directories and files in advance.
During a data import, both data and metadata will be imported, and a quick metadata import will be performed, meaning that the additional metadata (such as uid, gid, and mode) will not be imported.
- Find the added OBS bucket and click Import Data in the Operation column.
Figure 3 Import Data
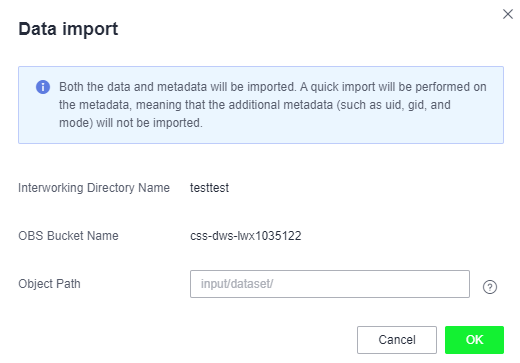
- Set Object Path to the path of objects in the OBS bucket (excluding the bucket name).Note
If you enter the path of a directory, end it with a slash (/).
- To import data of all the objects in the OBS bucket, leave the object path field empty. SFS Turbo will import data to the interworking directory and ensure that the file paths in the interworking directory are the same as those in the OBS bucket.
- Object path examples: (/mnt/sfs_turbo is the local mount point and output-1 is the interworking directory name.)
- If you enter dir/ as the object path, data will be imported to /mnt/sfs_turbo/output-1/dir.
- If you enter dir/file as the object path, data will be imported to /mnt/sfs_turbo/output-1/dir/file.
- If you leave the object path field empty, data will be imported to /mnt/sfs_turbo/output-1.
- Click OK.
- After you import data from OBS to SFS Turbo, if new data is written to the bucket or existing data is modified, you need to import the data to SFS Turbo again.
- You can also import data by calling the API. For details, see section "Creating an Import or Export Task" in the Scalable File Service API Reference.
- The length of a file or subdirectory name cannot exceed 255 bytes.
Data Export
After you add an OBS bucket as a storage backend, you can use the data export function.
Data export allows you to export to the OBS bucket the files newly created in the interworking directory or the objects previously imported and then modified in the interworking directory. You can specify a prefix for data export. Then, only directories and files that match the specified prefix will be exported to the bucket.
- Find the added OBS bucket and click Export in the Operation column.
Figure 4 Export

- Set File Prefix to the path of directories or files (excluding the interworking directory name) or that of a specific file. To export all files in the interworking directory to the bucket, leave the file prefix field empty.
- Click OK.
- Before data is exported, SFS Turbo starts asynchronous tasks to scan the files in the target directories. If there is any file that has been updated in the last 10 seconds, this file will not be exported.
- For a given file, if no changes were made since the last time it was exported to OBS, it will not be exported in the next export task even though the previously exported file has been deleted from the OBS bucket.
- After files are exported to OBS, certain SFS Turbo metadata whose name started with x-obs-meta-sfsturbo-st- will be included in the objects' custom metadata.
- The maximum file path that supports export is 1,023 characters.
- The maximum file size supported in an SFS Turbo file system is 320 TB, and the maximum file size that can be exported is 48.8 TB.
- When large files are exported, temporary files generated during the export will be stored in the x-obs-upload-sfsturbo-temp-part directory in the bucket. After the export is complete, SFS Turbo will automatically delete this directory as well as the temporary files in it.
- When a file is exported from SFS Turbo to OBS:
If it was previously imported to and then modified in SFS Turbo, it will overwrite its peer object in the bucket if it is newer. Otherwise, it will not overwrite its peer object in the bucket.
If you upload an object to OBS when an object with the same name is being exported, the object you uploaded may be overwritten.
- If the OBS bucket is enabled with WORM, data cannot be exported.
Cold Data Eviction
After you add an OBS bucket as a storage backend, you can use the cold data eviction function. Only data is deleted during an eviction. The metadata is retained. When the file is accessed later, the file data is loaded from OBS again.
Evicting data by time
After adding an OBS bucket, you can configure a cold data eviction duration to delete data from the cache by time. Files that have not been accessed within the specified duration will be evicted.
The procedure is as follows:
- Log in to the SFS console.
- In the file system list, click the name of the created SFS Turbo file system to go to its details page.
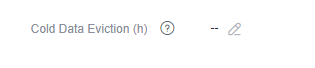
- On the Basic Info tab, configure a cold data eviction duration.
Figure 5 Setting a cold data eviction duration
Evicting data by capacity
SFS Turbo file systems also support data eviction by capacity.
When the capacity usage of a file system reaches 95%, SFS Turbo will delete data that has been accessed in the last 30 minutes until the capacity usage falls below 85%.
- Data can be evicted by time or capacity depending on which rule is triggered first.
- Cold data eviction is enabled by default, and the default duration is 60 hours. To configure a cold data eviction duration by calling the API, see section "Updating a File System" in the Scalable File Service API Reference.
- Services will be affected if the capacity of an SFS Turbo file system is used up, so you are advised to configure an alarm rule on Cloud Eye to monitor the file system capacity usage.
- When a file system capacity alarm is generated, change the cold data eviction duration to a shorter one, for example from 60 hours to 40 minutes to speed up data eviction, or simply expand the file system capacity.
FAQs
- In what cases will SFS Turbo evicts data?
For the files imported from OBS to SFS Turbo, if they not accessed within the configured eviction duration, they will be evicted.
For the files created in SFS Turbo, they will only be evicted when they have been exported to OBS and meet the eviction rule. If they have not been exported, they will not be evicted.
- How do I import evicted data to my SFS Turbo file system?
- File data is loaded from the bucket to the file system when the file is read or written.
- You can use data import to manually load data to the file system.
- In what scenarios will data import fail?
When the SFS Turbo file system contains only the file metadata (only metadata is imported or data eviction happens) and the object in the OBS bucket has been deleted, importing data or access the file will fail.
- Are the import or export tasks synchronous or asynchronous?
Tasks are asynchronous. After a task is submitted, you can query the task status based on the task ID.
- If I delete the files in the SFS Turbo interworking directory, will the objects in the OBS bucket be deleted as well?
No.
- Overview
- Notes and Constraints
- Adding an OBS Bucket
- Metadata Import
- Data Import
- Data Export
- Cold Data Eviction
- FAQs