Installing an Agent on the Linux OS
You can enable HSS only after the HSS agent is installed on your servers. This topic describes how to install the agent on a server running a Linux OS. For details about how to install an agent on the Windows OS, see Installing an Agent on the Windows OS.
WTP and HSS can use the same agent on a server.
Default Installation Path
The agent installation path on servers running the Linux OS cannot be customized. The default path is:
/usr/local/hostguard/
Prerequisites
- An EIP has been bound to the server on which the agent is to be installed.
- A remote management tool, such as Xftp, SecureFX, and WinSCP, has been installed on your PC.
- The Security-Enhanced Linux (SELinux) firewall has been disabled. The firewall affects agent installation and should remain disabled until the agent is installed.
Installing an Agent Using Commands
This procedure involves logging in to the server and running commands.
- Log in to the management console.
- In the upper left corner of the page, select a region, click
 , and choose .
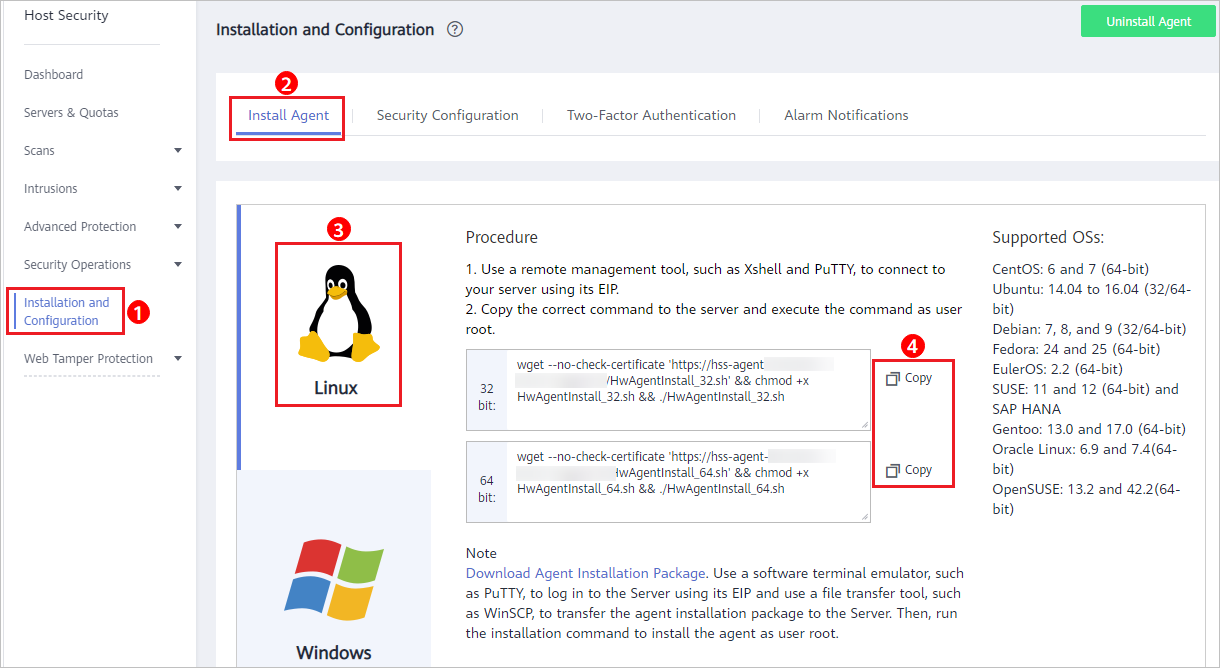
 - In the navigation pane on the left, choose Installation and Configuration. On the Install Agent tab, copy the required installation command.
Figure 1 Copying the command for installing the agent
- Remotely log in to the server where the agent is to be installed.
- You can log in to the ECS management console and click Remote Login in the ECS list.
- If your server has an EIP bound, you can also use a remote management tool, such as Xftp, SecureFX, or WinSCP, to log in to the server and install the agent on the server as user root.
- Paste the copied installation command and press Enter to install the agent on the server.
If information similar to the following is displayed, the agent is successfully installed:
Preparing... ########################## [100%]1:hostguard ########################## [100%]Hostguard is running.Hostguard installed. - Run the service hostguard status command to check the running status of the agent.
If the following information is displayed, the agent is running properly:
Hostguard is running
Installing an Agent Using an Installation Package
Download the agent installation package, upload it to the server where the agent is to be installed, and run the installation command on the server to install the agent.
- Log in to the management console.
- In the navigation pane on the left, choose Installation and Configuration. On the Install Agent tab, download the agent package.
Figure 2 Downloading the agent installation package

- Download the agent to be installed based on the server OS version.
- Use a file transfer tool, such as Xftp, SecureFX, or WinSCP, to upload the agent installation package to the server.
- Remotely log in to the server where the agent is to be installed.
- You can log in to the ECS management console and click Remote Login in the ECS list.
- If your server has an EIP bound, you can also use a remote management tool, such as Xftp, SecureFX, or WinSCP, to log in to the server and install the agent on the server as user root.
- Run cd Installation_package_directory to access the directory.
- Run the following command to install the agent on the server:
- For an .rpm package, run rpm -ivh Package_name.Note
To forcibly install the agent, run the rpm -ivh --force Package_name command.
- For a .deb package, run dpkg -i Package_name.
If information similar to the following is displayed, the agent is successfully installed:
Preparing... ########################## [100%]1:hostguard ########################## [100%]Hostguard is running.Hostguard installed.
- For an .rpm package, run rpm -ivh Package_name.
- Run the service hostguard status command to check the running status of the agent.
If the following information is displayed, the agent is running properly:
Hostguard is running
- Default Installation Path
- Prerequisites
- Installing an Agent Using Commands
- Installing an Agent Using an Installation Package