Enabling the Basic/Enterprise/Premium Edition
For the WTP edition, choose Web Tamper Protection > Server Protection and then enable it. For details, see Enabling the WTP Edition.
Check Mode
The HSS system detects all data at 00:00 every day.
If you enable server protection before the detection interval, you can view detection results only after the detection is performed at 00:00 of the next day or you perform a manual detection immediately.
Prerequisites
- In the server list on the Servers page of the HSS console, the Agent Status of the target server is Online.
- Alarm notifications have been enabled.
- To better protect your containers, you are advised to set security configurations.
Constraints
- Linux OS
On servers running the EulerOS with ARM, HSS does not block the IP addresses suspected of SSH brute-force attacks, but only generates alarms.
- Windows OS
- Authorize the Windows firewall when you enable protection for a Windows server. Do not disable the Windows firewall during the HSS in-service period. If the Windows firewall is disabled, HSS cannot block brute-force attack IP addresses.
- If the Windows firewall is manually enabled, HSS may also fail to block brute-force attack IP addresses.
Enabling Protection
- Log in to the management console.
- In the upper left corner of the page, select a region, click
 , and choose .
 - In the navigation tree on the left, choose Servers.
Figure 1 Server list

- Select the target server and click Enable.
In the Enable Protection dialog box, select an HSS edition.
- Click OK. View the server protection status in the server list.
If the Protection Status of the target server is Enabled, the basic, enterprise, or premium edition has been enabled.
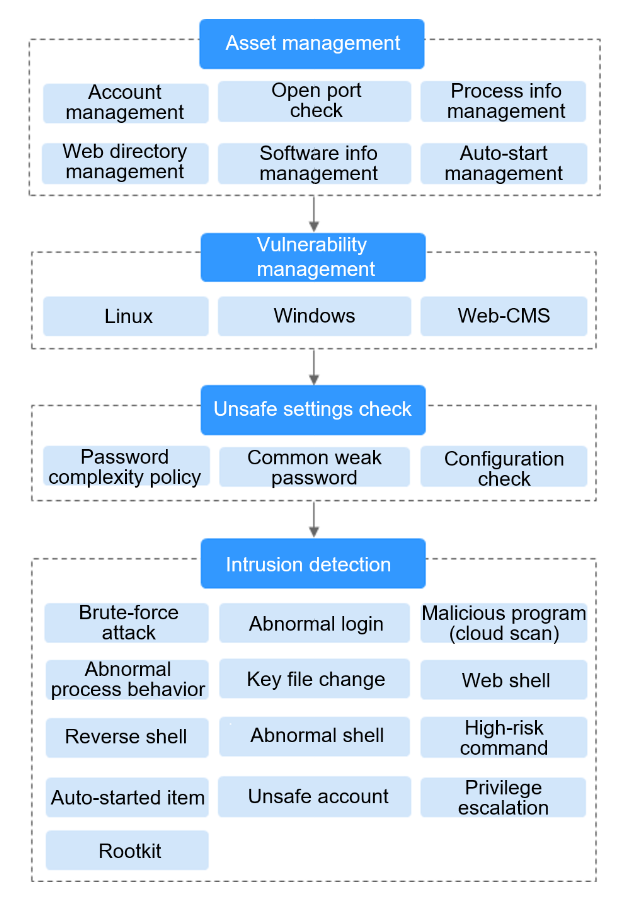
After HSS is enabled, it will scan your servers for security issues. Check items vary according to the edition you enabled. Figure 2 illustrates more details.
For details about the differences between editions, see Editions.
Figure 2 Automatic security check items
Viewing Detection Details
After server protection is enabled, HSS will immediately perform comprehensive detection on the server. The detection may take a long time, which needs your patience.
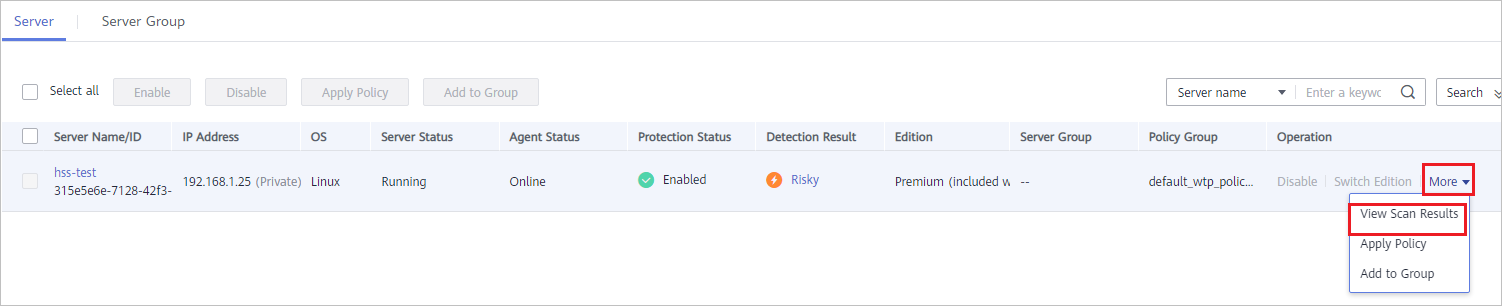
In the Operation column on the Server tab, choose More > View Scan Results to view the detection result of a specified server.
Figure 3 Viewing details
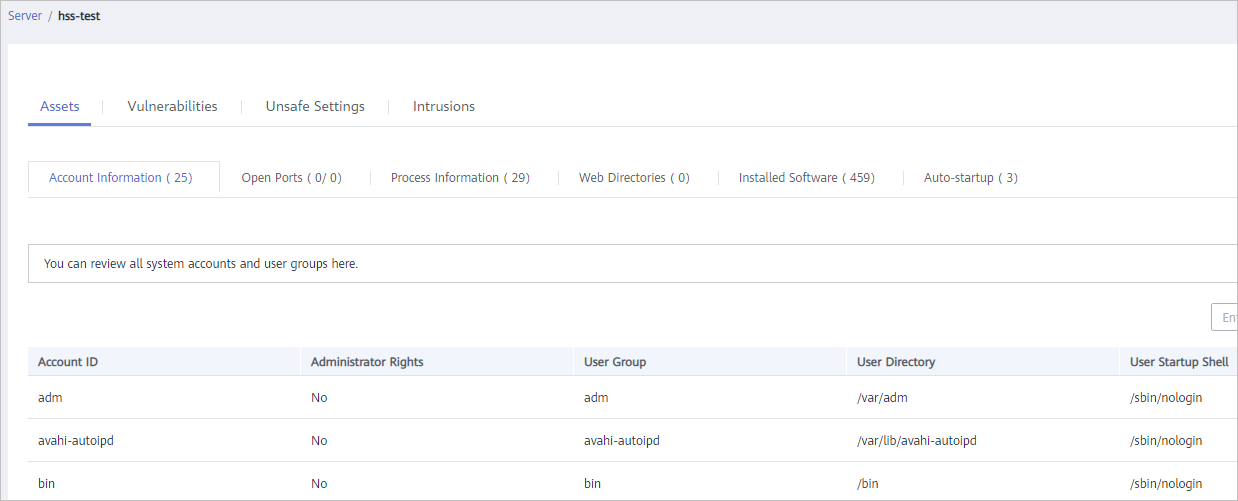
The details page shows detection results and detected risks.
Figure 4 Viewing the detection result
Switching Editions
You can switch between the basic, enterprise, and premium editions of HSS if you already purchased quotas of the required editions.
- If the HSS service is switched from a higher edition to a lower edition, protected servers will be more vulnerable to attacks.
- You can switch from other editions to the basic, enterprise, or premium edition.
- Preparations
- Before switching to a lower edition, check the server, handle known risks, and record operation information to prevent O&M errors and attacks.
- Operations after the edition change
- After switching to a lower edition, clear important data on the server, stop important applications on the server, and disconnect the server from the external network to avoid unnecessary loss caused by attacks.
- After switching to a higher edition, perform a security detection on the server, handle security risks on the server, and configure necessary functions in a timely manner.
Follow-up Operation
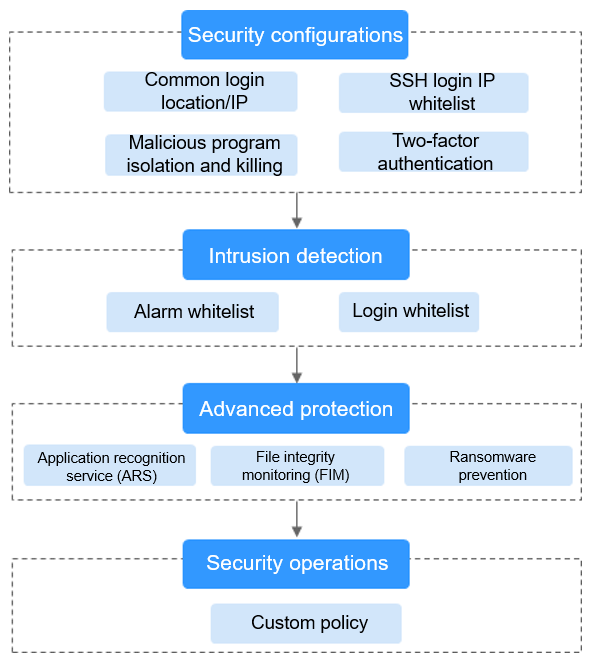
You can manually configure check items, as shown in Figure 5. Configurable items vary according to the edition you enabled.
For details about the differences between editions, see Editions.
Figure 5 Manual check items
Function | Check Item | Reference |
|---|---|---|
Security configuration |
| |
Intrusion detection |
| |
Advanced protection |
| |
Security operations |
|
Follow-Up Procedure
Disabling HSS
On the Server tab of the Servers page, click Disable in the Operation column of a server.
- Before disabling protection, perform a comprehensive detection on the server, handle known risks, and record operation information to prevent O&M errors and attacks on the server.
- After protection is disabled, clear important data on the server, stop important applications on the server, and disconnect the server from the external network to avoid unnecessary loss caused by attacks.
- Check Mode
- Prerequisites
- Constraints
- Enabling Protection
- Viewing Detection Details
- Switching Editions
- Follow-up Operation
- Follow-Up Procedure