Creating and Deploying a Component
This section describes how to create and deploy a component on ServiceStage.
ServiceStage allows you to create components with the same name in the same application. During component deployment, for components with the same name:
- Components with the same name in the same application cannot be deployed in the same environment.
- Components with the same name in different applications can be deployed in the same environment.
Prerequisites
- An application has been created because components can only be added to applications. For details, see Creating an Application.
- An environment has been created and resources have been managed because components need to be deployed in a specified environment. For details, see Environment Management.
- An organization has been created because the image generated by the component deployment needs to be managed based on an organization. For details, see Creating an Organization.
- (Optional) A namespace has been created, if you want to create and deploy a component in a Kubernetes environment. For details, see Creating a Namespace.
- If you create a component based on a source code repository, create repository authorization first. For details, see Authorizing a Repository.
- If you create a component based on a software package, the software package has been uploaded to the SWR software repository or OBS bucket.
- Upload the software package to the software repository. For details, see Uploading a Software Package.
- Upload the software package to OBS. For details, see Uploading a File.
- If you create a component based on an image package, preparing the image by referring to Component Source.
Procedure
- Log in to ServiceStage.
- Use any of the following methods to go to the Create Component page:
- Choose Component Management > Create Component.
- On the Application Management page, select the application for which you want to create a component, and click Create Component in the Operation column.
- On the Application Management page, click the application for which you want to create a component. On the displayed Overview page, click Create Component.
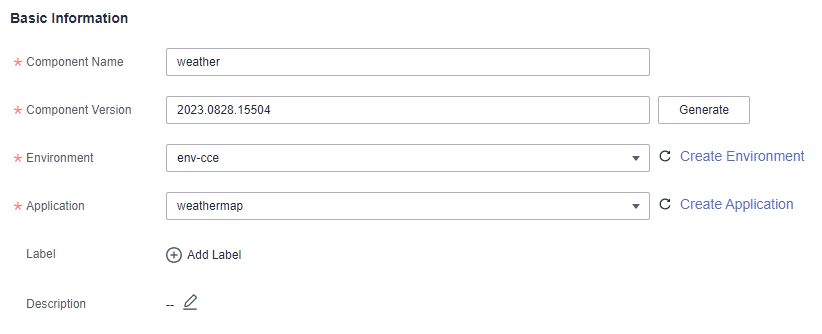
- In the Basic Information area, configure the component by referring to the following table. Parameters marked with an asterisk (*) are mandatory.
Parameter
Description
*Component Name
Component name.
*Component Version
Component version number, which can be automatically generated or customized.
- Automatically-generated: Click Generate. By default, the version number is the time when you click Generate. The format is yyyy.mmdd.hhmms, where s is the ones place of the second in the timestamp. For example, if the timestamp is 2022.0803.104321, the version number is 2022.0803.10431.
- Customized: Enter a value in the format of A.B.C or A.B.C.D. A, B, C, and D are natural numbers. For example, 1.0.0 or 1.0.0.0.
*Environment
Component deployment environment.
*Application
Application to which the component belongs.
*Labels
ServiceStage allows you to add labels of the key-value pair type to manage and select components, for example, to set affinity and anti-affinity scheduling.
- Click Add Label.
- In the Add Label dialog box, click Add Label.
- Enter a key and value.
- Click OK.
Description
Description of the component.
- Click
 and enter the component description.
 - Click
 to save the component description.
Click
 to cancel the setting.
Figure 1 Setting the basic component information
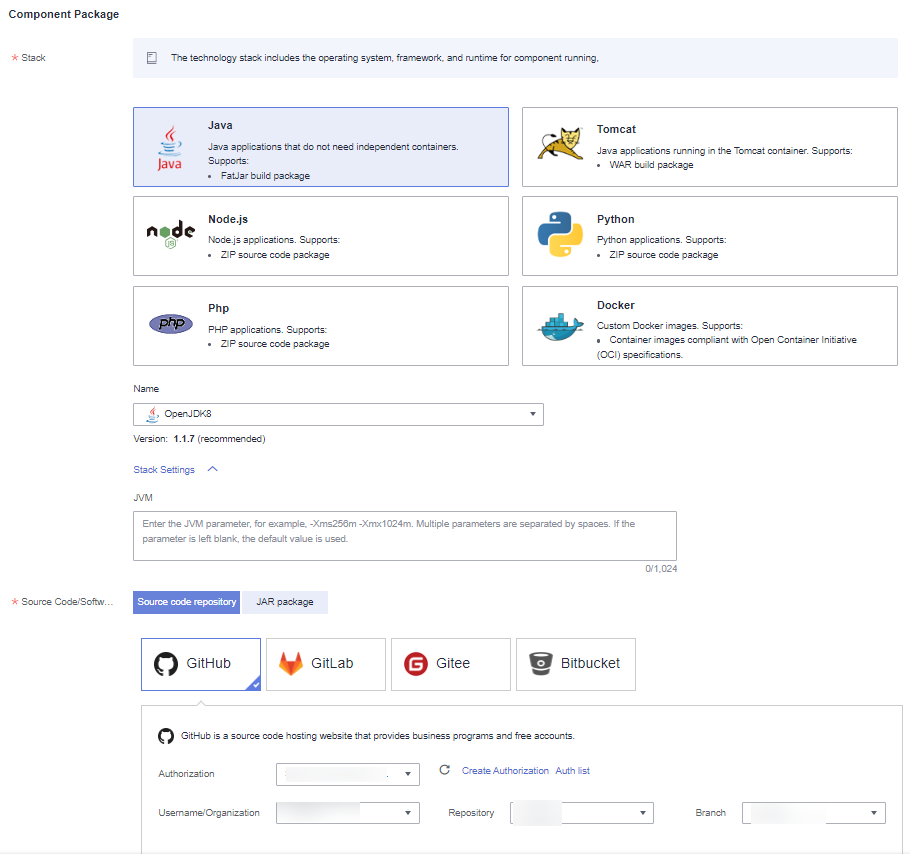
- In the Component Package area, configure the component package by referring to the following table. Parameters marked with an asterisk (*) are mandatory.
Parameter
Description
*Stack
- Select a component technology stack type based on the component deployment mode. For details, see Table 1.
- Select a technology stack from the Name drop-down list.
- (Optional) Set JVM to configure the memory parameter size during Java code running. This parameter is available when a Java or Tomcat technology stack is selected.
Click Stack Settings and set JVM, for example, -Xms256m -Xmx1024m. Multiple parameters are separated by spaces.
- (Optional) Set Tomcat parameters to configure the parameters such as Tomcat request path and port number. This parameter is available when a Tomcat technology stack is selected.
- Click Stack Settings and select Tomcat. The Tomcat dialog box is displayed.
- Click Use Sample Code and edit the template file based on service requirements.
- Click OK.
*Source Code/Software Package
If you select Source code repository, create authorization by referring to Authorizing a Repository and set the code source.
If you select a software package, the software package type supported by the component source is determined by the selected technology stack type. For details, see Table 1.
*Upload Method
If the component source is software package or image package, select an uploaded software package or image package. For details about the upload method, see Component Source.
Figure 2 Setting software package parameters
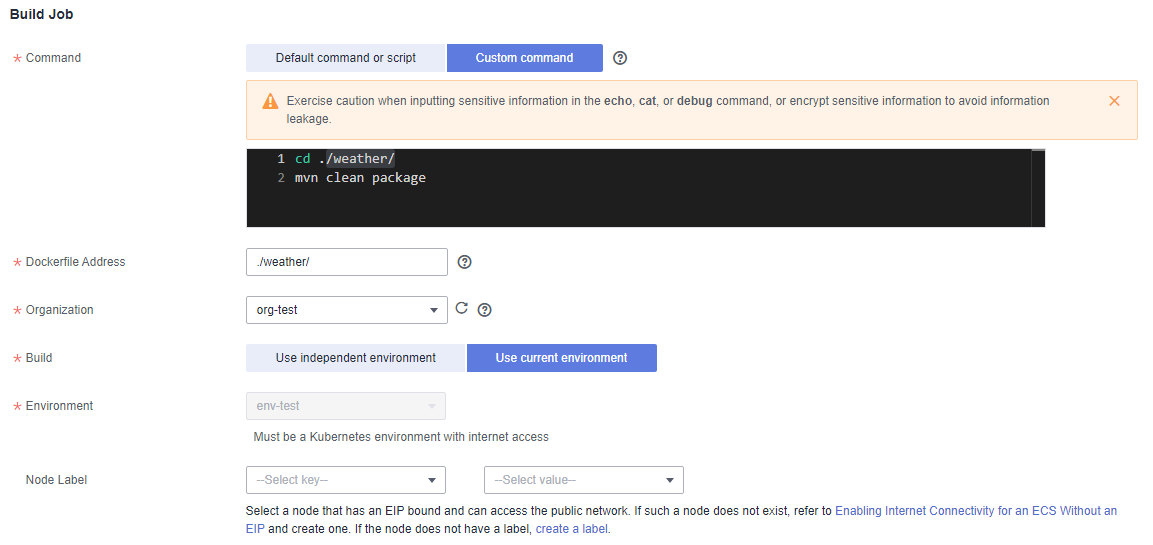
- In the Build Job area, set build parameters by referring to the following table. Parameters marked with an asterisk (*) are mandatory.
This area is mandatory if the component is deployed based on CCE and the selected technology stack type is Java, Tomcat, Node.js, Python, or PHP.
Parameter
Description
*Command
If the component source is Source code repository, set Command based on service requirements.
- Default command or script: preferentially executes build.sh in the root directory. If build.sh does not exist, the code will be compiled using the common method of the selected language. Example: mvn clean package for Java.
- Custom command: Commands are customized using the selected language. Alternatively, the default command or script is used after build.sh is modified.NOTICE:
- If Custom command is selected, exercise caution when inputting sensitive information in the echo, cat, or debug command, or encrypt sensitive information to avoid information leakage.
- To run the compilation command in the project subdirectory, you need to go to the project subdirectory and then run other script commands. For example:
cd ./weather/
mvn clean package
*Dockerfile Address
If the component source is Source code repository, set Dockerfile Address based on service requirements.
Dockerfile Address is the directory where the Dockerfile is located relative to the root directory (./) of the project. The Dockerfile is used to build an image.
If Dockerfile Address is not specified, the system searches for the Dockerfile in the root directory of the project by default. If the Dockerfile does not exist in the root directory, the system automatically generates the Dockerfile based on the selected operating environment.
*Organization
An organization is used to manage images generated during component build.
*Build
Select the type of the environment used to build an image. The build environment must be a Kubernetes environment and can access the Internet.
You are advised to select Use current environment. If the CCE cluster in the current environment cannot access the Internet and you have planned an independent build environment, you can select Use independent environment.
- Use independent environment: Use an independent build environment to build an image. The CCE clusters in the independent build environment and in the current component deployment environment must have the same CPU architecture. Otherwise, the component deployment fails.
- Use current environment: Use the deployment environment to which the component belongs to build an image. In the current environment, masters and nodes in the CCE cluster must have the same CPU architecture. Otherwise, the component build fails.
*Environment
- Use independent environment: Select an independent build environment different from that to which the component belongs.
- Use current environment: Select the deployment environment to which the component belongs.
*Namespace
Select the namespace of the CCE cluster in the environment where the build is executed, which is used to isolate build data. For details about namespaces, see Managing Namespaces.
Node Label
You can use a node label to deliver the build job to a fixed node bound with an EIP.
For details about how to add a label, see Managing Node Labels.
Figure 3 Configuring build parameters
- Click Next.
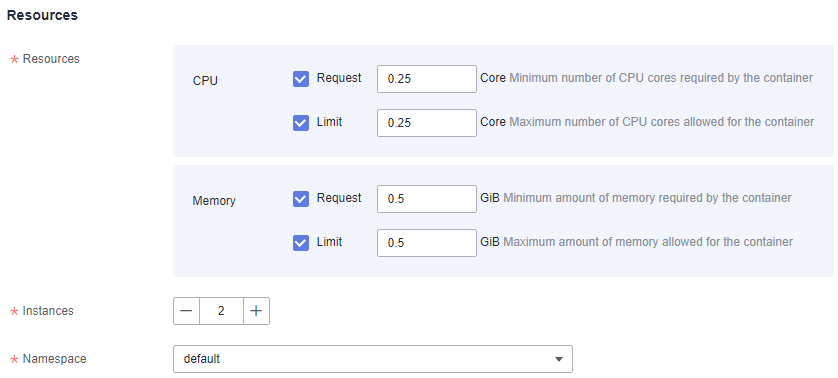
- In the Resources area, set the resources required by the component.
Set the parameters by referring to the following table. Parameters marked with an asterisk (*) are mandatory.
Parameter
Description
*Resources
Components cannot be scheduled to nodes whose residual resources are fewer than the requested amount. For details about how to configure the request and limit parameters, see Managing Resources for Containers.
You can customize CPU and Memory to set their quota, and set the maximum/minimum number of CPU cores and memory size (GiB) that can be used by components. To modify them, select the item to be changed and enter a new value.
Unselected parameters indicate no restriction.
*Instances
Set the number of component instances running in the environment. The value range is 1–200.
*Namespace
Select the namespace of the container where the component instance is located.
Figure 4 Deploying component resources
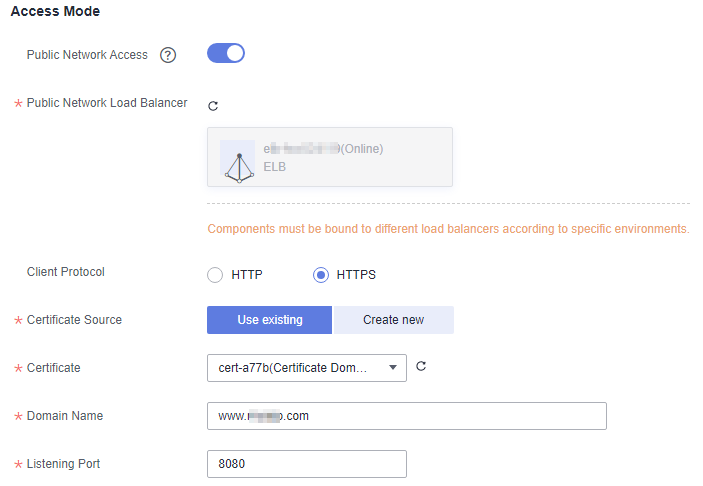
- (Optional) In the Access Mode area, enable Public Network Access.
Click
 to enable public access and set the following parameters:
- Set Public Network Load Balancer.
- Select an Elastic Load Balance (ELB) resource that has been bound to an elastic IP address (EIP) in the selected environment.
- If no ELB resource exists, click Add One. On the Edit Environment page that is displayed, click Add Optional Resource to add created ELB resources to the environment.
- For details about how to create an ELB resource, see Creating a Dedicated Load Balancer.Note
- An EIP has been bound to the load balancer and must be in the same VPC and subnet as the compute resources managed in the current component deployment environment.
- Components must be bound with different load balancers in different deployment environments to avoid route errors.
- (Optional) Set Client Protocol.
- HTTP has security risks. You are advised to select HTTPS.
- If HTTPS is selected, click Use existing to select an existing certificate.
If no certificate exists, click Create new to create a server certificate. For details, see Creating a Certificate.
- Set Domain Name.
Enter a customize domain name.
- Set Listening Port.
Enter the listening port number of the application process.
Figure 5 Configuring public access
- Set Public Network Load Balancer.
- (Optional) In the Local Time area, set the time zone of the container.
This parameter is available when the component is deployed in a CCE container.
By default, the time zone is the same as that of the region where the container node is located.
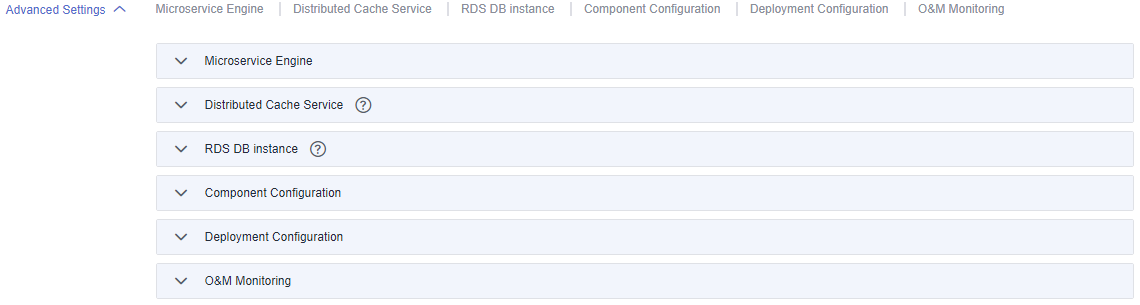
- (Optional) Set Advanced Settings.
- If the component is deployed in a CCE container, refer to the following table.
Operation Type
Operation
Description
Microservice Engine
Binding a microservice engine
Bind the microservice engine and connect the component to it.
NOTE:After a component developed based on ServiceComb 2.7.8 or later or Spring Cloud Huawei 1.10.4-2021.0.x or later is connected to a microservice engine, the following attributes are injected into the properties parameter of the MicroServiceInstance parameter when a microservice instance is created in the microservice engine:
- CAS_APPLICATION_ID: ID of the application to which the component belongs.
- CAS_COMPONENT_NAME: component name.
- CAS_ENVIRONMENT_ID: ID of the component deployment environment.
- CAS_INSTANCE_ID: component instance ID.
- CAS_INSTANCE_VERSION: component instance version.
- Choose Advanced Settings > Microservice Engine.
- Click Bind Microservice Engine.
- Select a microservice engine instance that has been bound in the environment.
- Click OK.NOTE:
Move the cursor to a bound microservice engine and perform the following operations:
- Bind the microservice engine again: Click
 , select the target microservice engine again, and click OK.
 - Delete a bound microservice engine: Click
 .
.
- Bind the microservice engine again: Click
- (Optional) Select Addons.
- Mesher: Enter the listening port number of the application process to enable multi-language access to service mesh. You can use Mesher to connect components that are not developed in the microservice framework to the microservice engine.
NOTE:- For non-microservice components developed using Java, Tomcat, or Docker, you can enable Mesher and use Mesher to connect the components to CSE for microservice registry and discovery.
- For components developed using Python, PHP, or Node.js, forcibly enable Mesher and connect the components to CSE for microservice registry and discovery.
- Sermant Injector: Sermant Agent can be automatically mounted using the Sermant Injector plug-in installed in CCE in the component deployment environment. In this way, the component can be connected to the microservice engine though Sermant Agent. For details about how to install the Sermant Injector plug-in, see Installing Sermant Injector.
Distributed Cache Service
Binding a distributed cache
In a distributed system, the distributed cache service provides scalable and reliable user session management.
Choose Advanced Settings > Distributed Cache Service and bind a distributed cache. For details, see Configuring a Distributed Cache.
Cloud Database
Binding a cloud database
The cloud database is required for persistent storage of application data.
Choose Advanced Settings > RDS DB instance and bind a cloud database. For details, see Configuring Relational Databases.
Component Configuration
Configuring environment variables
Environment variables are set in the container running environment and can be modified after component deployment, ensuring the flexibility of applications. Environment variables set for a component are local environment variables and take effect only for this component.
Choose Advanced Settings > Component Configuration and set environment variables. For details, see Configuring Environment Variables of a Component.
Deployment Configuration
Setting a startup command
A startup command is used to start a container.
Choose Advanced Settings > Deployment Configuration and set the startup command. For details, see Configuring the Lifecycle of a Component.
Configuring data storage
Container storage is a component that provides storage for applications. Multiple types of storage are supported. A component can use any amount of storage.
Choose Advanced Settings > Deployment Configuration and configure data storage. For details, see Configuring Data Storage.
Configuring the lifecycle
For container-deployed components, ServiceStage provides callback functions for the lifecycle management of applications. For example, if you want an application component to perform a certain operation before stopping, you can register a hook function.
Choose Advanced Settings > Deployment Configuration and configure the lifecycle. For details, see Configuring the Lifecycle of a Component.
Configuring the scheduling policy
For container-based deployment components, ServiceStage divides the components into minimum deployment instances based on the deployment features of the components. The application scheduler monitors application instance information in real time. When detecting that a new pod needs to be scheduled, the application scheduler calculates all remaining resources (compute, storage, and network resources) in the cluster to obtain the most appropriate scheduling target node.
Choose Advanced Settings > Deployment Configuration and configure the scheduling policy. For details, see Configuring a Scheduling Policy of a Component Instance.
O&M Monitoring
Configuring log collection
For container-based deployment components, ServiceStage supports setting of application log policies. You can view related logs on the AOM console. You can configure a log policy during or after component deployment. If no configuration is performed, the system collects standard application output logs by default.
Choose Advanced Settings > O&M Monitoring and configure log collection. For details, see Configuring a Log Policy of an Application.
Configuring health check
Health check periodically checks application health status during running of container-based deployment components.
Choose Advanced Settings > O&M Monitoring and configure health check. For details, see Configuring Health Check.
Configuring performance management
The Application Performance Management (APM) service helps you quickly locate application problems and analyze performance bottlenecks, improving user experience. ServiceStage allows you to configure application performance management during or after component deployment.
APM can be configured for components whose technology stack type is Java, Tomcat, or Docker.
Choose Advanced Settings > O&M Monitoring and configure performance management. For details, see Configuring Application Performance Management.
Configuring custom monitoring
ServiceStage allows you to obtain monitoring data based on custom metrics. You can set custom metric monitoring during or after component deployment. This section applies to components deployed using CCE.
Choose Advanced Settings > O&M Monitoring and configure custom monitoring. For details, see Configuring Custom Monitoring of a Component.
Figure 6 Setting advanced settings of a Kubernetes component
- If the component is deployed in a CCE container, refer to the following table.
- Click Create and Deploy.
On the Deployment Records page, view the deployment logs and wait until the component deployment is complete.
- Prerequisites
- Procedure