What Should I Do If Container Startup Fails?
Fault Locating
On the details page of a workload, if an event is displayed indicating that the container fails to be started, perform the following operations to locate the fault:
- Log in to the node where the abnormal workload is located.
- Check the ID of the container where the workload pod exits abnormally.
If the node is a Docker node, run the following command:
docker ps -a | grep $podNameIf the node is a containerd node, run the following command:
crictl ps -a | grep $podName - View the logs of the corresponding container.
If the node is a Docker node, run the following command:
docker logs $containerIDIf the node is a containerd node, run the following command:
crictl logs $containerIDRectify the fault of the workload based on logs.
- Check the error logs.cat /var/log/messages | grep $containerID | grep oom
Check whether the system OOM is triggered based on the logs.
Troubleshooting
Determine the cause based on the event information, as listed in Table 1.
Log or Event | Cause and Solution |
|---|---|
The log contains exit(0). | No process exists in the container. Check whether the container is running properly. |
Event information: Liveness probe failed: Get http... The log contains exit(137). | Health check fails. |
Event: Thin Pool has 15991 free data blocks which are less than minimum required 16383 free data blocks. Create more free space in thin pool or use dm.min_free_space option to change behavior | The disk space is insufficient. Clear the disk space. |
The keyword OOM exists in the log. | The memory is insufficient. |
Address already in use | A conflict occurs between container ports in the pod. |
Error: failed to start container "filebeat": Error response from daemon: OCI runtime create failed: container_linux.go:330: starting container process caused "process_linux.go:381: container init caused \"setenv: invalid argument\"": unknown | A secret is mounted to the workload, and the value of the secret is not encrypted using Base64. |
In addition to the preceding possible causes, there are some other possible causes:
- Check Item 8: Whether the Container Startup Command Is Correctly Configured
- Check Item 9: Whether the User Service Has a Bug
- Use the correct image when you create a workload on an Arm node.
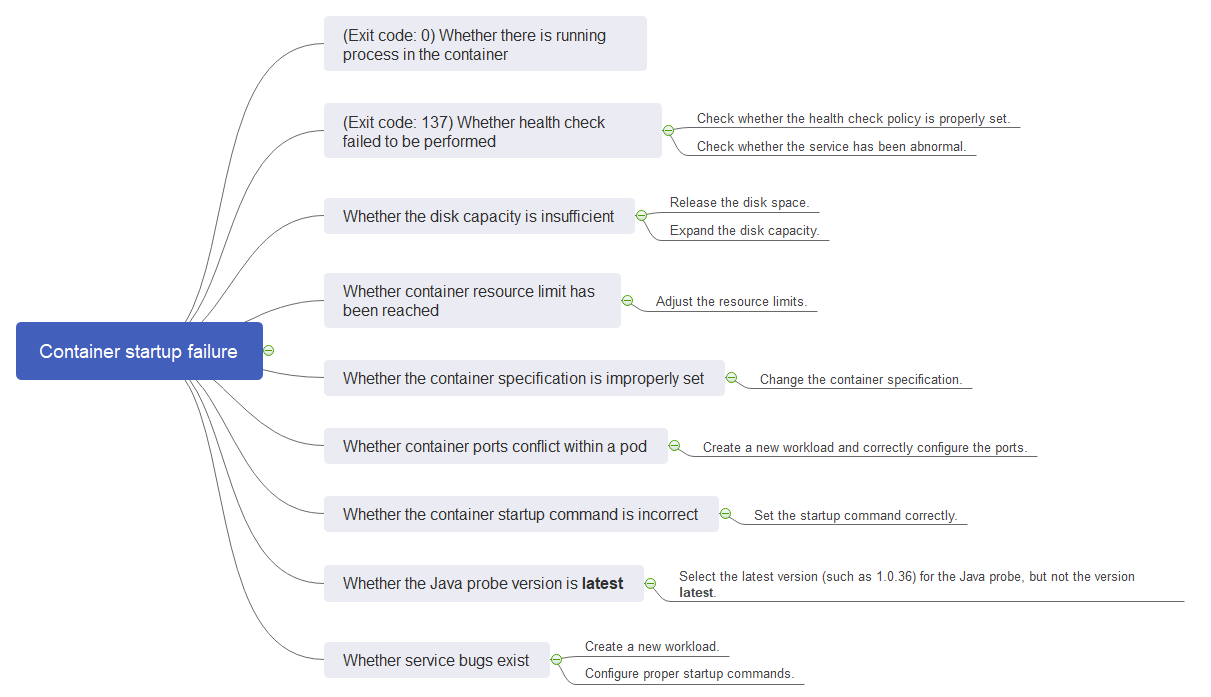
Figure 1 Troubleshooting process of the container restart failure
Check Item 1: Whether There Are Processes that Keep Running in the Container (Exit Code: 0)
- Log in to the node where the abnormal workload is located.
- View the container status.
If the node is a Docker node, run the following command:
docker ps -a | grep $podNameIf the node is a containerd node, run the following command:
crictl ps -a | grep $podNameExample:

If no running process exists in the container, the status code Exited (0) is displayed.
Check Item 2: Whether Health Check Fails to Be Performed (Exit Code: 137)
The health check configured for a workload is performed on services periodically. If an exception occurs, the pod reports an event and the pod fails to be restarted.
If the liveness-type (workload liveness probe) health check is configured for the workload and the number of health check failures exceeds the threshold, the containers in the pod will be restarted. On the workload details page, if Kubernetes events contain Liveness probe failed: Get http..., the health check fails.
Solution
Click the workload name to go to the workload details page, click the Containers tab. Then select Health Check to check whether the policy is proper or whether services are running properly.
Check Item 3: Whether the Container Disk Space Is Insufficient
The following message refers to the thin pool disk that is allocated from the Docker disk selected during node creation. You can run the lvs command as user root to view the current disk usage.
Thin Pool has 15991 free data blocks which are less than minimum required 16383 free data blocks. Create more free space in thin pool or use dm.min_free_space option to change behavior

Solution
Solution 1: Clearing images
Perform the following operations to clear unused images:
- Nodes that use containerd
- Obtain local images on the node.crictl images -v
- Delete the unnecessary images by image ID.crictl rmi {Image ID}
- Obtain local images on the node.
- Nodes that use Docker
- Obtain local images on the node.docker images
- Delete the unnecessary images by image ID.docker rmi {}Image ID}
- Obtain local images on the node.
Do not delete system images such as the cce-pause image. Otherwise, the pod creation may fail.
Solution 2: Expanding the disk capacity
To expand a disk capacity, perform the following operations:
- Expand the capacity of a data disk on the EVS console.
Only the storage capacity of EVS disks can be expanded. You need to perform the following operations to expand the capacity of logical volumes and file systems.
- Log in to the CCE console and click the cluster name to access the cluster console. In the navigation pane, choose Nodes. In the right pane, click the Nodes tab, locate the row containing the target node, and choose More > Sync Server Data in the Operation column.
- Log in to the target node.
- Run lsblk to view the block device information of the node.
A data disk is divided depending on the container storage Rootfs:
Overlayfs: No independent thin pool is allocated. Image data is stored in dockersys.
- Check the disk and partition space of the device.# lsblkNAME MAJ:MIN RM SIZE RO TYPE MOUNTPOINTsda 8:0 0 50G 0 disk└─sda1 8:1 0 50G 0 part /sdb 8:16 0 150G 0 disk # The data disk has been expanded to 150 GiB, but 50 GiB space is free.├─vgpaas-dockersys 253:0 0 90G 0 lvm /var/lib/containerd└─vgpaas-kubernetes 253:1 0 10G 0 lvm /mnt/paas/kubernetes/kubelet
- Expand the disk capacity.
Add the new disk capacity to the dockersys logical volume used by the container engine.
- Expand the PV capacity so that LVM can identify the new EVS capacity. /dev/sdb specifies the physical volume where dockersys is located.pvresize /dev/sdb
Information similar to the following is displayed:
Physical volume "/dev/sdb" changed1 physical volume(s) resized or updated / 0 physical volume(s) not resized - Expand 100% of the free capacity to the logical volume. vgpaas/dockersys specifies the logical volume used by the container engine.lvextend -l+100%FREE -n vgpaas/dockersys
Information similar to the following is displayed:
Size of logical volume vgpaas/dockersys changed from <90.00 GiB (23039 extents) to 140.00 GiB (35840 extents).Logical volume vgpaas/dockersys successfully resized. - Adjust the size of the file system. /dev/vgpaas/dockersys specifies the file system path of the container engine.resize2fs /dev/vgpaas/dockersys
Information similar to the following is displayed:
Filesystem at /dev/vgpaas/dockersys is mounted on /var/lib/containerd; on-line resizing requiredold_desc_blocks = 12, new_desc_blocks = 18The filesystem on /dev/vgpaas/dockersys is now 36700160 blocks long.
- Expand the PV capacity so that LVM can identify the new EVS capacity. /dev/sdb specifies the physical volume where dockersys is located.
- Check whether the capacity has been expanded.# lsblkNAME MAJ:MIN RM SIZE RO TYPE MOUNTPOINTsda 8:0 0 50G 0 disk└─sda1 8:1 0 50G 0 part /sdb 8:16 0 150G 0 disk├─vgpaas-dockersys 253:0 0 140G 0 lvm /var/lib/containerd└─vgpaas-kubernetes 253:1 0 10G 0 lvm /mnt/paas/kubernetes/kubelet
- Check the disk and partition space of the device.
Check Item 4: Whether the Upper Limit of Container Resources Has Been Reached
If the upper limit of container resources has been reached, OOM will be displayed in the event details as well as in the log:
cat /var/log/messages | grep 96feb0a425d6 | grep oom

When a workload is created, if the requested resources exceed the configured upper limit, the system OOM is triggered and the container exits unexpectedly.
Check Item 5: Whether the Resource Limits Are Improperly Configured for the Container
If the resource limits set for the container during workload creation are less than required, the container fails to be restarted.
Check Item 6: Whether the Container Ports in the Same Pod Conflict with Each Other
- Log in to the node where the abnormal workload is located.
- Check the ID of the container where the workload pod exits abnormally.
If the node is a Docker node, run the following command:
docker ps -a | grep $podNameIf the node is a containerd node, run the following command:
crictl ps -a | grep $podName - View the logs of the corresponding container.
If the node is a Docker node, run the following command:
docker logs $containerIDIf the node is a containerd node, run the following command:
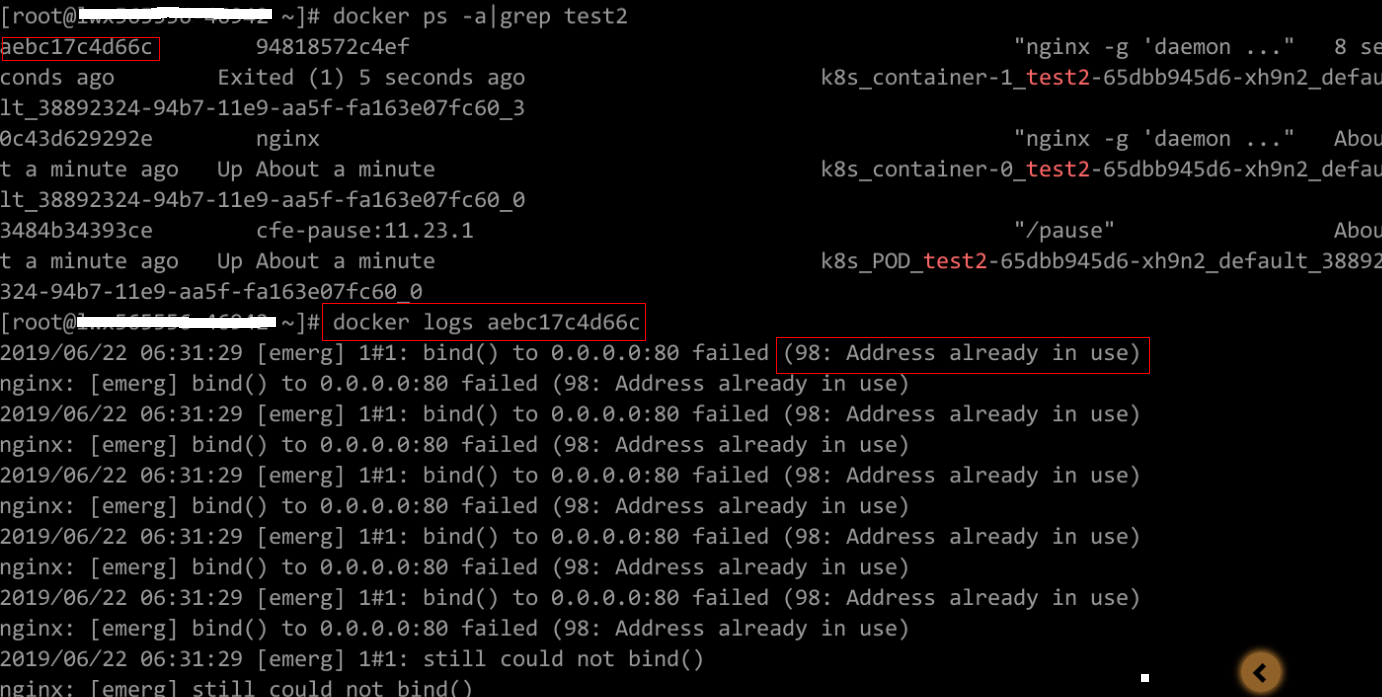
crictl logs $containerIDRectify the fault of the workload based on logs. As shown in the following figure, container ports in the same pod conflict. As a result, the container fails to be started.
Figure 2 Container restart failure due to a container port conflict
Solution
Re-create the workload and set a port number that is not used by any other pod.
Check Item 7: Whether the Value of the Secret Mounted to the Workload Meets Requirements
Information similar to the following is displayed in the event:
Error: failed to start container "filebeat": Error response from daemon: OCI runtime create failed: container_linux.go:330: starting container process caused "process_linux.go:381: container init caused \"setenv: invalid argument\"": unknown
The root cause is that a secret is mounted to the workload, but the value of the secret is not encrypted using Base64.
Solution
Create a secret on the console. The value of the secret is automatically encrypted using Base64.
If you use YAML to create a secret, you need to manually encrypt its value using Base64.
# echo -n "Content to be encoded" | base64
Check Item 8: Whether the Container Startup Command Is Correctly Configured
The error messages are as follows:
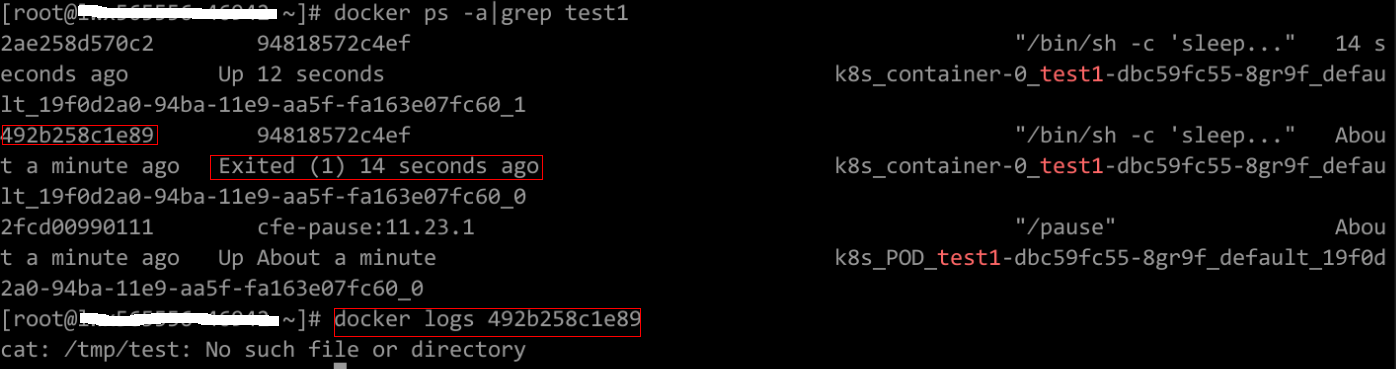
Solution
Click the workload name to go to the workload details page, click the Containers tab. Choose Lifecycle, click Startup Command, and ensure that the command is correct.
Check Item 9: Whether the User Service Has a Bug
Check whether the workload startup command is correctly executed or whether the workload has a bug.
- Log in to the node where the abnormal workload is located.
- Check the ID of the container where the workload pod exits abnormally.
If the node is a Docker node, run the following command:
docker ps -a | grep $podNameIf the node is a containerd node, run the following command:
crictl ps -a | grep $podName - View the logs of the corresponding container.
If the node is a Docker node, run the following command:
docker logs $containerIDIf the node is a containerd node, run the following command:
crictl logs $containerIDNote: In the preceding command, containerID indicates the ID of the container that has exited.
Figure 3 Incorrect startup command of the container
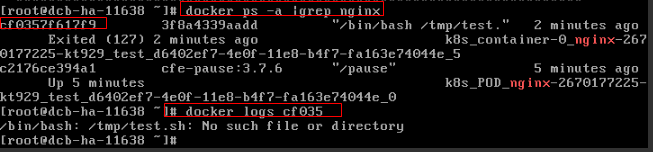
As shown in the figure above, the container fails to be started due to an incorrect startup command. For other errors, rectify the bugs based on the logs.
Solution
Create a new workload and configure a correct startup command.
- Fault Locating
- Troubleshooting
- Check Item 1: Whether There Are Processes that Keep Running in the Container (Exit Code: 0)
- Check Item 2: Whether Health Check Fails to Be Performed (Exit Code: 137)
- Check Item 3: Whether the Container Disk Space Is Insufficient
- Check Item 4: Whether the Upper Limit of Container Resources Has Been Reached
- Check Item 5: Whether the Resource Limits Are Improperly Configured for the Container
- Check Item 6: Whether the Container Ports in the Same Pod Conflict with Each Other
- Check Item 7: Whether the Value of the Secret Mounted to the Workload Meets Requirements
- Check Item 8: Whether the Container Startup Command Is Correctly Configured
- Check Item 9: Whether the User Service Has a Bug