Configuring Passthrough Networking for a LoadBalancer Service
Application Scenarios
kube-proxy, which is responsible for forwarding intra-cluster traffic, adds the IP addresses of load balancers associated with the LoadBalancer Services to nodes' local forwarding rules by default. When a client from within a cluster accesses the IP address of a load balancer, the traffic is directly forwarded to the destination instead of being forwarded by the load balancer.
If node-level affinity is configured for a Service (with externalTrafficPolicy set to Local), the Service will forward traffic only to pods on the node that run these pods. When a node or pod accesses another pod in the same cluster, if the node where the client runs does not have the corresponding backend pod, the access may fail.
Solution
CCE supports passthrough networking. You can configure the kubernetes.io/elb.pass-through annotation for the LoadBalancer Service so that the load balancer forwards the intra-cluster access to the IP address of the load balancer associated with the Service to backend pods.
Figure 1 Passthrough networking illustration
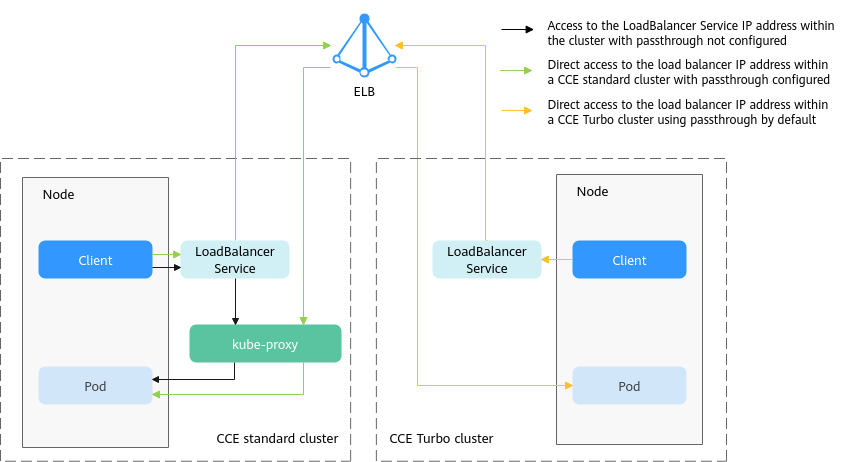
- CCE clusters
When a LoadBalancer Service is accessed within the cluster, the access is forwarded to the backend pods using iptables/IPVS by default.
When a LoadBalancer Service (configured with elb.pass-through) is accessed within the cluster, the access is first forwarded to the load balancer, then the nodes, and finally to the backend pods using iptables/IPVS.
- CCE Turbo clusters
When a client accesses a LoadBalancer Service from within the cluster, passthrough is used by default. In this case, the client directly accesses the load balancer private network IP address and then access a container through the load balancer.
Notes and Constraints
- In a CCE standard cluster, after passthrough networking is configured for a dedicated load balancer, the private IP address of the load balancer cannot be accessed from the node where the workload pod resides or other containers on the same node as the workload.
- Passthrough networking is not supported for clusters of or earlier.
- In IPVS network mode, the passthrough settings of Services connected to the same load balancer must be the same.
- If node-level (local) service affinity is used, kubernetes.io/elb.pass-through is automatically set to onlyLocal to enable pass-through.
Procedure
This section describes how to create a Deployment using an Nginx image and create a Service with passthrough networking enabled.
- Use the kubectl command line tool to connect to the cluster.
- Use the Nginx image to create a Deployment.
Create an nginx-deployment.yaml file. The file content is as follows:
apiVersion: apps/v1kind: Deploymentmetadata:name: nginxspec:replicas: 2selector:matchLabels:app: nginxtemplate:metadata:labels:app: nginxspec:containers:- image: nginx:latestname: container-0resources:limits:cpu: 100mmemory: 200Mirequests:cpu: 100mmemory: 200MiimagePullSecrets:- name: default-secretRun the following command to deploy the workload:
kubectl create -f nginx-deployment.yaml - Create a LoadBalancer Service and set kubernetes.io/elb.pass-through to true.
The content of the nginx-elb-svc.yaml file is as follows: (In this example, a shared load balancer named james is automatically created.)
apiVersion: v1kind: Servicemetadata:annotations:kubernetes.io/elb.pass-through: "true"kubernetes.io/elb.class: unionkubernetes.io/elb.autocreate: '{"type":"public","bandwidth_name":"cce-bandwidth","bandwidth_chargemode":"bandwidth","bandwidth_size":5,"bandwidth_sharetype":"PER","eip_type":"5_bgp","name":"james"}'labels:app: nginxname: nginxspec:externalTrafficPolicy: Localports:- name: service0port: 80protocol: TCPtargetPort: 80selector:app: nginxtype: LoadBalancer - Run the following command to create the Service:kubectl create -f nginx-elb-svc.yaml
Verification
- Log in to the ELB console and check the load balancer (named james in this example) associated with the Service.
- Click the load balancer name and click the Monitoring tab.
There is 0 connections to the load balancer.
- Log in to an Nginx container in the cluster using kubectl and access the IP address of the load balancer.
- Obtain the Nginx containers in the cluster.kubectl get pod
Information similar to the following is displayed:
NAME READY STATUS RESTARTS AGEnginx-7c4c5cc6b5-vpncx 1/1 Running 0 9m47snginx-7c4c5cc6b5-xj5wl 1/1 Running 0 9m47s - Log in to an Nginx container container.kubectl exec -it nginx-7c4c5cc6b5-vpncx -- /bin/sh
- Access the load balancer IP address.curl **.**.**.**
- Obtain the Nginx containers in the cluster.
- Wait for a while and check the monitoring data on the ELB console.
If a new access connection is displayed, the access is forwarded by the load balancer as expected.
- Application Scenarios
- Solution
- Notes and Constraints
- Procedure
- Verification