After you learn the basic concepts in SMN, you can start to create a topic, add subscriptions to the topic, and publish messages on the SMN console or by calling RESTful APIs provided by SMN.
Message Types
You can publish different formats of messages using SMN.
Message Format | Scenarios | Reference |
|---|---|---|
JSON message | Send different message content to different types of subscribers with only one message publishing. | |
Template message | Send messages containing fixed content and variables that can be easily set to desired content. |
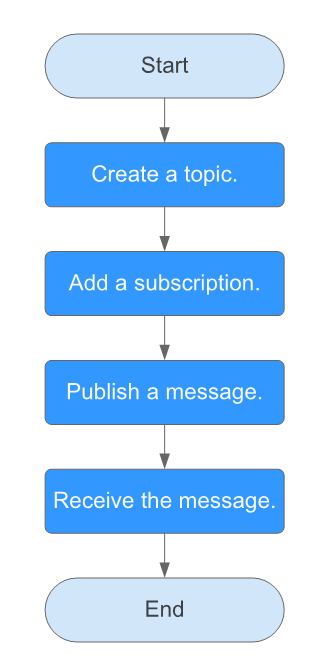
Figure 1 shows the process to publish a message to a topic.
Figure 1 Process of publishing a message
Scenarios
To send similar messages repeatedly, create a message template which contains fixed and changeable content. Every time you send messages using the template, you only have to replace changeable content. For example, your organization holds expositions regularly and needs to notify relevant people of the time, you can create a message template containing date variables and other fixed content.
Step 1. Create a Topic
- Log in to the management console.
- In the upper left corner of the page, click
 and select the desired region and project.
 - Select Application > Simple Message Notification.
The SMN console is displayed.
- In the navigation pane on the left, choose Topic Management > Topics.
The Topics page is displayed.
- In the upper right corner, click Create Topic.
Figure 2 Create Topic
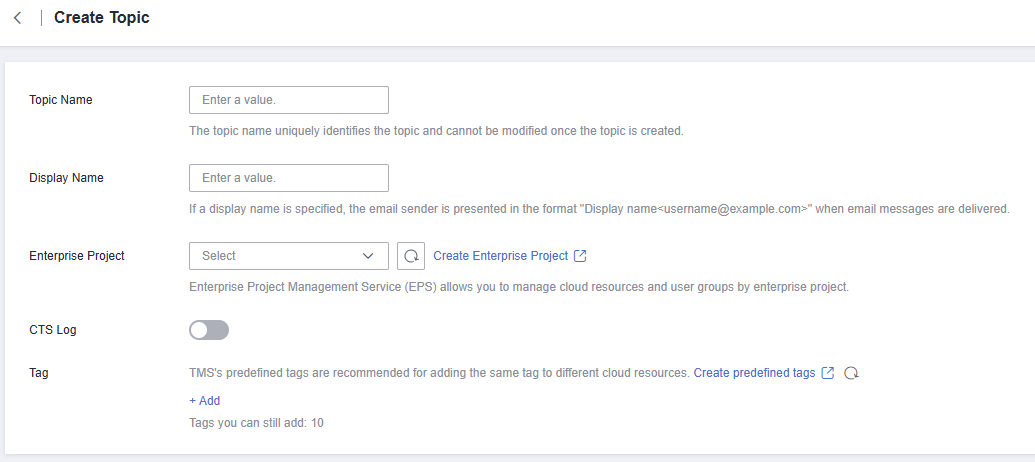
- Enter a topic name and display name.
Table 2 Parameter descriptions Parameter
Description
Topic Name
Topic name, which:
- Contains only letters, digits, hyphens (-), and underscores (_) and must start with a letter or digit.
- Contains 1 to 255 characters.
- Must be unique and cannot be modified once the topic is created.
Display Name
Message sender name, which can contain up to 192 bytes.
NOTE:After you specify a display name, the sender in email messages will be presented as Display name<username@example.com>. Otherwise, the sender will be username@example.com.
Enterprise Project
Name of an enterprise project. An enterprise project allows you to group cloud resources under specific projects and makes it easier to manage cloud resources and users.
This parameter is for enterprise users.
CTS Log
Whether to enable CTS log.
Log Group
Select a log group.
A log group is a group of log streams which share the same log retention settings. For details, see Log Groups.
Log Stream
Select a log stream in the specified log group.
A log stream is the basic unit for reading and writing logs. You can sort logs of different types, such as operation logs and access logs, into different log streams. For details, see Log Streams.
Tag
A tag is a key-value pair. Tags identify cloud resources so that you can easily categorize and search for your resources.
- A key can contain up to 128 characters, and a value can contain up to 255 characters.
- A tag key can contain letters, digits, spaces, and special characters _.:=+-@, but cannot start or end with a space or start with _sys_.
- A tag value can contain letters, digits, spaces, and any of the following characters: _.:/=+-@
- You can add up to 10 tags for each topic.
- Click OK.
The topic you created is displayed in the topic list. The system generates a topic URN, which is the unique resource identifier of the topic and cannot be changed.
To search for a topic, filter topics by project or enter the topic name or ID in the upper right corner of the topic list. Then click
 or press Enter. Alternatively, click Search by Tag above the upper right corner of the topic list and search for a topic by tag key and value.
 - Click the name of the topic to view its details, including the topic URN, display name, logs, tags, and subscriptions.
Step 2. Add a Subscription
- Log in to the management console.
- In the upper left corner of the page, click
 and select the desired region and project.
 - Select Application > Simple Message Notification.
The SMN console is displayed.
- In the navigation pane on the left, choose Topic Management > Subscriptions.
- In the upper right corner, click Add Subscription.
The Add Subscription dialog box is displayed.
Figure 3 Add Subscription
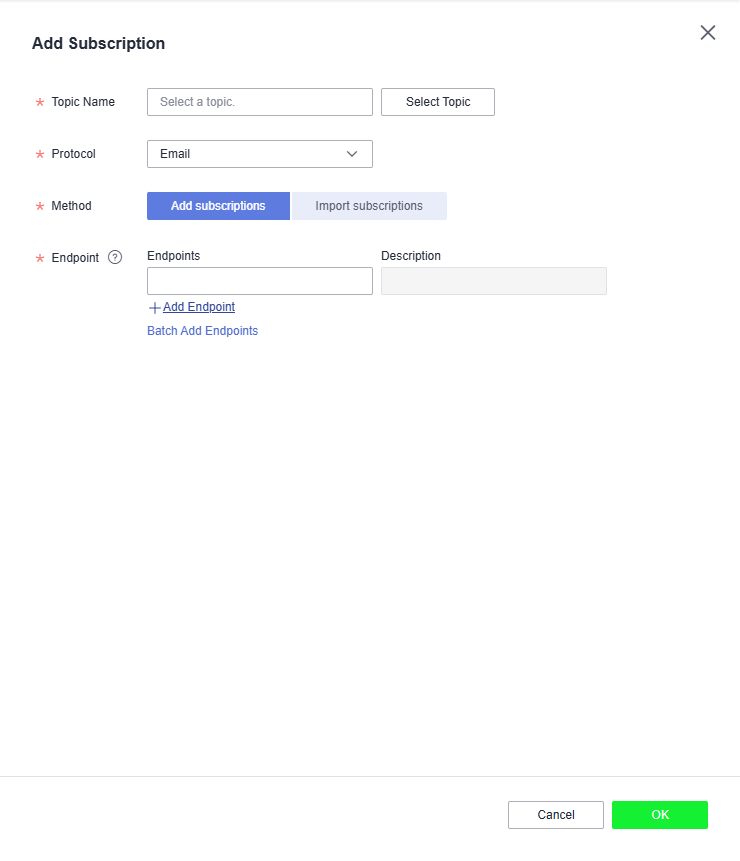
- Specify the required subscription information.
- Beside Topic Name, click Select Topic.
- Specify the subscription protocol and endpoints.
Table 3 Parameters for adding a subscription Parameter
Description
Topic Name
Specifies the name of the topic to which messages are published.
Protocol
Specifies the protocol over which messages are sent. Possible values are FunctionGraph (function), Email, HTTP, and HTTPS.
Method
The following two options are available:
- Add subscriptions
- Import subscriptions: Select subscribers whose subscription has been confirmed and import the subscription data. After the subscription is imported, information such as the subscription endpoint and subscription status is synchronized. Only email, HTTP, and HTTPS subscriptions can be imported.
Endpoint
Specifies the subscription endpoint. You can add up to 10 email, HTTP, or HTTPS endpoints, one in each line.
- Email: Enter one or more valid email addresses.
Examples:
username@example.com
username2@example.com
- HTTP: Enter one or more public network URLs.
Example:
http://example.com/notification/action
- HTTPS: Enter one or more public network URLs.
Example:
https://example.com/notification/action
- FunctionGraph (function): Click
 to select a function and specify its version.
Request Header
This parameter is only available if HTTP or HTTPS is selected for Protocol. It indicates whether to configure the request header now. If you select Configure now, specify Key and Value. You can add up to 10 request headers.
The value of Key must:
- Be case insensitive and unique.
- Start with x- but cannot start with x-smn.
- Contain only digits, letters, and hyphens (-), but not end with a hyphen nor contain consecutive hyphens.
Version
This parameter is only available if FunctionGraph (function) is selected for Protocol. Select the version for the function.
Description
Enter the remarks for the subscription.
To modify the subscription remarks, click
 in the Description column of the target subscription in the subscription list.
- Click OK.
The subscription you added is displayed in the subscription list.
To search for a subscription, you can filter subscriptions by protocol or subscription status in the upper right corner of the subscription list. You can also enter a subscription endpoint and click
 or press Enter.Note
- To prevent malicious users from attacking subscription endpoints, SMN limits the number of confirmation messages that can be sent to an endpoint within a specified period. For details, see Traffic Control over Subscription Confirmation.
- SMN does not check whether subscription endpoints exist when you add subscriptions.
- After you add a subscription or request subscription confirmation, SMN will send a confirmation message to the endpoints, and the link in the confirmation message will be valid for 48 hours.
- Subscription confirmation messages will be counted as messages sent and will be billed.
Step 3. Create a Message Template
- Log in to the management console.
- Click
 on the upper left to select the desired region and project.
 - Select Application > Simple Message Notification.
The SMN console is displayed.
- In the navigation pane on the left, choose Topic Management > Message Templates.
- In the upper right corner, click Create Message Template.
The Create Message Template dialog box is displayed.
- Specify the template name, protocol, and content.
Table 4 Parameters required for creating a message template Parameter
Description
Template Name
Template name, which:
- Contains only letters, digits, hyphens (-), and underscores (_) and must start with a letter or digit.
- Can contain 1 to 64 characters.
- Cannot be modified once the template is created.
Protocol
Endpoint protocol of the template, which cannot be changed once the template is created
The protocol can be Default, Email, HTTP, HTTPS, or FunctionGraph (function).
If you do not specify a protocol, Default is used.
Content
Template content
Use {xxx} as the placeholder to create a template. When you use this template to publish messages, replace {xxx} with specific content. xxx must start with a letter or digit and can contain up to 21 characters, including only letters, digits, hyphens (-), periods (.), and underscores (_).
The message template must meet the following requirements:
- The template supports plain text only.
- The template content cannot be left blank and its size cannot exceed 256 KB.
- The template can contain up to 256 variables in total, but that includes redundant variables. For unique variables, there can be no more than 90.
- When you publish messages using a template, the message content you specify for each variable cannot exceed 1 KB.
For example, the template information is as follows:
- Template Name: tem_001
- Protocol: Default
- Content: The Arts and Crafts Exposition will be held from {startdate} through {enddate}. We sincerely invite you to join us.
- Click OK.
The template you created is displayed in the template list.
To search for a template, enter the template name in the upper right corner of the message template list and click
 or press Enter.
Step 4. Publish a Template Message
- Log in to the management console.
- Click
 on the upper left to select the desired region and project.
 - Under Application, select Simple Message Notification.
The SMN console is displayed.
- In the navigation pane on the left, choose Topic Management > Topics.
The Topics page is displayed.
- In the topic list, locate the topic that you need to publish a message to and click Publish Message in the Operation column.
Alternatively, locate the topic and click its name. In the upper right corner of the displayed topic details page, click Publish Message.
- Configure the required parameters. (The topic name is provided by default and cannot be changed. Subject is optional.)
Select Template for Message Format. Then, manually type the template content in the Message box or click Generate Template Message to generate it automatically. The message content cannot be left blank and its size cannot exceed 256 KB.
- If you choose to manually type the template message, see Template Message Format for detailed requirements.
- If you choose to automatically generate the template message, proceed with 7 through 10.
- Click Generate Template Message.
- Select a template name, for example, tem_001. Enter values for the variables.
The system replaces the variables with the message content you specified. The protocols configured in the template are displayed after each variable. Only the Default protocol is specified in tem_001. Therefore, all confirmed subscribers in the topic will receive the message content in the default template.
- Click the Preview tab and click Message Preview to preview the message.
In this example, the message generated is The Arts and Crafts Exposition will be held from February 10 through February 21. We sincerely invite you to join us..
- Click OK.
The message that is generated contains the template name and variables.
- Click OK.
SMN delivers your message to all subscription endpoints. For details about messages for different protocols, see Messages Using Different Protocols.
Step 5. Receive the Message
Subscription endpoints of different protocols receive different messages.
- Email
Subscription endpoints are email addresses.
Email messages contain the message subject, content, and a link to unsubscribe.
- HTTP/HTTPS
Subscription endpoints are public network URLs. For details, see section "HTTP/HTTPS Messages" in Simple Message Notification User Guide.