Publishing a Template Message
Scenarios
You can publish a template message to an SMN topic when most of the content in the messages is fixed, and only a few parts vary with the occasions. In this scenario, you can create a message template and use variables as placeholders to indicate changeable content. Each time when you publish a message, you can select the template and set values only for variables without having to edit the message content repeatedly.
For example, your organization holds expositions regularly, and you need to notify people of the time. Except for the time, most part of the message remains unchanged. You can perform the following operations to send notifications:
- Create a topic Mytopic.
- Add email subscriptions to the topic.
- Publish message "The Arts and Crafts Exposition will be held from {startdate} through {enddate}. We sincerely invite you to join us."
{startdate} indicates the date when the exposition is started. {enddate} indicates the date when the exposition is ended.
Operation Process
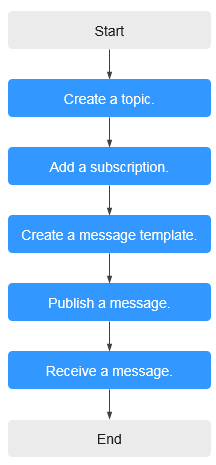
Figure 1 shows the process to publish a template message.
Figure 1 Process of publishing a template message
Step 1. Create a Topic
- Log in to the management console.
- Under Application, select Simple Message Notification.
The SMN console is displayed.
- In the navigation pane on the left, choose Topic Management > Topics.
- In the upper right corner, click Create Topic.
Figure 2 Create Topic
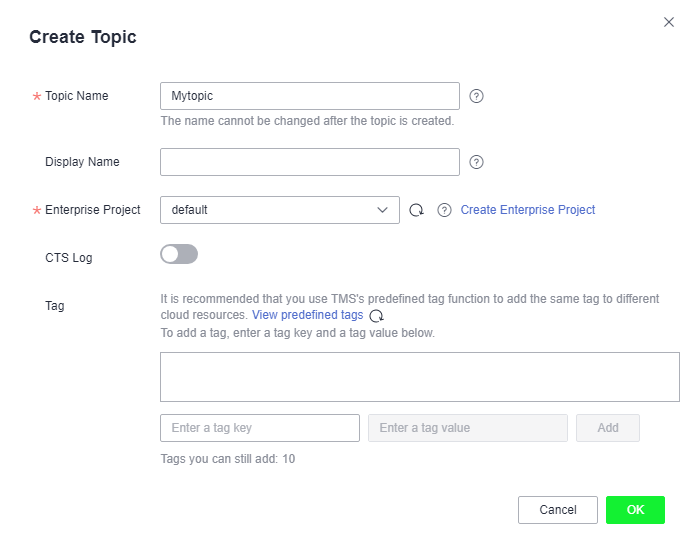
- Set Topic Name to Mytopic.
- Click OK.
After a topic is created, the system generates a topic URN, which uniquely identifies the topic and cannot be changed. The topic you created is displayed in the topic list.
- Click the name of the topic to view its details, including the topic URN, display name, logs, tags, and subscriptions.
Step 2. Add a Subscription
- In the navigation pane on the left, choose Topic Management > Subscriptions.
- On the Subscriptions page, click Add Subscription.
The Add Subscription dialog box is displayed.
- Add an email subscription to a topic.
- Click
 beside the Topic Name box to select Mytopic.
 - Select Email from the Protocol drop-down list.
- In the Endpoint box, enter the subscription endpoint.
Enter one endpoint on a separate line.
- Click OK.
After a subscription is added, the subscription endpoint receives a confirmation message. Confirm the subscription so that the endpoint can receive messages published to the topic.
- Click
Step 3. Create a Message Template
- In the navigation pane on the left, choose Topic Management > Message Templates.
- In the upper right corner, click Create Message Template.
The Create Message Template dialog box is displayed.
- In the Create Message Template box, set the following parameters:
- Template Name: tem_001
- Protocol: Default
- Content: The Arts and Crafts Exposition will be held from {startdate} through {enddate}. We sincerely invite you to join us.
When you publish the messages, you need to replace {startdate} with the exposition start time and {enddate} with the end time.
- Click OK.
The template you created is displayed in the template list.
Step 4. Publish a Message
- In the navigation pane on the left, choose Topic Management > Topics.
The Topics page is displayed.
- Locate Mytopic and click Publish Message in the Operation column.
- On the Publish Message page, configure the following parameters:
- Topic Name: The topic name is displayed by default.
- Message Format: Template
- Message:
- Click Generate Template Message.
- Select tem_01 from the Template Name drop-down list.
- On the Variables tab, specify startdate and enddate.
For example, set startdate to 02/01/2019 and enddate to 02/10/2019.
- Click Preview to preview the message.
In this example, the message generated is "The Arts and Crafts Exposition will be held from 02/01/2019 through 02/10/2019. We sincerely invite you to join us."
- Click OK.
The generated message contains the template name and variables.
- Click OK to deliver your message to all subscription endpoints.
Step 5. Receive the Message
Subscription endpoints of different protocols receive different messages.
- Email
Email messages contain the message subject, content, and a link to unsubscribe.
- Scenarios
- Operation Process
- Step 1. Create a Topic
- Step 2. Add a Subscription
- Step 3. Create a Message Template
- Step 4. Publish a Message
- Step 5. Receive the Message