Creating a NAT Gateway
Scenarios
This section guides you on how to create a NAT gateway to enable your servers to access the Internet or to provide services available from the Internet.
Prerequisites
- When creating a public NAT gateway, you must specify its VPC and subnet.
- To allow traffic to pass through the public NAT gateway, a route to the public NAT gateway in the VPC is required. When you create a public NAT gateway, a default route 0.0.0.0/0 to the public NAT gateway is automatically added to the default route table of the VPC. If the default route 0.0.0.0/0 already exists in the default route table of the VPC before you create the public NAT gateway, the default route that points to the public NAT gateway will fail to be added automatically. In this case, perform the following operations after the public NAT gateway is successfully created: Manually add a different route that points to the gateway or create a default route 0.0.0.0/0 pointing to the gateway in the new routing table.
Procedure
- Log in to the management console.
- Under Network, select NAT Gateway.
- On the displayed page, click Create Public NAT Gateway.
Figure 1 Create Public NAT Gateway
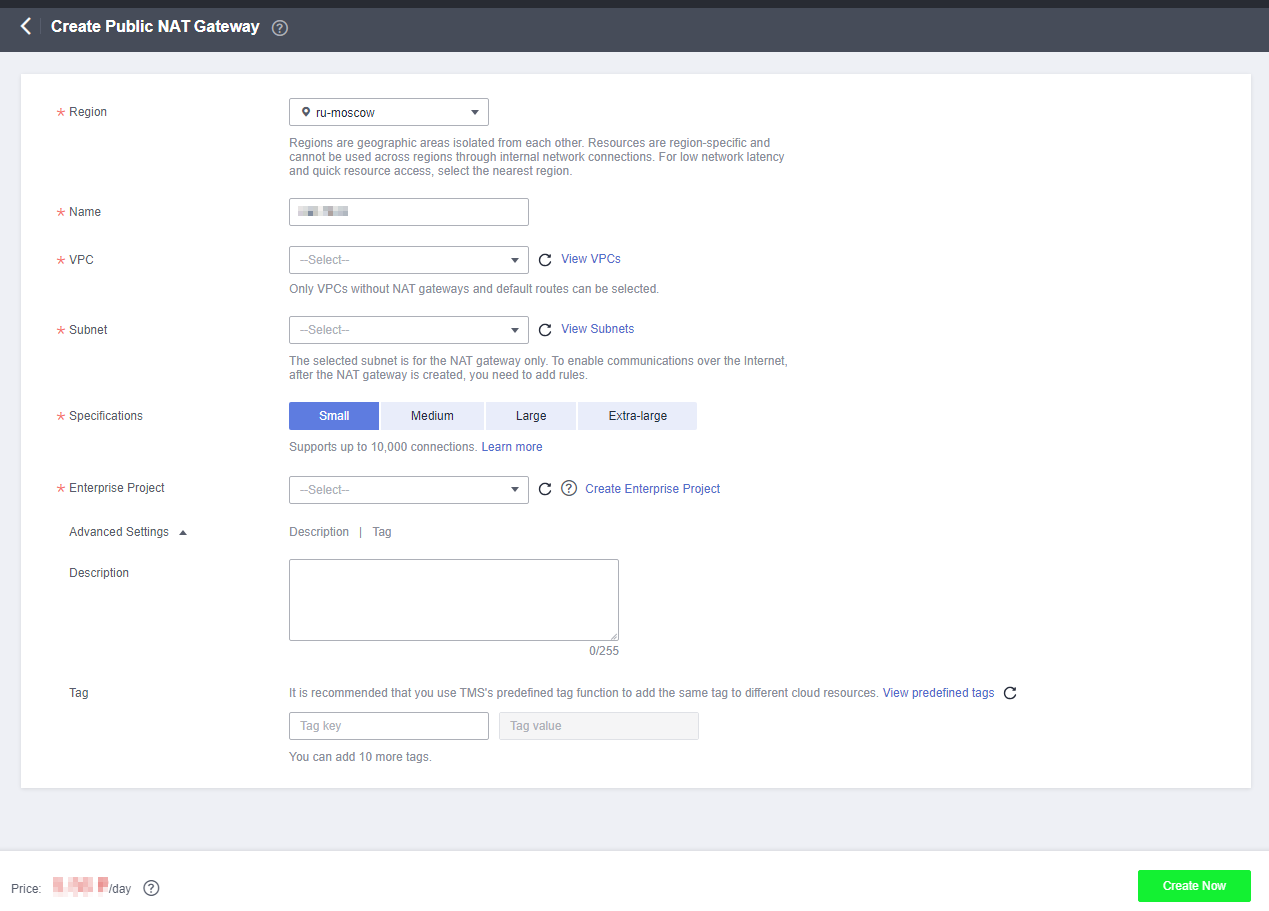
- Configure the parameters. For details, see Table 1.
Table 1 Parameter descriptions of a public NAT gateway Parameter
Description
Region
The region where the NAT gateway is located.
Name
The name of the NAT gateway. Enter up to 64 characters including only digits, letters, underscores (_), and hyphens (-).
VPC
The VPC that the NAT gateway belongs to. Select a VPC which is not used by any other NAT gateways and has no default route.
You can change the VPC only when you are creating the NAT gateway. After the NAT gateway is created, you cannot modify the VPC.
NOTE:To allow traffic to pass through the public NAT gateway, a route to the public NAT gateway in the VPC is required. When you create a public NAT gateway, a default route 0.0.0.0/0 to the public NAT gateway is automatically added to the default route table of the VPC. If the default route 0.0.0.0/0 already exists in the default route table of the VPC before you create the public NAT gateway, the default route that points to the public NAT gateway will fail to be added automatically. In this case, perform the following operations after the public NAT gateway is successfully created: Manually add a different route that points to the gateway or create a default route 0.0.0.0/0 pointing to the gateway in the new routing table.
Subnet
The subnet of the VPC that the NAT gateway belongs to.
The subnet must have at least one available IP address.
You can change the subnet only when you are creating the NAT gateway. After the NAT gateway is created, you cannot change the subnet.
Specifications
The specifications of the NAT gateway.
The option can be Small, Medium, Large, or Extra-large. You can click Learn more on the page to view details of each specification.
Enterprise Project
The enterprise project that the NAT gateway belongs to. If an enterprise project is configured for a NAT gateway, the NAT gateway belongs to this enterprise project. If you do not specify an enterprise project, enterprise project default will be used.
Advanced Settings
Click the drop-down arrow to configure advanced parameters of the public NAT gateway, such as Tag.
Tag
The NAT gateway tag, which consists of a key and value pair. You can add a maximum of 10 tags to each NAT gateway.
The tag key and value must meet the requirements listed in Table 2.
Description
Supplementary information about the NAT gateway. Enter up to 255 characters. Angle brackets (<>) are not allowed.
Table 2 Tag requirements Parameter
Requirement
Key
- Cannot be left blank.
- Must be unique for each NAT gateway.
- Contains a maximum of 36 characters.
- Cannot contain equal signs (=), asterisks (*), left angle brackets (<), right angle brackets (>), backslashes (\), commas (,), vertical bars (|), and slashes (/), and the first and last characters cannot be spaces.
Value
- Can contain a maximum of 43 characters.
- Cannot contain equal signs (=), asterisks (*), left angle brackets (<), right angle brackets (>), backslashes (\), commas (,), vertical bars (|), and slashes (/), and the first and last characters cannot be spaces.
- Click Create Now. Confirm the NAT gateway information on the displayed page.
- If you do not need to modify the information, click Submit.
It takes 1 to 5 minutes to create a NAT gateway.
- In the NAT gateway list, view the NAT gateway status.
Adding a Default Route Pointing to the NAT Gateway
- Log in to the management console.
- Under Network, select Virtual Private Cloud.
- In the navigation pane on the left, choose Route Tables.
- On the Route Tables page, click Create Route Table in the upper right corner.
VPC: Select the VPC to which the NAT gateway belongs.
- After the custom route table is created, click its name.
The Summary page is displayed.
- Click Add Route and configure parameters as follows:
Destination: Set it to 0.0.0.0/0.
Next Hop Type: Select NAT gateway.
Next Hop: Select the created NAT gateway.
- Click OK.
- Scenarios
- Prerequisites
- Procedure
- Adding a Default Route Pointing to the NAT Gateway