After creating a Kafka instance, you can increase its specifications. Table 1 lists available modification options. Only one object can be modified per operation: broker quantity, bandwidth, storage space, or broker flavor.
Old/New Flavor | Modified Object | Increase | Decrease |
|---|---|---|---|
New flavor | Broker quantity | √ | × |
Storage space | √ | × | |
Broker flavor | √ | × | |
Old flavor | Bandwidth | √ | × |
Storage space | √ | × | |
Broker flavor | × | × |
Distinguishing Between Old and New Specifications
- Old specifications: In the instance list, the instance specification is displayed as bandwidth (for example, 100 MB/s).
- New specifications: In the instance list, the instance specification is displayed as the ECS flavor multiplied by the number of brokers (for example, kafka.2u4g.cluster*3 brokers).
Figure 1 Instance list

Impact of Specification Modification
Modified Object | Impact |
|---|---|
Bandwidth or broker quantity |
|
Storage space | Storage space expansion does not affect services. |
Broker flavor |
|
Process of Increasing Broker Flavors
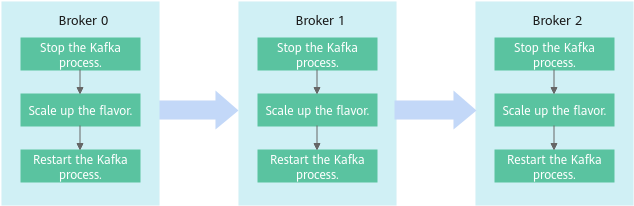
When you scale up the broker flavor, a rolling restart is performed on brokers. The following process takes three brokers as an example:
- The Kafka process on Broker 0 is stopped.
- The flavor of Broker 0 is scaled up.
- The Kafka process on Broker 0 is restarted.
- 1 to 3 are repeated to scale up the flavor of Broker 1.
- 1 to 3 are repeated to scale up the flavor of Broker 2.
Figure 2 Process of increasing a broker flavor
Modifying the Broker Quantity or Bandwidth
- Log in to the console.
- Click
 in the upper left corner to select the region where your instance is located.
 - Click
 in the upper left corner and choose Application > Distributed Message Service for Kafka to open the Kafka instance list.
 - In the row containing the desired instance, click Modify Specifications in the Operation column.
- Specify the number of brokers or bandwidth as required.
- Increase the bandwidth (for instances using old specifications)
- Specify a new bandwidth and click Next.
- Confirm the configurations and click Submit.
- Return to the instance list and check whether the change succeeded.
- If the instance status has changed from Changing to Running, the change succeeded. You can check the new bandwidth in the Flavor column.
- If the instance status has changed from Changing to Change failed, the change failed. Move the cursor over Change failed to check the failure cause.
Instances in the Change failed state cannot be restarted, modified, or deleted. After the instance status automatically changes from Change failed to Running, you can continue to perform operations on the instance. If the status does not change to Running, contact customer service.
- After increasing the bandwidth, add the IP address of the new broker to the client connection configuration to improve reliability.
- Increase the broker quantity (for instances using new specifications).
- For Change By, select Brokers.
- For Brokers, specify the broker quantity. The broker quantity range varies by instance specifications. For details, see Table 1.
- If public access has been enabled, configure EIPs for the new brokers.
- For Subnet, retain the default settings.
- For Private IP Addresses, select Auto or Manual.
- Auto: The system assigns an IP address from the subnet automatically.
- Manual: Select the IP addresses for the new brokers from the drop-down list. If the number of selected IP addresses is less than the number of brokers, the remaining IP addresses will be automatically assigned.
- Click Next.
- Confirm the configurations and click Submit.
- Check the modification progress and estimated remaining time.
- In the instance list, click the instance to go to the instance details page.
- In the navigation pane, choose Instance > Background Tasks. The Current Tasks tab page is displayed.
- Click the Modify Specifications task. The Specification Modification Task Details dialog box is displayed.
- Check the progress and estimated remaining time. In Steps, check the steps, start time, and end time.
- Check whether the modification is successful.
- If the task is in the Successful state, the modification is successful. View the number of brokers in the Flavor column in the instance list.
- If the task is in the Failed state, the modification is not successful. Move the cursor over Failed or check the cause in Steps.
After the modification fails, the instance is in the Change failed state, and cannot be restarted, modified, or deleted. After the instance status automatically changes from Change failed to Running, you can continue to perform operations. If the status does not change to Running, contact customer service.
- After adding brokers, add the IP addresses of the new brokers to the client connection configuration to improve reliability.
- Increase the bandwidth (for instances using old specifications)
Expanding the Storage Space
- Log in to the console.
- Click in the upper left corner to select the region where your instance is located.
- Click in the upper left corner and choose Application > Distributed Message Service for Kafka to open the Kafka instance list.
- In the row containing the desired instance, click Modify Specifications in the Operation column.
- Specify the required storage space.
- Expand the storage space (for instances using old specifications)
- Specify a new storage space (a multiple of 100 only) and click Next.
- Confirm the configurations and click Submit.
- Return to the instance list and check whether the change succeeded.
- If the instance status has changed from Changing to Running, the change succeeded. View the new storage space in the Used/Available Storage Space (GB) column in the instance list.
- If the instance status has changed from Changing to Change failed, the change failed. Move the cursor over Change failed to check the failure cause.
Instances in the Change failed state cannot be restarted, modified, or deleted. After the instance status automatically changes from Change failed to Running, you can continue to perform operations on the instance. If the status does not change to Running, contact customer service.
- Expand the storage space (for instances using new specifications)
- For Change By, select Storage.
- For Storage Space per Broker, specify a new storage space, and click Next.
Note: The disk capacity can only be set to an integer multiple of 100. The storage space range varies by instance specifications. For details, see Table 1.
- Confirm the configurations and click Submit.
- Check the modification progress and estimated remaining time.
- In the instance list, click the instance to go to the instance details page.
- In the navigation pane, choose Instance > Background Tasks. The Current Tasks tab page is displayed.
- Click the Modify Specifications task. The Specification Modification Task Details dialog box is displayed.
- Check the progress and estimated remaining time. In Steps, check the steps, start time, and end time.
- Check whether the modification is successful.
- If the task is in the Successful state, the modification is successful. View the new storage space (Storage space per broker × Number of brokers) in the Used/Available Storage Space (GB) column in the instance list.
- If the task is in the Failed state, the modification is not successful. Move the cursor over Failed or check the cause in Steps.
After the modification fails, the instance is in the Change failed state, and cannot be restarted, modified, or deleted. After the instance status automatically changes from Change failed to Running, you can continue to perform operations. If the status does not change to Running, contact customer service.
- Expand the storage space (for instances using old specifications)
Increasing the Broker Flavor
- Log in to the console.
- Click in the upper left corner to select the region where your instance is located.
- Click in the upper left corner and choose Application > Distributed Message Service for Kafka to open the Kafka instance list.
- In the row containing the desired instance, click Modify Specifications in the Operation column.
- Specify the required broker flavor.
- For Change By, select Broker Flavor.
- Specify a new broker flavor.
- In the Risk Check area, check for risks.
If any risk is found, handle it as prompted and then click Recheck. If the risks do not need to be handled, select I understand the risks.
- Click Next, confirm the information, and click Submit.
- Check the scaling progress and estimated remaining time.
- In the instance list, click the instance to go to the instance details page.
- In the navigation pane, choose Instance > Background Tasks. The Current Tasks tab page is displayed.
- Click the Modify Specifications task. The Specification Modification Task Details dialog box is displayed.
- Check the progress and estimated remaining time. In Steps, check the steps, start time, and end time.
- Check whether the modification is successful.
- If the task is in the Successful state, the modification is successful. View the broker flavor in the Flavor column in the instance list.
- If the task is in the Failed state, the modification is not successful. Move the cursor over Failed to view failure causes.
After the modification fails, the instance is in the Change failed state, and cannot be restarted, modified, or deleted. After the instance status automatically changes from Change failed to Running, you can continue to perform operations. If the status does not change to Running, contact customer service.