Buying a Kafka Instance
Kafka instances are tenant-exclusive, and physically isolated in deployment. You can customize the computing capabilities and storage space of a Kafka instance as required.
Preparing Instance Dependencies
Before creating a Kafka instance, prepare the resources listed in Table 1.
Resource | Requirement | Operations |
|---|---|---|
VPC and subnet | You need to configure a VPC and subnet for the Kafka instance as required. You can use the current account's existing VPC and subnet, or create new ones. Note: VPCs must be created in the same region as the Kafka instance. | For details about how to create a VPC and subnet, see the Virtual Private Cloud User Guide. |
Security group | Different Kafka instances can use the same or different security groups. Before accessing a Kafka instance, configure security groups based on the access mode. For details, see Table 2. | For details about how to create a security group and configure security group rules, see the Virtual Private Cloud User Guide. |
EIP | To access a Kafka instance on a client over a public network, create EIPs in advance. Note the following when creating EIPs:
| For details about how to create an EIP, see "Assigning an EIP" in Elastic IP User Guide. |
Procedure
- Log in to the console.
- Click
 in the upper left corner to select a region.
Select a region near you to ensure the lowest latency possible.
- Click
 in the upper left corner and choose Application > Distributed Message Service for Kafka to open the console of DMS for Kafka.
 - Click Buy Instance in the upper right corner of the page.
- Specify Billing Mode.
- Select a region.
DMS for Kafka instances in different regions cannot communicate with each other over an intranet. Select a nearest location for low latency and fast access.
- Select a Project.
Projects isolate compute, storage, and network resources across geographical regions. For each region, a preset project is available.
- Select an AZ.
An AZ is a physical region where resources use independent power supply and networks. AZs are physically isolated but interconnected through an internal network.
Select one, three, or more AZs as required. The AZs cannot be changed once the instance is created.
- Enter an Instance Name.
You can customize a name that complies with the rules: 4–64 characters; starts with a letter; can contain only letters, digits, hyphens (-), and underscores (_).
- Select an Enterprise Project.
This parameter is for enterprise users. An enterprise project manages cloud resources. The enterprise project management service unifies cloud resources in projects, and resources and members in a project. The default project is default.
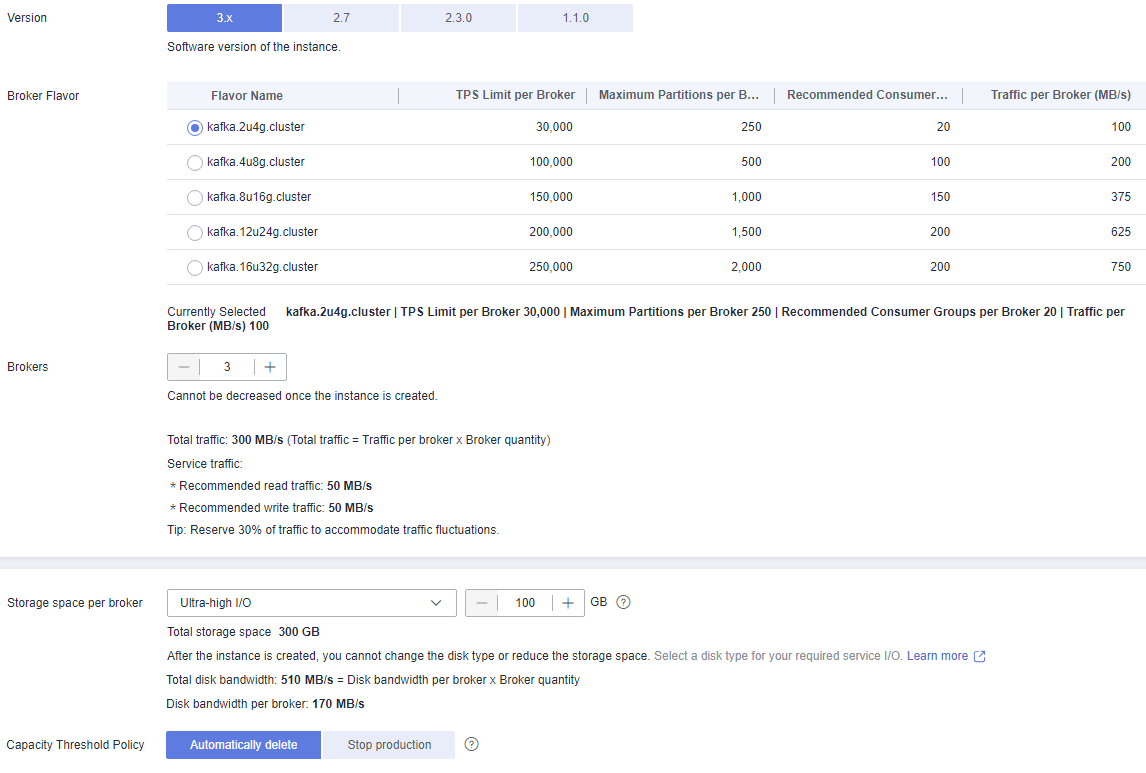
- Configure the following instance parameters:
- Version: Kafka version, which can be 1.1.0, 2.3.0, 2.7, or 3.x. The version cannot be changed once the instance is created.
- Broker Flavor: Select a broker flavor that best fit your needs. For Brokers, specify the broker quantity.
Maximum number of partitions per broker x Number of brokers = Maximum number of partitions of an instance. If the total number of partitions of all topics exceeds the upper limit of partitions, topic creation fails.
- Storage Space per Broker: Disk type and size for storing the instance data. The disk type cannot be changed once the Kafka instance is created.
The storage space is consumed by message replicas, logs, and metadata. Specify the storage space based on the expected service message size, the number of replicas, and the reserved disk space. Each Kafka broker reserves 33 GB disk space for storing logs and metadata.
Disks are formatted when an instance is created. As a result, the actual available disk space is 93% to 95% of the total disk space.
- Capacity Threshold Policy: Policy used when the disk usage reaches the threshold. The capacity threshold is 95%.
- Automatically delete: Messages can be created and retrieved, but 10% of the earliest messages will be deleted to ensure sufficient disk space. This policy is suitable for scenarios where no service interruption can be tolerated. Data may be lost.
- Stop production: New messages cannot be created, but existing messages can still be retrieved. This policy is suitable for scenarios where no data loss can be tolerated.
Figure 1 Creating a Kafka instance
- Configure the instance network parameters.
- Select a VPC and a subnet.
A VPC provides an isolated virtual network for your Kafka instances. You can configure and manage the network as required.
NoteAfter the Kafka instance is created, its VPC and subnet cannot be changed.
- Select a security group.
A security group is a set of rules for accessing a Kafka instance. You can click Manage Security Group to view or create security groups on the network console.
Before accessing a Kafka instance on the client, configure security group rules based on the access mode. For details about security group rules, see Table 2.
- Select a VPC and a subnet.
- Configure the instance access mode.
Table 2 Instance access modes Public or Private Network
Plaintext or Ciphertext
Description
Private Network Access
Plaintext Access
Clients connect to the Kafka instance without SASL authentication.
Once enabled, private network access cannot be disabled. Enable plaintext or ciphertext access, or both.
Ciphertext Access
Clients connect to the Kafka instance with SASL authentication.
Once enabled, private network access cannot be disabled. Enable plaintext or ciphertext access, or both. To disable ciphertext access, contact customer service.
If you enable Ciphertext Access, specify a SASL/PLAIN, username, and password.
Cross-VPC Access Protocol
- When Plaintext Access is enabled and Ciphertext Access is disabled, PLAINTEXT is used for Cross-VPC Access Protocol.
- When Ciphertext Access is enabled, SASL_SSL is used for Cross-VPC Access Protocol.
Fixed once the instance is created.
Private IP Addresses
Select Auto or Manual.
- Auto: The system automatically assigns an IP address from the subnet.
- Manual: Select IP addresses from the drop-down list. If the number of selected IP addresses is less than the number of brokers, the remaining IP addresses will be automatically assigned.
Public Network Access
Plaintext Access
Clients connect to the Kafka instance without SASL authentication.
Enable or disable plaintext access, and configure addresses for public network access.
Ciphertext Access
Clients connect to the Kafka instance with SASL authentication.
Enable or disable ciphertext access, and configure addresses for public network access.
If you enable Ciphertext Access, specify a SASL/PLAIN, username, and password.
Public IP Addresses
Select the number of public IP addresses as required.
If EIPs are insufficient, click Create Elastic IP to create EIPs. Then, return to the Kafka console and click
 next to Public IP Address to refresh the public IP address list.
Kafka instances only support IPv4 EIPs.
The SASL/PLAIN mechanism, username, and password are described as follows.
Table 3 Ciphertext access parameters Parameter
Value
Description
SASL/PLAIN
-
- If SASL/PLAIN is disabled, the SCRAM-SHA-512 mechanism is used for username and password authentication.
- If SASL/PLAIN is enabled, both the SCRAM-SHA-512 and PLAIN mechanisms are supported. You can select either of them as required.
The SASL/PLAIN setting cannot be changed once ciphertext access is enabled.
Username and Password
-
Username and password used by the client to connect to the Kafka instance.
A username should contain 4 to 64 characters, start with a letter, and contain only letters, digits, hyphens (-), and underscores (_).
A password must meet the following requirements:
- Contains 8 to 32 characters.
- Cannot start with a hyphen (-) and must contain at least three of the following character types: uppercase letters, lowercase letters, digits, spaces, and special characters `~! @#$ %^&*()-_=+\|[{}];:'",<.>?
- Cannot be the username spelled forwards or backwards.
The username cannot be changed once ciphertext access is enabled.
- Configure the username and password for logging in to Kafka Manager. The Kafka Manager username cannot be changed once the instance is created.
Kafka Manager is an open-source tool for managing Kafka clusters. After a Kafka instance is created, you can go to the instance details page to obtain the address for logging in to Kafka Manager. In Kafka Manager, you can view the monitoring statistics and broker information of your Kafka clusters.
- Click Advanced Settings to configure more parameters.
- Configure Automatic Topic Creation.
This setting is disabled by default. You can enable or disable it as required.
If this option is enabled, a topic will be automatically created when a message is produced in or consumed from a topic that does not exist. The default topic parameters are listed in Table 4.
For cluster instances, after you change the value of the log.retention.hours (retention period), default.replication.factor (replica quantity), or num.partitions (partition quantity) parameter, the value will be used in later topics that are automatically created. For example, assume that num.partitions is changed to 5, an automatically created topic has parameters listed in Table 4.
Table 4 Topic parameters Parameter
Default Value
Modified Value
Partitions
3
5
Replicas
3
3
Aging Time (h)
72
72
Synchronous Replication
Disabled
Disabled
Synchronous Flushing
Disabled
Disabled
Message Timestamp
CreateTime
CreateTime
Max. Message Size (bytes)
10,485,760
10,485,760
- Specify Tags.
Tags are used to identify cloud resources. When you have multiple cloud resources of the same type, you can use tags to classify them based on usage, owner, or environment.
- If you have predefined tags, select a predefined pair of tag key and value. You can click View predefined tags to go to the Tag Management Service (TMS) console and view or create tags.
- You can also create new tags by specifying Tag key and Tag value.
Up to 20 tags can be added to each Kafka instance. For details about the requirements on tags, see Configuring Kafka Instance Tags.
- Enter a Description of the instance for 0–1024 characters.
- Configure Automatic Topic Creation.
- Click Buy.
- Confirm the instance information, and click Submit.
- Return to the instance list and check whether the Kafka instance has been created.
It takes 3 to 15 minutes to create an instance. During this period, the instance status is Creating.
- If the instance is created successfully, its status changes to Running.
- If the instance is in the Failed state, delete it by referring to Deleting Kafka Instances and try creating another one. If the instance creation fails again, contact customer service.Note
Instances that fail to be created do not occupy other resources.
- Preparing Instance Dependencies
- Procedure