Scenarios
You can create an image of an entire ECS, including not just the OS, but also the software and all the service data. You can then use this image to migrate data by quickly provisioning exact clones of the original ECS.
This section does not apply to a BMS.
Background
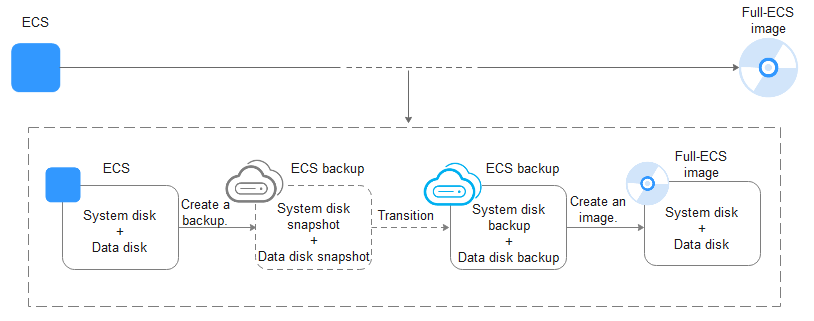
The following figure shows the process of creating an image from an entire ECS, with both the system and data disks included.
Figure 1 Creating a full-ECS image from an ECS
- The time required for creating a full-ECS image depends on the disk size, network quality, and the number of concurrent tasks.
- The ECS used to create a full-ECS image must be in Running or Stopped state. To create a full-ECS image containing a database, use a stopped ECS.
- If an ECS is in Stopped state, do not start it when you are using it to create a full-ECS image.
- When a full-ECS image is being created from an ECS, do not perform any operations on the ECS, or the image creation may fail.
- In Figure 1, if there are snapshots of the system disk and data disks but the ECS backup creation is not complete, the full-ECS image you create will only be available in the AZ where the source ECS is and can only be used to provision ECSs in this AZ. You cannot provision ECSs in other AZs in the region until the original ECS is fully backed up and the full-ECS image is in the Normal state.
- If you use a full-ECS image to change an ECS OS, only the system disk data can be written into the ECS. Therefore, if you want to restore or migrate the data disk data of an ECS by using a full-ECS image, you can only use the image to create a new ECS rather than use it to change the ECS OS.
Constraints
- When creating a full-ECS image from an ECS, ensure that the ECS has been properly configured, or the image creation may fail.
- A Windows ECS used to create a full-ECS image cannot have a spanned volume, or data may be lost when ECSs are created from that image.
- A Linux ECS used to create a full-ECS image cannot have a physical disk group or a logical disk that contains multiple physical disks, or data may be lost when ECSs are created from that image.
- A full-ECS image cannot be replicated within a region or be exported.
- When creating a full-ECS image from a Windows ECS, you need to change the SAN policy of the ECS to OnlineAll. Otherwise, EVS disks attached to the ECSs created from the image may be offline. For details, see Setting the ECS SAN Policy to OnlineAll.
Procedure
- Log in to the management console.
- Under Computing, click Image Management Service. The IMS console is displayed.
- Create a full-ECS image.
- Click Create Image in the upper right corner.
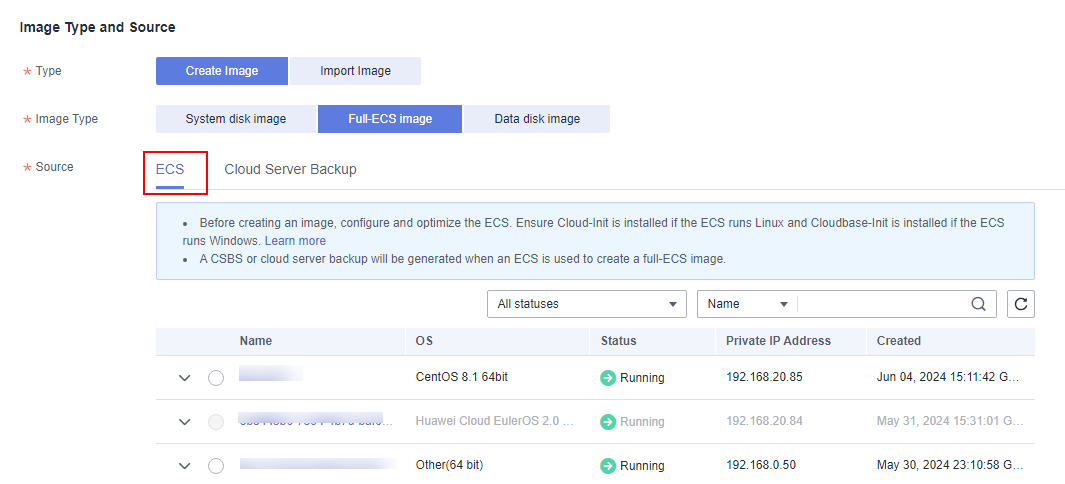
- In the Image Type and Source area, select Create Image for Type and then select Full-ECS image for Image Type.
- Select ECS for Source and then select an ECS from the list.
Figure 2 Creating a full-ECS image using an ECS
- Specify Server Backup Vault to store backups.
The created full-ECS image and backup are stored in the server backup vault.
If no server backup vault is available, click Create Server Backup Vault to create one. Ensure that you select Backup for Protection Type. For more information about CBR backups and vaults, see Cloud Backup and Recovery User Guide.
- In the Image Information area, configure basic image details, such as the image name and description.
- Click Apply Now.
- Confirm the settings and click Submit Application.
- Go back to the private image list and check the new full-ECS image status.
- When the image status changes to Normal, the image creation is complete.
- If Available in AZX is displayed under Normal in the Status column for a full-ECS image, the backup for the source ECS has not been created and only a disk snapshot is created. (AZX indicates the AZ where the source ECS of the image resides.)
In this case, the full-ECS image can only be used to provision ECSs in this AZ. If you want to use this image to provision ECSs in other AZs of the region, you need to wait until Available in AZX disappears from under Normal, which indicates that the ECS backup has been successfully created. This process takes about 10 minutes, depending on the data volume of the source ECS.
Figure 3 Full-ECS image status

Follow-up Procedure
- If you want to use the full-ECS image to create ECSs, click Apply for ECS in the Operation column. On the displayed page, create ECSs by following the instructions in Elastic Cloud Server User Guide.Note
When you use a full-ECS image to create an ECS:
- The system and data disk information defaulted by the image will be automatically displayed.
- If the full-ECS image contains multiple data disks, it takes some time to load and display the disk information.
- If you use a full-ECS image to change an ECS OS, only the system disk data can be written into the ECS. Therefore, if you want to restore or migrate the data disk data of an ECS by using a full-ECS image, you can only use the image to create a new ECS rather than use it to change the ECS OS.
- If you want to share the full-ECS image with other tenants, you can use either of the following methods:
- If the ECS from which the full-ECS image was created has a CSBS backup, you must first migrate the backup to CBR before you share the image because CSBS is being deprecated.
- If the ECS has no such a backup, you can share the full-ECS image directly.
Setting the ECS SAN Policy to OnlineAll
Windows has three types of SAN policies: OnlineAll, OfflineShared, and OfflineInternal.
Type | Description |
|---|---|
OnlineAll | All newly detected disks are automatically brought online. |
OfflineShared | All disks on sharable buses, such as iSCSI and FC, are left offline by default, while disks on non-sharable buses are kept online. |
OfflineInternal | All newly detected disks are left offline. |
To set the ECS SAN policy to OnlineAll, perform the following steps: