Scenarios
To ensure that you can use the user data injection function to inject initial custom information into ECSs created from a private image (such as setting the ECS login password), install Cloud-Init on the ECS used to create the image.
- By default, ECSs created from a public image have Cloud-Init installed. You do not need to install or configure Cloud-Init on such ECSs.
- For ECSs created using an external image file, install and configure Cloud-Init by performing the operations in this section.
- You need to download Cloud-Init from its official website. Therefore, you must bind an EIP to the ECS.
- If Cloud-Init is not installed, you cannot configure an ECS. As a result, you can only use the password in the image file to log in to the created ECSs.
Cloud-Init is open-source software. If the installed version has security vulnerabilities, you are advised to upgrade it to the latest version.
Prerequisites
- An EIP has been bound to the ECS.
- You have logged in to the ECS.
- The ECS uses DHCP to obtain IP addresses.
Procedure
- Check whether Cloud-Init has been installed.
For details, see Check Whether Cloud-Init Has Been Installed.
- Install Cloud-Init.
You can install Cloud-Init using either of the following methods: (Recommended) Install Cloud-Init Using the Official Installation Package and Install Cloud-Init Using the Official Source Code Package and pip.
Check Whether Cloud-Init Has Been Installed
Perform the operations provided here to check whether Cloud-Init has been installed. The methods of checking whether Cloud-Init is installed vary depending on the OSs.
- If you are in a Python 3 environment, run the following command to check whether Cloud-Init is installed (Ubuntu 22.0.4 is used as an example):
which cloud-init
- If information similar to the following is displayed, Cloud-Init has been installed:/usr/bin/cloud-init
- If information similar to the following is displayed, Cloud-Init is not installed:/usr/bin/which: no cloud-init in (/usr/local/bin:/usr/local/sbin:/usr/local/bin:/sbin:/bin:/usr/sbin:/usr/bin)
- If information similar to the following is displayed, Cloud-Init has been installed:
- If you are in a Python 2 environment, run the following command to check whether Cloud-Init is installed (CentOS 6 is used as an example):
which cloud-init
- If information similar to the following is displayed, Cloud-Init has been installed:cloud-init-0.7.5-10.el6.centos.2.x86_64
- If no information is returned, Cloud-Init is not installed.Note
To confirm Cloud-Init is really not installed, you are advised to run rpm -qa |grep cloud-init to check again. If either of which cloud-init and rpm -qa |grep cloud-init shows that Cloud-Init has been installed, Cloud-Init is installed.
- If information similar to the following is displayed, Cloud-Init has been installed:
If Cloud-Init has been installed, perform the following operations:
- Determine whether to continue to use the SSH certificate in the OS of this ECS. If no, delete it.
- If the certificate is stored in a directory of user root, for example, /$path/$to/$root/.ssh/authorized_keys, run the following commands:
cd /root/.ssh
rm authorized_keys
- If the certificate is not stored in a directory of user root, for example, /$path/$to/$none-root/.ssh/authorized_keys, run the following commands:
cd /home/centos/.ssh
rm authorized_keys
- If the certificate is stored in a directory of user root, for example, /$path/$to/$root/.ssh/authorized_keys, run the following commands:
- Delete the cache data generated by Cloud-Init to ensure that ECSs created from the private image can be logged in by using an SSH certificate:
sudo rm -rf /var/lib/cloud/*
After the operations are complete, do not restart the ECS. Otherwise, you need to perform these operations again.
(Recommended) Install Cloud-Init Using the Official Installation Package
The method of installing Cloud-Init on an ECS varies depending on the OS. Perform the installation operations as user root.
The following describes how to install Cloud-Init on an ECS running SUSE Linux, CentOS, Fedora, Debian, and Ubuntu. For other OS types, install the required type of Cloud-Init. For example, you need to install coreos-cloudinit on ECSs running CoreOS.
- SUSE Linux
Paths for obtaining the Cloud-Init installation package for SUSE Linux
NoteSelect the required repo installation package in the provided paths.
Take SUSE Enterprise Linux Server 12 as an example. Perform the following steps to install Cloud-Init:
- Log in to the ECS used to create a Linux private image.
- Add a network installation source.
zypper ar https://ftp5.gwdg.de/pub/opensuse/repositories/Cloud:/Tools/SLE_12_SP3/Cloud:Tools.repo
- Update the network installation source.
zypper refresh
- Run the following command to install Cloud-Init:
zypper install cloud-init
- Run the following commands to enable Cloud-Init to automatically start upon system boot:
- SUSE 11
chkconfig cloud-init-local on; chkconfig cloud-init on; chkconfig cloud-config on; chkconfig cloud-final on
service cloud-init-local status; service cloud-init status; service cloud-config status; service cloud-final status
- SUSE 12 and openSUSE 12/13/42
systemctl enable cloud-init-local.service cloud-init.service cloud-config.service cloud-final.service
systemctl status cloud-init-local.service cloud-init.service cloud-config.service cloud-final.service
CautionFor SUSE and openSUSE, perform the following steps to prevent DHCP from changing the hostname:
- Run the following command to open the dhcp file using the vi editor:
vi etc/sysconfig/network/dhcp
- Change the value of DHCLIENT_SET_HOSTNAME in the dhcp file to no.
- SUSE 11
- CentOS
Table 1 lists the Cloud-Init installation paths for CentOS. Select an epel-release installation package matching your OS.
Table 1 Cloud-Init installation package addresses OS Type
Version
How to Obtain
CentOS
6 32-bit
6 64-bit
7 64-bit
- Run the following commands to install Cloud-Init:
yum install Cloud-Init installation package address/epel-release-x-y.noarch.rpm
yum install cloud-init
NoteCloud-Init installation package address indicates the address of the Cloud-Init epel-release installation package, and x-y indicates the version of the Cloud-Init epel-release required by the current OS. Replace them with the actual values according to Table 1.
- Take CentOS 6 64-bit as an example. If the version is 6.8, the command is as follows:
yum install https://archives.fedoraproject.org/pub/archive/epel/6/x86_64/epel-release-6-8.noarch.rpm
- Take CentOS 7 64-bit as an example. If the version is 7.14, the command is as follows:
yum install https://archives.fedoraproject.org/pub/archive/epel/7/x86_64/Packages/e/epel-release-7-14.noarch.rpm
- Take CentOS 6 64-bit as an example. If the version is 6.8, the command is as follows:
- Run the following commands to enable Cloud-Init to automatically start upon system boot:
systemctl enable cloud-init-local.service cloud-init.service cloud-config.service cloud-final.service
systemctl status cloud-init-local.service cloud-init.service cloud-config.service cloud-final.service
- Run the following commands to install Cloud-Init:
- Fedora
Before installing Cloud-Init, ensure that the network installation source has been configured for the OS by checking whether the /etc/yum.repo.d/fedora.repo file contains the installation source address of the software package. If the file does not contain the address, configure the address by following the instructions on the Fedora official website.
- Run the following command to install Cloud-Init:
yum install cloud-init
- Run the following commands to enable Cloud-Init to automatically start upon system boot:
systemctl enable cloud-init-local.service cloud-init.service cloud-config.service cloud-final.service
systemctl status cloud-init-local.service cloud-init.service cloud-config.service cloud-final.service
- Run the following command to install Cloud-Init:
- Debian and Ubuntu
Before installing Cloud-Init, ensure that the network installation source has been configured for the OS by checking whether the /etc/apt/sources.list file contains the installation source address of the software package. If the file does not contain the address, configure the address by following the instructions on the Debian or Ubuntu official website.
- Run the following commands to install Cloud-Init:
apt-get update
apt-get install cloud-init
- Run the following commands to enable Cloud-Init to automatically start upon system boot:
systemctl enable cloud-init-local.service cloud-init.service cloud-config.service cloud-final.service
systemctl status cloud-init-local.service cloud-init.service cloud-config.service cloud-final.service
- Run the following commands to install Cloud-Init:
Install Cloud-Init Using the Official Source Code Package and pip
The following operations use Cloud-Init 0.7.9 as an example to describe how to install Cloud-Init.
- Download the cloud-init-0.7.9.tar.gz source code package and upload it to the /home/ directory of the ECS.
Download cloud-init-0.7.9.tar.gz from the following path:
- Create a pip.conf file in the ~/.pip/ directory and edit the following content:Note
If the ~/.pip/ directory does not exist, run the mkdir ~/.pip command to create it.
[global]index-url = https://<$mirror>/simple/trusted-host = <$mirror>NoteReplace <$mirror> with a public network PyPI source.
Public network PyPI source: https://pypi.python.org/
- Run the following command to install the downloaded Cloud-Init source code package (select --upgrade as needed during installation):
pip install [--upgrade] /home/cloud-init-0.7.9.tar.gz
NoteFor details about how to install a Cloud-Init source code package, see Cloud-Init Documentation.
- Run the cloud-init -v command. Cloud-Init is installed successfully if the following information is displayed:cloud-init 0.7.9
- Enable Cloud-Init to automatically start upon system boot.
- If the OS uses SysVinit to manage automatic start of services, run the following commands:
chkconfig --add cloud-init-local; chkconfig --add cloud-init; chkconfig --add cloud-config; chkconfig --add cloud-final
chkconfig cloud-init-local on; chkconfig cloud-init on; chkconfig cloud-config on; chkconfig cloud-final on
service cloud-init-local status; service cloud-init status; service cloud-config status; service cloud-final status
- If the OS uses Systemd to manage automatic start of services, run the following commands:
systemctl enable cloud-init-local.service cloud-init.service cloud-config.service cloud-final.service
systemctl status cloud-init-local.service cloud-init.service cloud-config.service cloud-final.service
CautionIf you install Cloud-Init using the official source code package and pip, note that:
- Add user syslog to the adm group during the installation. If user syslog exists, add it to the adm group. For some OSs (such as CentOS and SUSE), user syslog may not exist. Run the following commands to create user syslog and add it to the adm group:
useradd syslog
groupadd adm
usermod -g adm syslog
- Change the value of distro in system_info in the /etc/cloud/cloud.cfg file based on the OS release version. For example, the value can be distro: ubuntu, distro: sles, distro: debian, or distro: fedora.
- Add user syslog to the adm group during the installation. If user syslog exists, add it to the adm group. For some OSs (such as CentOS and SUSE), user syslog may not exist. Run the following commands to create user syslog and add it to the adm group:
- If the OS uses SysVinit to manage automatic start of services, run the following commands:
Configure Cloud-Init
- Configure the user permissions for logging in to the ECS. If you use a common account (not user root) to log in to the ECS, disable the SSH permissions of user root and remote login using a password to improve the ECS security.
- You can remotely log in to the ECS using SSH and a key pair injected into your account. (It is recommended that you select the key pair login mode when creating an ECS.)
- You can also use a random password to log in to the ECS through noVNC.
Run the following command to open the sshd_config file using the vi editor:
vi /etc/ssh/sshd_config
- Change the value of PasswordAuthentication in the sshd_config file to no.Note
For SUSE and openSUSE, change the values of the following parameters in the sshd_config file to no:
- PasswordAuthentication
- ChallengeResponseAuthentication
- Run the following command to open the cloud.cfg file using the vi editor:
vi /etc/cloud/cloud.cfg
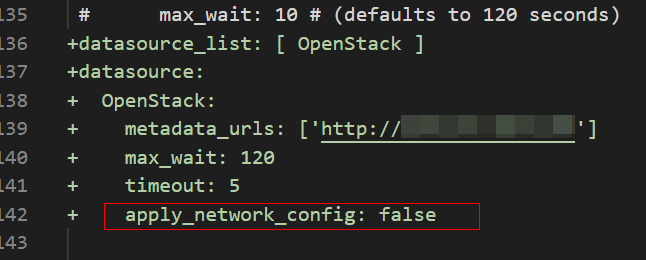
- (Optional) In /etc/cloud/cloud.cfg, set apply_network_config to false.
This step is only for Cloud-Init 18.3 or later.
Figure 1 Example configuration

- Disable the SSH permissions of user root in /etc/cloud/cloud.cfg, add a common user (which is used for logging in to the ECS using VNC), and configure a password for the added user and assign sudo permissions to it.Note
For Ubuntu and Debian, set the value of manage_etc_hosts in the /etc/cloud/cloud.cfg file to localhost. Otherwise, switching to user root may time out. For details about how to change the hostname of a cloud server, configure the SSH key, use Cloud-Init to add a user, and configure swap partitions, see Cloud-Init Configuration FAQ.
Take Ubuntu as an example.
- Run the following command to create script /etc/cloud/set_linux_random_password.sh, which is executable and can be used to generate random passwords:
cat /etc/cloud/set_linux_random_password.sh
The file content is as follows:
#!/bin/bashpassword=$(cat /dev/urandom | tr -dc 'A-Za-z0-9!@#$%&+=' | head -c 9)echo "linux:$password" | chpasswdsed -i -e '/^Login/d' /etc/issuesed -i -e '/^Initial/d' /etc/issuesed -i -c -e '/^$/d' /etc/issueecho -e "\nInitial login with linux:$password\n" >> /etc/issueNoteYou can run the chmod +x /etc/cloud/set_linux_random_password.sh command to add execute permissions of set_linux_random_password.sh.
- After you log in to the ECS, run the following commands to add a user-friendly prompt "Please change password for user linux after first login."
echo -e '\e[1;31m#################################\\e[0m' > /etc/motd
echo -e '\e[1;31m# Important !!! #\e[0m' >> /etc/motd
echo -e '\e[1;31m# Please change password for user linux after first login. #\e[0m' >> /etc/motd
echo -e '\e[1;31m#################################\e[0m' >> /etc/motd
echo -e '' >> /etc/motd
- Run the following command to create script /etc/cloud/set_linux_random_password.sh, which is executable and can be used to generate random passwords:
- Add a common login user, set its password, assign sudo permissions to it, and use bootcmd to create a script used for generating a random password for each created ECS.Caution
Ensure that the configuration file format (such as alignment and spaces) is consistent with the provided example.
system_info:# This will affect which distro class gets useddistro: rhel# Default user name + that default users groups (if added/used)default_user:name: linux #Username for loginlock_passwd: False #Login using a password is enabled. Note that some OSs use value 0 to enable the password login.gecos: Cloud Usergroups: users #Optional. Add users to other groups that have been configured in /etc/group.passwd: $6$I63DBVKK$Zh4lchiJR7NuZvtJHsYBQJIg5RoQCRLS1X2Hsgj2s5JwXI7KUO1we8WYcwbzeaS2VNpRmNo28vmxxCyU6LwoD0sudo: ["ALL=(ALL) NOPASSWD:ALL"] # Assign the root rights to the user.shell: /bin/bash # Execute shell in bash mode.# Other config here will be given to the distro class and/or path classespaths:cloud_dir: /var/lib/cloud/templates_dir: /etc/cloud/templates/ssh_svcname: sshdbootcmd:- [cloud-init-per, instance, password, bash,/etc/cloud/set_linux_random_password.sh]NoteThe value of passwd is encrypted using SHA512 (which is used as an example). For more details, see https://cloudinit.readthedocs.io/en/latest/topics/examples.html.
For details about how to encrypt a password and generate ciphertext, see the following (encrypting password cloud.1234 is used as an example):
[root@** ~]# python -c "import crypt, getpass, pwd; print crypt.mksalt()"$6$I63DBVKK[root@** ~]# python -c "import crypt, getpass, pwd; print crypt.crypt('cloud.1234', '\$6\$I63DBVKK')"$6$I63DBVKK$Zh4lchiJR7NuZvtJHsYBQJIg5RoQCRLS1X2Hsgj2s5JwXI7KUO1we8WYcwbzeaS2VNpRmNo28vmxxCyU6LwoD0 - Enable the agent to access the IaaS OpenStack data source.
Add the following information to the last line of /etc/cloud/cloud.cfg:
datasource_list: [ OpenStack ]datasource:OpenStack:metadata_urls: ['http://169.254.169.254']max_wait: 120timeout: 5Note- You can decide whether to set max_wait and timeout. The values of max_wait and timeout in the preceding example are only for reference.
- If the OS version is earlier than Debian 8 or CentOS 5, you cannot enable the agent to access the IaaS OpenStack data source.
- The default zeroconf route must be disabled for CentOS and EulerOS ECSs for accurate access to the IaaS OpenStack data source.
echo "NOZEROCONF=yes" >> /etc/sysconfig/network
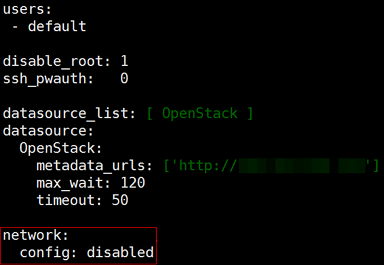
- Modify the /etc/cloud/cloud.cfg file to disable Cloud-Init's network configuration capability.
If the Cloud-Init version is 0.7.9 or later, add the following content to /etc/cloud/cloud.cfg:
network:config: disabledNoteThe added content must be in the YAML format.
Figure 2 Disabling Cloud-Init's network configuration capability

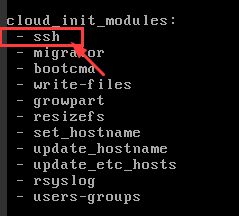
- Modify cloud_init_modules in the cloud.cfg configuration file.
Move ssh from the bottom to the top to speed up the SSH login.
Figure 3 Speeding up the SSH login to the ECS

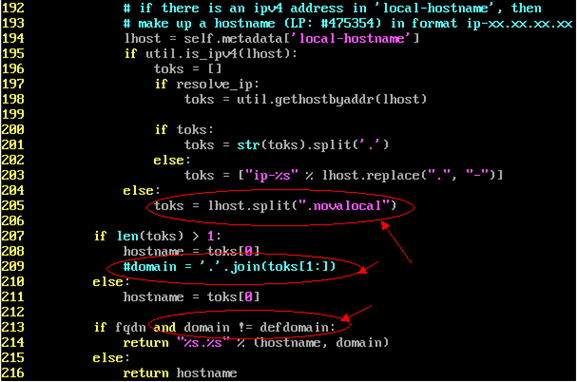
- Modify the configuration so that the hostname of the ECS created from the image does not contain the .novalocal suffix and can contain a dot (.).
- Run the following command to modify the __init__.py file:
vi /usr/lib/python2.7/site-packages/cloudinit/sources/__init__.py
Press i to enter editing mode. Modify the file content as follows based on the keyword toks:
if toks:toks = str(toks).split('.')else:#toks = ["ip-%s" % lhost.replace(".", "-")] # Comment out this line.toks = lhost.split(".novalocal") # Add this line.if len(toks) > 1:hostname = toks[0]#domain = '.'.join(toks[1:]) # Comment out this line.else:hostname = toks[0]if fqdn and domain != defdomain:return hostname#return "%s.%s" % (hostname, domain) # Comment out this line.else:return hostnameAfter the modification is complete, press Esc to exit the editing mode and enter :wq! to save the settings and exit.
Figure 4 Modifying the __init__.py file

- Run the following command to switch to the cloudinit/sources folder:
cd /usr/lib/python2.7/site-packages/cloudinit/sources/
- Run the following commands to delete the __init__.pyc file and the optimized __init__.pyo file:
rm -rf __init__.pyc
rm -rf __init__.pyo
- Run the following commands to clear the logs:
rm -rf /var/lib/cloud/*
rm -rf /var/log/cloud-init*
- Run the following command to modify the __init__.py file:
- Run the following command to edit the /etc/cloud/cloud.cfg.d/05_logging.cfg file to use cloudLogHandler to process logs:
vim /etc/cloud/cloud.cfg.d/05_logging.cfg
Figure 5 Setting the parameter value to cloudLogHandler

Check the Cloud-Init Configuration
Run the following command to check whether Cloud-Init has been properly configured:
cloud-init init --local
If Cloud-Init has been properly installed, the version information is displayed and no error occurs. For example, messages indicating lack of files will not be displayed.
(Optional) Run the following command to set the password validity period to the maximum:
chage -M 99999 $user_name
user_name is a system user, such as user root.
You are advised to set the password validity period to 99999.