Only an administrator can configure critical operation protection, and IAM users can only view the configurations. If an IAM user needs to modify the configurations, the user can request the administrator to perform the modification or grant the required permissions.
Federated users do not need to verify their identity when performing critical operations.
Virtual MFA Device
An MFA device generates 6-digit verification codes in compliance with the Time-based One-time Password Algorithm (TOTP). MFA devices can be hardware- or software-based. Currently, only software-based virtual MFA devices are supported. They are application programs running on smart devices such as mobile phones.
This section describes how to bind a virtual MFA device. If you have installed another MFA application, add a user by following the on-screen prompts. For details about how to bind or remove a virtual MFA device, see Configuring a Virtual MFA Device.
Before binding a virtual MFA device, ensure that you have installed an MFA application on your mobile device.
- Go to the Security Settings page.
- Click the Critical Operations tab, and click Bind in the Virtual MFA Device row.
Figure 1 Virtual MFA Device

- Set up the MFA application by scanning the QR code or manually entering the secret key.
Figure 2 Binding a virtual MFA device

You can bind a virtual MFA device to your account by scanning the QR code or entering the secret key.
- Scanning the QR code
Open the MFA application on your mobile phone, and use the application to scan the QR code displayed on the Bind Virtual MFA Device page. Your account or IAM user is then added to the application.
- Manually entering the secret key
Open the MFA application on your mobile phone, and enter the secret key.
NoteThe user can be manually added only using time-based one-time passwords (TOTP). You are advised to enable automatic time setting on your mobile device.
- Scanning the QR code
- View the verification codes on the MFA application. The code is automatically updated every 30 seconds.
- On the Bind Virtual MFA Device page, enter two consecutive verification codes and click OK.
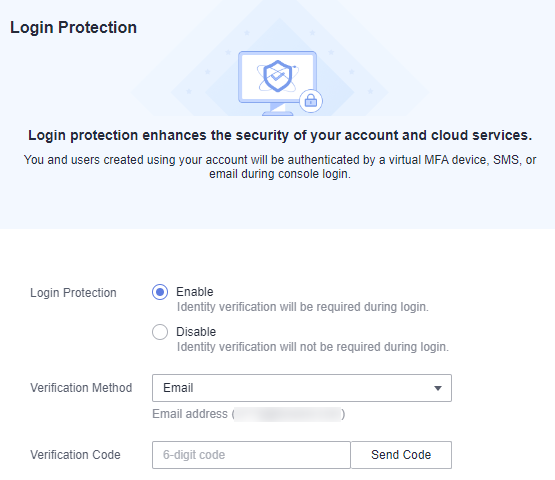
Login Protection
After login protection is enabled, you and IAM users created using your account will need to enter a verification code in addition to the username and password during login. Enable this function for account security.
For an account, only the account administrator can enable login protection for it. For IAM users, both the account administrator and other administrators can enable this feature for the users.
- (Administrator) Enabling login protection for an IAM user
To enable login protection for an IAM user, go to the Users page and choose Security Settings in the row that contains the IAM user. In the Login Protection area in the displayed Security Settings tab, click
 next to Verification Method, and select a verification method from SMS, email, or virtual MFA device or security key. You can enable or disable API login protection as needed when you select Virtual MFA device. The option is disabled by default. API login protection asks you for both a password and a virtual MFA device to obtain an IAM user token. Without API login protection, you can obtain the token with only a password. To obtain an IAM user token, see .
 - Enabling login protection for your account
To enable login protection, click the Critical Operations tab on the Security Settings page, click Enable next to Login Protection, select a verification method, enter the verification code, and click OK.
Figure 3 Enabling login protection

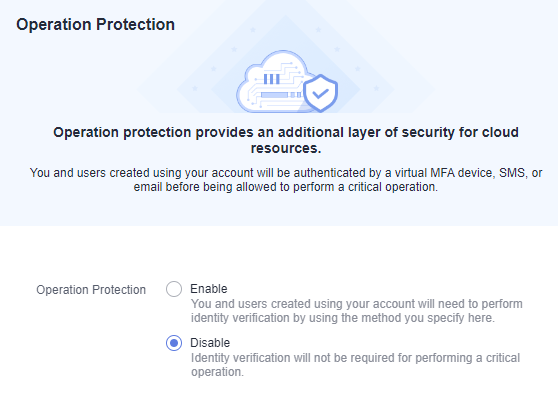
Operation Protection
- Enabling operation protection
After operation protection is enabled, you and IAM users created using your account need to enter a verification code when performing a critical operation, such as deleting an ECS. This function is enabled by default. To ensure resource security, keep it enabled.
The verification is valid for 15 minutes and you do not need to be verified again when performing critical operations within the validity period.
- Go to the Security Settings page.
- On the Critical Operations tab, locate the Operation Protection row and click Enable.
- Select Enable.
Figure 4 Configuring operation protection
- Click OK.
- Disabling operation protection
If operation protection is disabled, you and IAM users created using your account do not need to enter a verification code when performing a critical operation.
- Go to the Security Settings page.
- On the Critical Operations tab, locate the Operation Protection row and click Change.
Figure 5 Disabling operation protection

- Select Disable and click OK.
Figure 6 Disabling operation protection
- Enter a verification code.
- Self-verification: The administrator who wants to disable operation protection completes the verification. Email and virtual MFA verification are supported.
- Verification by another person: The specified person completes the verification. Only email verification is supported. Virtual MFA devices are not supported.
- Click OK.
- Each cloud service defines its own critical operations.
- When IAM users created using your account perform a critical operation, they will be prompted to choose a verification method from email and virtual MFA device.
- If a user is only associated with an email address, only email verification is available.
- If a user is not associated with an email address, or virtual MFA device, the user will need to associate at least one of them before they can perform any critical operations.
- You may not be able to receive email verification codes due to communication errors. In this case, you are advised to use a virtual MFA device for verification.
- If operation protection is enabled, IAM users need to enter verification codes when performing a critical operation. The verification codes are sent to the email address bound to the IAM users.
Access Key Management
- Enabling access key management
After access key management is enabled, only the administrator can create, enable, disable, or delete access keys of IAM users. This function is disabled by default. To ensure resource security, enable this function.
To enable access key management, click the Critical Operations tab on the Security Settings page, and click
 in the Access Key Management row.
 - Disabling access key management
After access key management is disabled, all IAM users can create, enable, disable, or delete their own access keys.
To disable access key management, click the Critical Operations tab on the Security Settings page, and click
 in the Access Key Management row.
Information Self-Management
- Enabling information self-management
By default, information self-management is enabled, indicating that all IAM users can manage their own basic information (login password, mobile number, and email address). Determine whether to allow IAM users to manage their own information and what information they can modify.
To enable information self-management, click the Critical Operations tab on the Security Settings page, and click Enable in the Information Self-Management row. Select Enable, select the information types that IAM users can modify, and click OK.
- Disabling information self-management
After you disable information self-management, only administrators can manage their own basic information. If you are an IAM user and want to change your login password, mobile number, or email address, contact the administrator. The administrator can modify the information by referring to Managing IAM User Information.
To disable information self-management, click the Critical Operations tab on the Security Settings page, and click Change in the Information Self-Management row. In the displayed pane, select Disable and click OK.
Critical Operations
The following tables list the critical operations defined by each cloud service.
Service Category | Service | Critical Operation |
|---|---|---|
Compute | Elastic Cloud Server (ECS) |
|
Compute | Bare Metal Server (BMS) |
|
Compute | Auto Scaling | Deleting an auto scaling group |
Storage | Object Storage Service (OBS) |
|
Storage | Elastic Volume Service (EVS) |
|
Storage | Cloud Backup and Recovery (CBR) |
|
Storage | Scalable File Service (SFS) | Deleting an SFS Turbo file system |
Containers | Application Orchestration Service (AOS) |
|
Network | Virtual Private Cloud (VPC) |
|
Network | Elastic Load Balance (ELB) |
|
Network | Elastic IP (EIP) |
|
Network | NAT Gateway (NAT) |
|
Management & Deployment | Identity and Access Management (IAM) |
|
Management & Deployment | Simple Message Notification (SMN) |
|
Middleware | Distributed Cache Service (DCS) |
|
Middleware | Distributed Message Service (DMS) for Kafka | Deleting an instance |
Application | Distributed Message Service (DMS) for RabbitMQ | Deleting an instance |
Application | Distributed Message Service (DMS) for RocketMQ | Deleting an instance |
Database | RDS for MySQL |
|
Database | RDS for SQL Server |
|
Database | Document Database Service (DDS) |
|