Scenarios
After a disk is expanded on the console, the disk size is enlarged, but the additional space cannot be used directly.
In Windows, you must allocate the additional space to an existing partition or a new partition.
If the disk capacity is expanded on a stopped server, the additional space of a Windows system disk or Windows data disk will be automatically added to the partition at the end of the disk upon the server startup. In this case, the additional space can be used directly.
This section uses Windows Server 2008 R2 Enterprise 64bit as the sample OS to describe the expansion methods:
- For a system disk:
- If volume (C:) already exists, you can add the additional space to volume (C:) and use it as a system volume. For details, see System Disk: Add the Additional Space to the Original Volume.
- If volume (C:) already exists, you can create a new volume such as volume (F:) with the additional space and use the new volume as a data volume. For details, see System Disk: Create a New Volume with the Additional Space.
- If the additional space has been added to volume (C:), you can shrink volume (C:), create a new volume with the available space, and use the new volume as a data volume. Only the available space can be shrunk and used to create the new volume. The additional space cannot be shrunk if it has already been used. This section uses a system disk to describe how to perform extension operations for a Windows disk. These operations are also suitable for data disks. For details, see System Disk: Create a New Volume Using the Available Space Shrunk from the Original Volume.
- For a data disk:
- If volume (D:) already exists, you can add the additional space to volume (D:) and use it as a data volume. For details, see Data Disk: Add the Additional Space to the Original Volume.
- If volume (D:) already exists, you can create a new volume such as volume (E:) with the additional space and use the new volume as a data volume. For details, see Data Disk: Create a New Volume with the Additional Space.
The way you allocate additional space depends on the OS. This example is used for reference only. For detailed operations and differences, see the corresponding OS documents.
Incorrect operations may lead to data loss or exceptions. So you are advised to back up the disk data using CBR or snapshots before expansion. For details about using CBR, see Backing Up EVS Disks. For details about using snapshots, see Creating an EVS Snapshot.
Constraints
- The additional space of a data disk cannot be added to the root partition. To extend the root partition, expand the system disk instead.
- During an expansion, the additional space is added to the end of the disk. If the disk has multiple partitions, the additional space can only be allocated to the last partition of the disk.
- If the target partition is an extended MBR partition (whose partition number is usually greater than or equal to 5), you need to first expand the extended partition and then the logical partition. Assume that you have three partitions, /dev/vdb1 (primary partition), /dev/vdb2 (extended partition), and /dev/vdb5 (logical partition), you need to run growpart /dev/vdb2 and then growpart /dev/vdb5 to extend the partitions.
- The maximum disk capacity that MBR supports is 2 TiB, and the disk space in access of 2 TiB cannot be used. If your disk already uses MBR for partitioning and you require more than 2 TiB after the capacity expansion, do as follows:
- (Recommended) Create a new EVS disk and use GPT.
- Back up the disk data, perform the expansion, and then change the partition style from MBR to GPT. During this change, services will be interrupted and data on the disk will be erased.
Prerequisites
- You have expanded the disk capacity and attached the disk to a server on the console.
- You have logged in to the ECS.
- For how to log in to an ECS, see the Elastic Cloud Server User Guide.
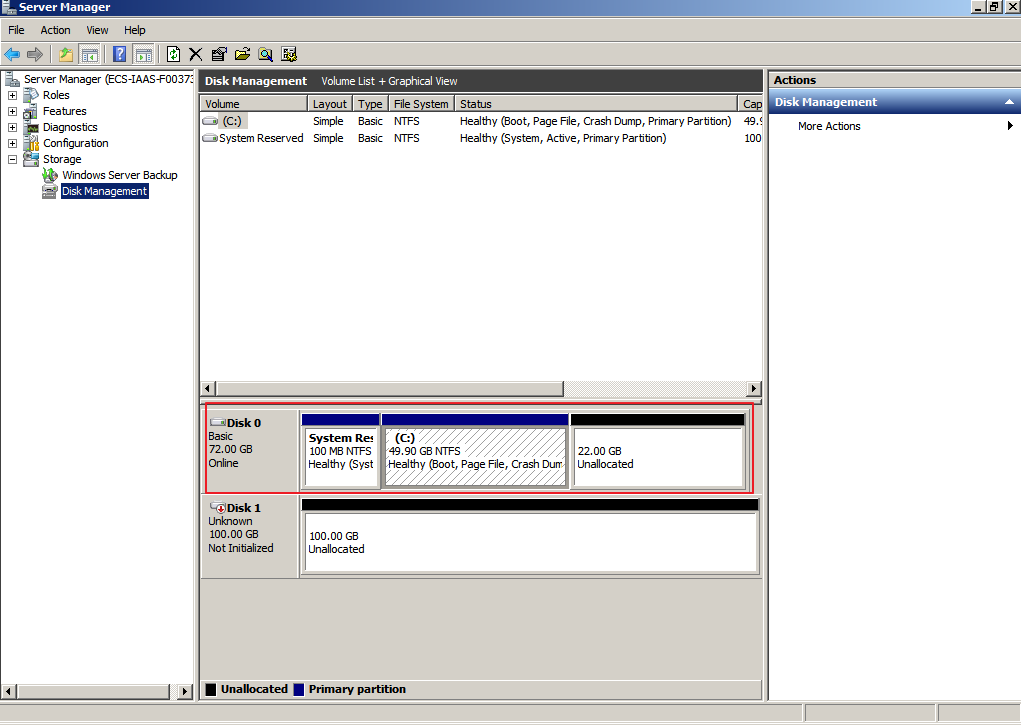
System Disk: Add the Additional Space to the Original Volume
In this example, the system disk has 50 GiB originally, and 22 GiB is added on the console. The following procedure describes how to add this 22 GiB to volume (C:) on the server. After the operation is complete, volume (C:) will have 72 GiB of capacity and can be used as a system volume.
- On the desktop of the server, right-click Computer and choose Manage from the shortcut menu.
The Server Manager window is displayed.
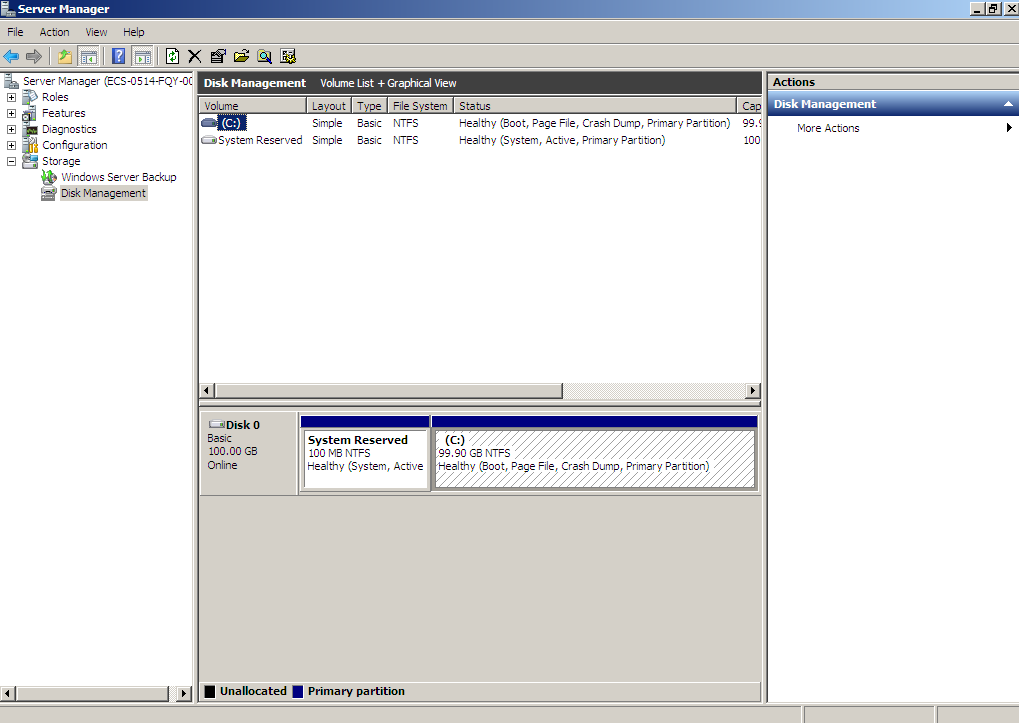
- In the navigation tree, choose Storage > Disk Management.
The Disk Management window is displayed.
Figure 1 Disk Management (system disk)
 Note
NoteIf you cannot see the additional space, right-click Disk Management and choose Refresh from the shortcut menu.
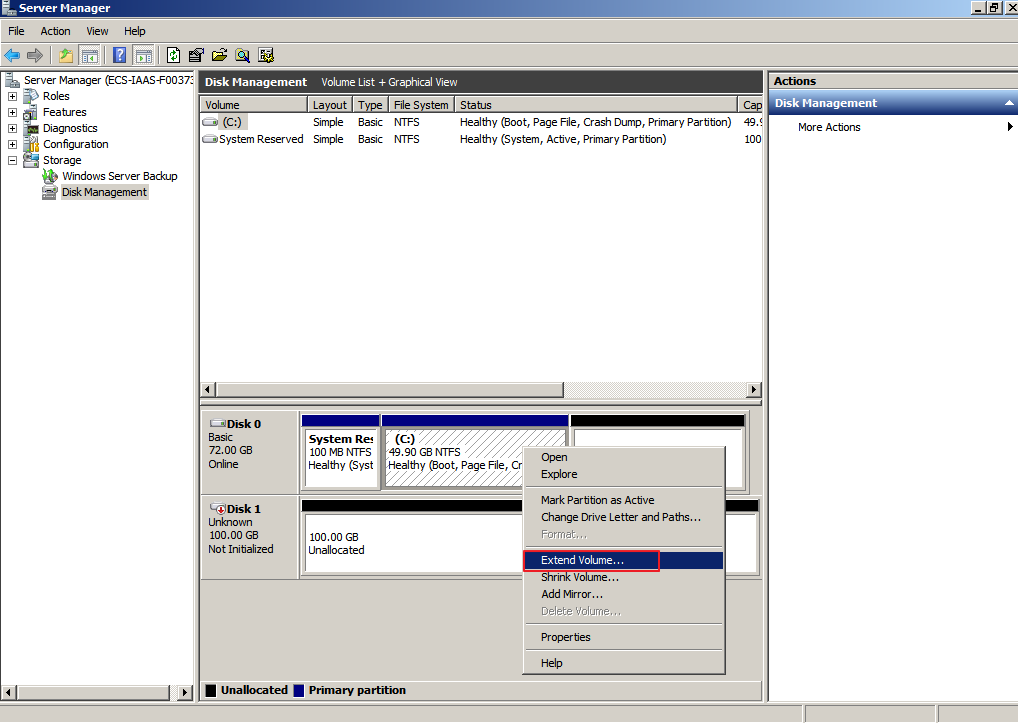
- On the Disk Management page, find the disk and volume that you want to extend. Check the size and unallocated space.
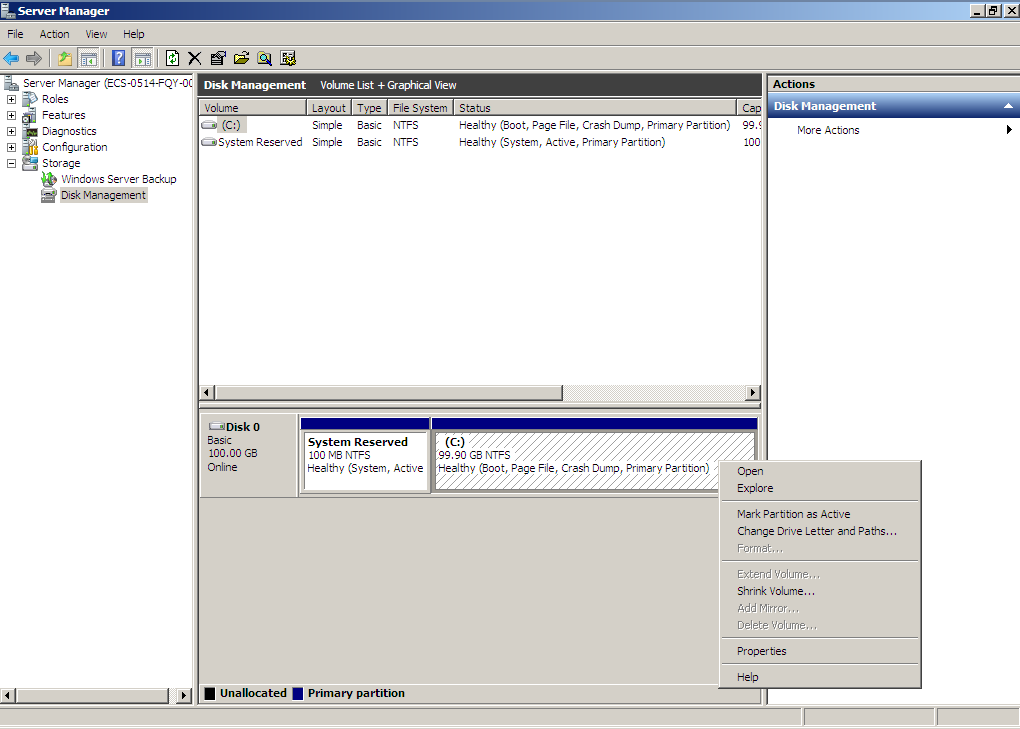
- Right-click the target volume and choose Extend Volume.
Figure 2 Choosing Extend Volume
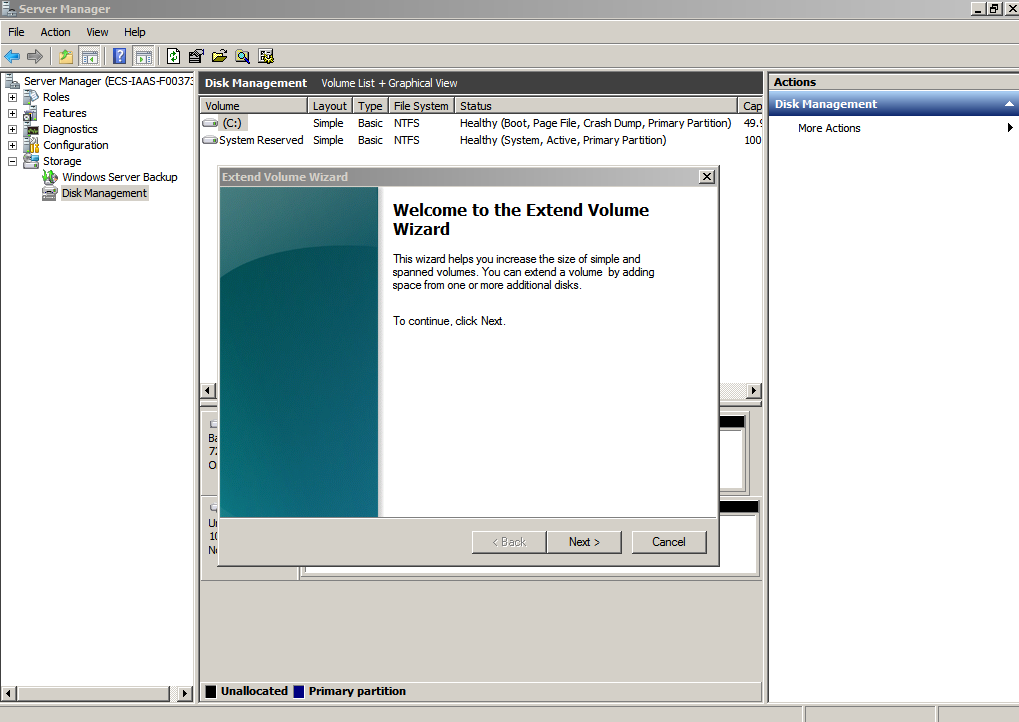
- On the displayed Extend Volume Wizard window, click Next.
Figure 3 Extend Volume Wizard
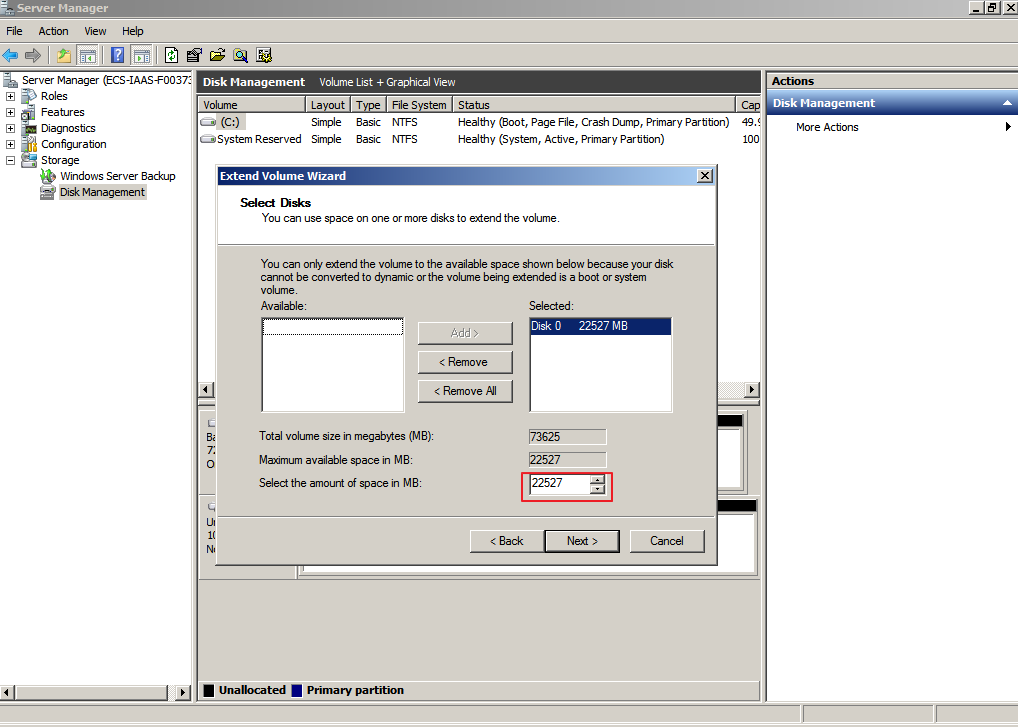
- In the text box to the right of Select the amount of space in MB, enter the amount of the additional space and click Next.
Figure 4 Selecting space
- Click Finish.
After the extension succeeded, the partition size is larger than the original size.
Figure 5 Extension succeeded
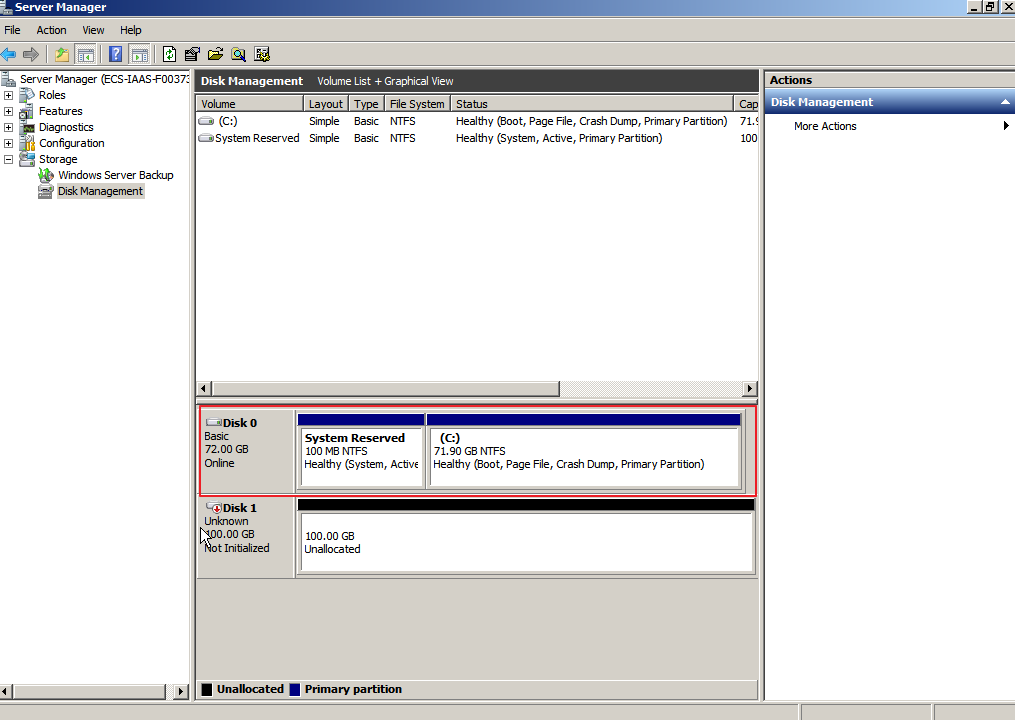
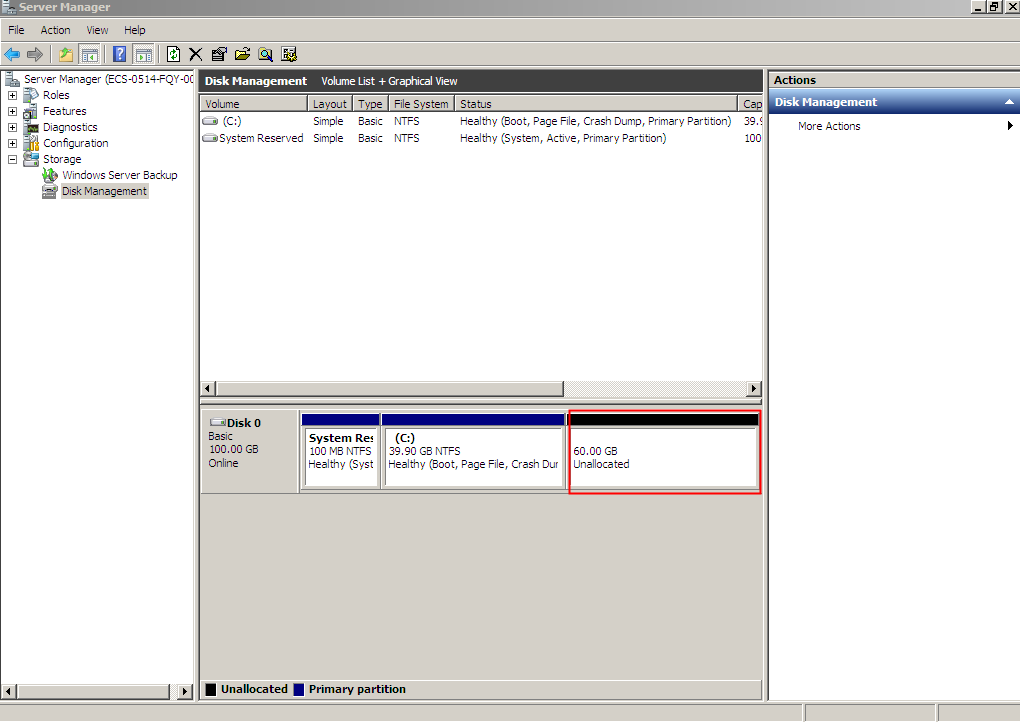
System Disk: Create a New Volume with the Additional Space
In this example, the system disk has 40 GiB originally, and 60 GiB is added on the console. The following procedure describes how to use this 60 GiB to create a new volume, for example volume (F:), on the server. After the operation is complete, new volume (F:) has 60 GiB of capacity and can be used as a data volume.
- On the desktop of the server, right-click Computer and choose Manage from the shortcut menu.
The Server Manager window is displayed.
- In the navigation tree, choose Storage > Disk Management.
The Disk Management window is displayed.
Figure 6 Refresh (system disk)
- If you cannot see the additional space, right-click Disk Management and choose Refresh from the shortcut menu.
After the refresh, the additional space is displayed in the right area and is unallocated.
Figure 7 Unallocated disk space (system disk)
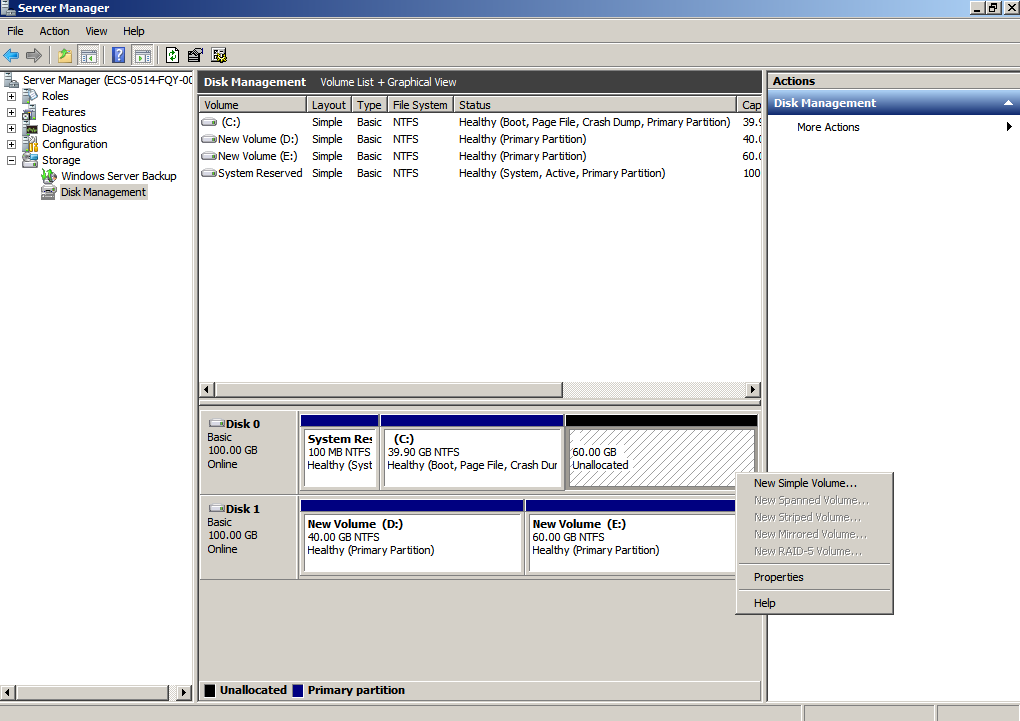
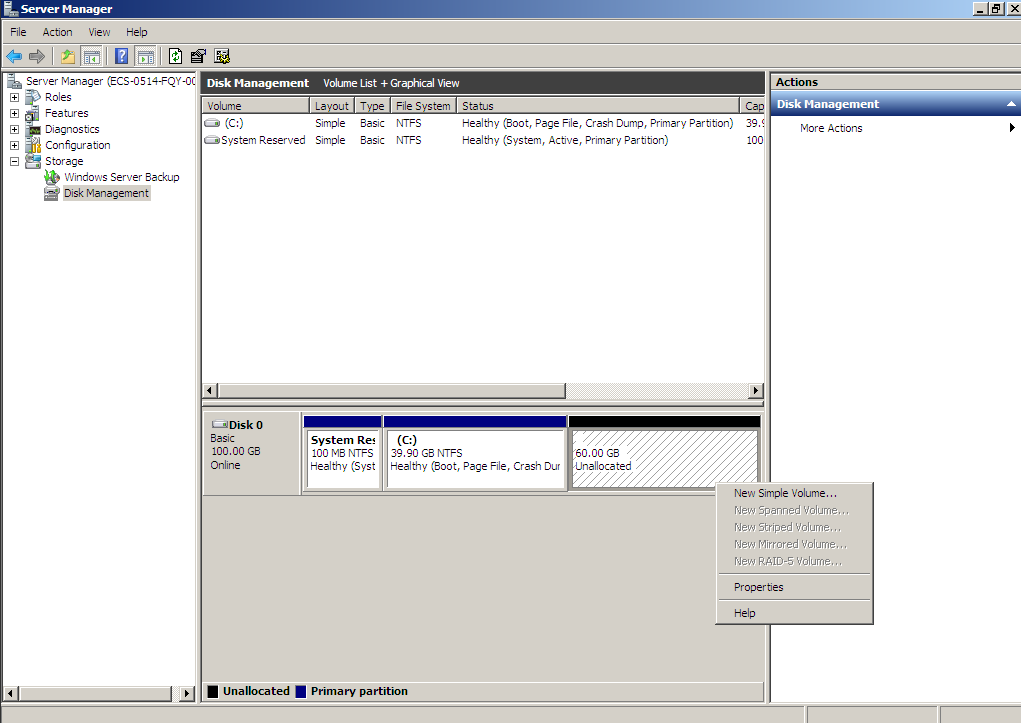
- In the Unallocated area of Disk 0, right-click the blank area and choose New Simple Volume.
Figure 8 New Simple Volume (system disk)
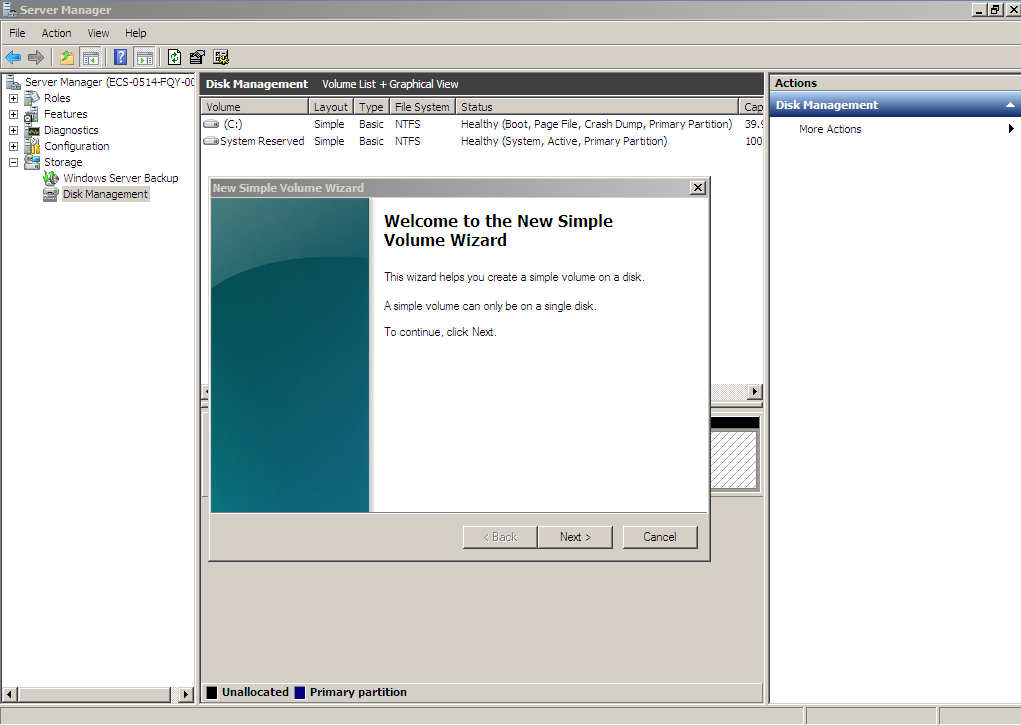
- On the displayed New Simple Volume Wizard window, click Next.
Figure 9 New Simple Volume Wizard (system disk)

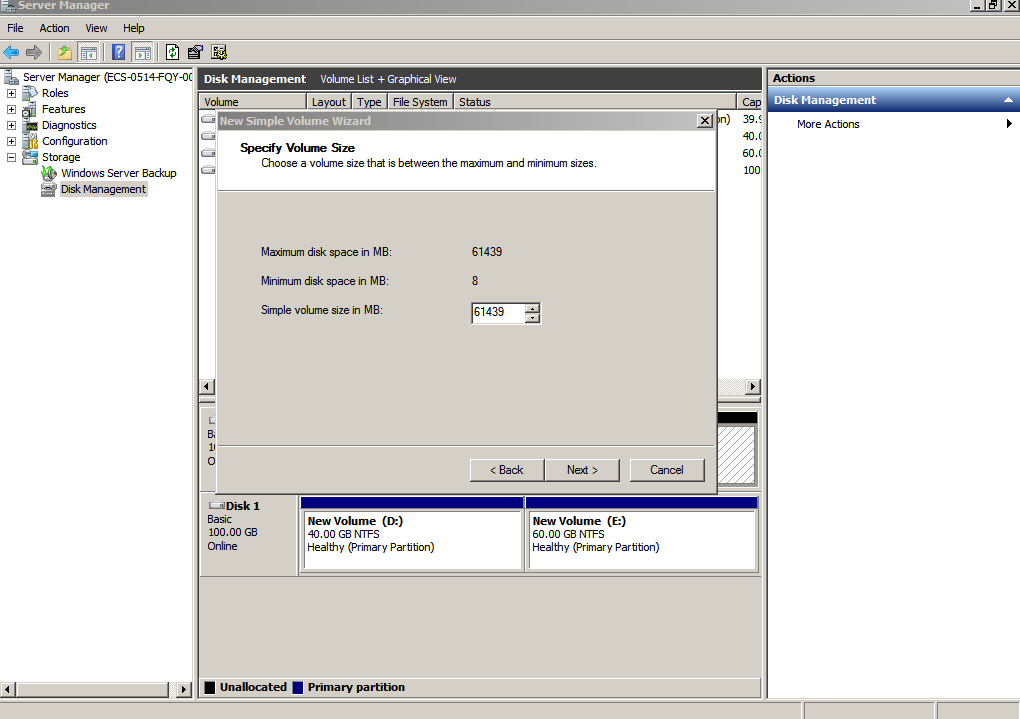
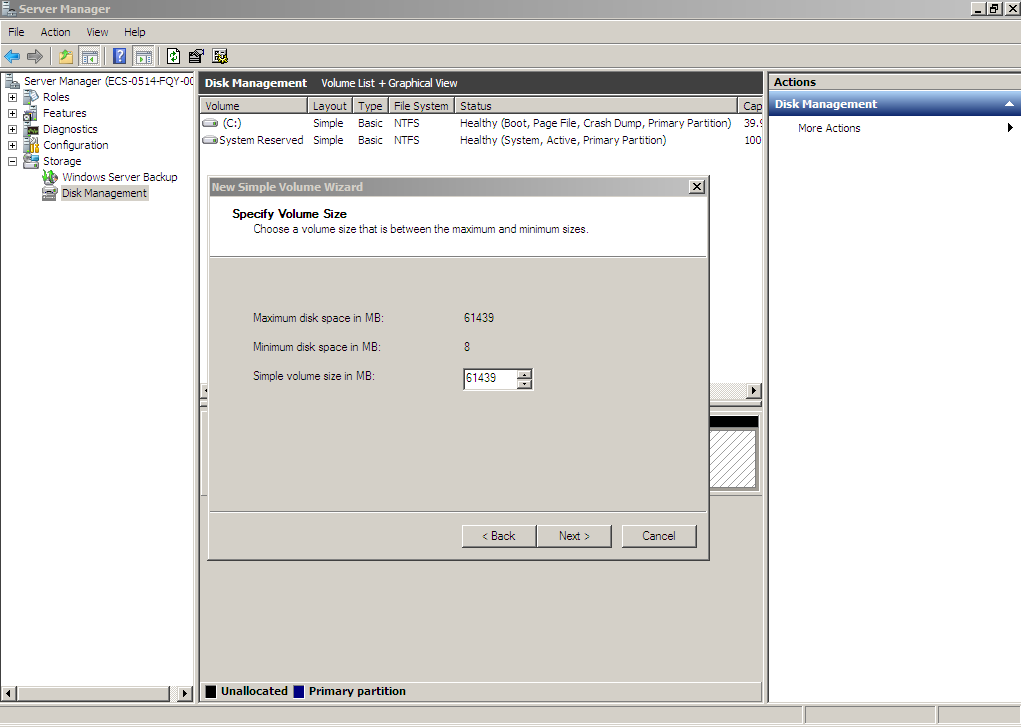
- On the displayed Specify Volume Size page, set Simple volume size in MB and click Next. In this example, the default size is used.
Figure 10 Specify Volume Size (system disk)
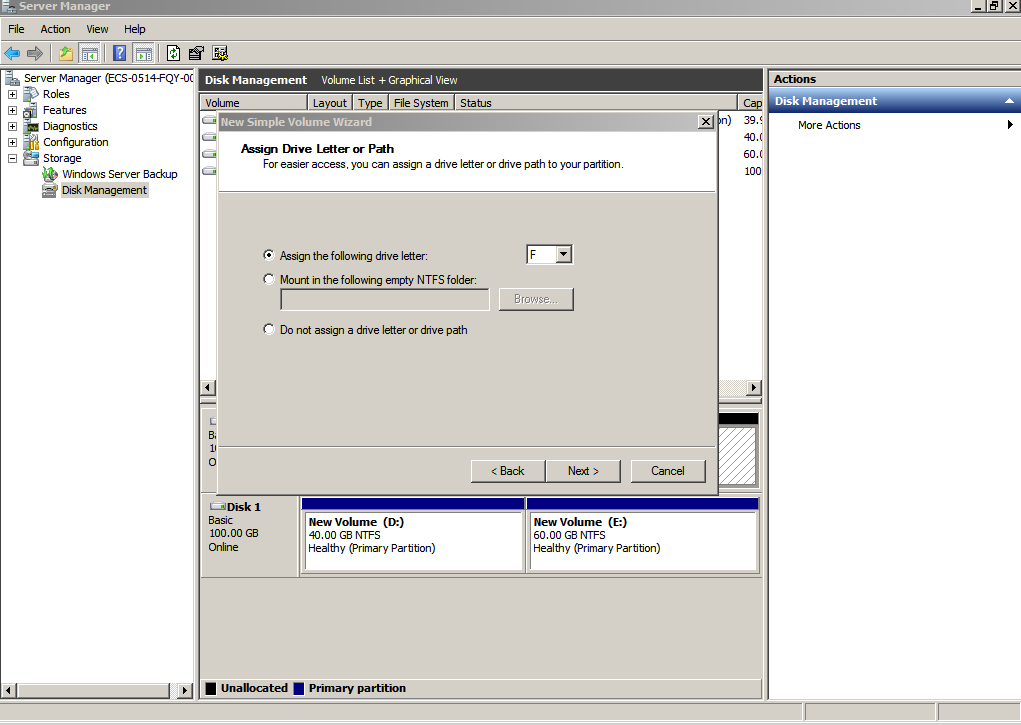
- On the displayed Assign Drive Letter and Path page, click Assign the following drive letter, select a drive letter, and click Next. In this example, drive letter F is selected.
Figure 11 Assign Drive Letter or Path (system disk)
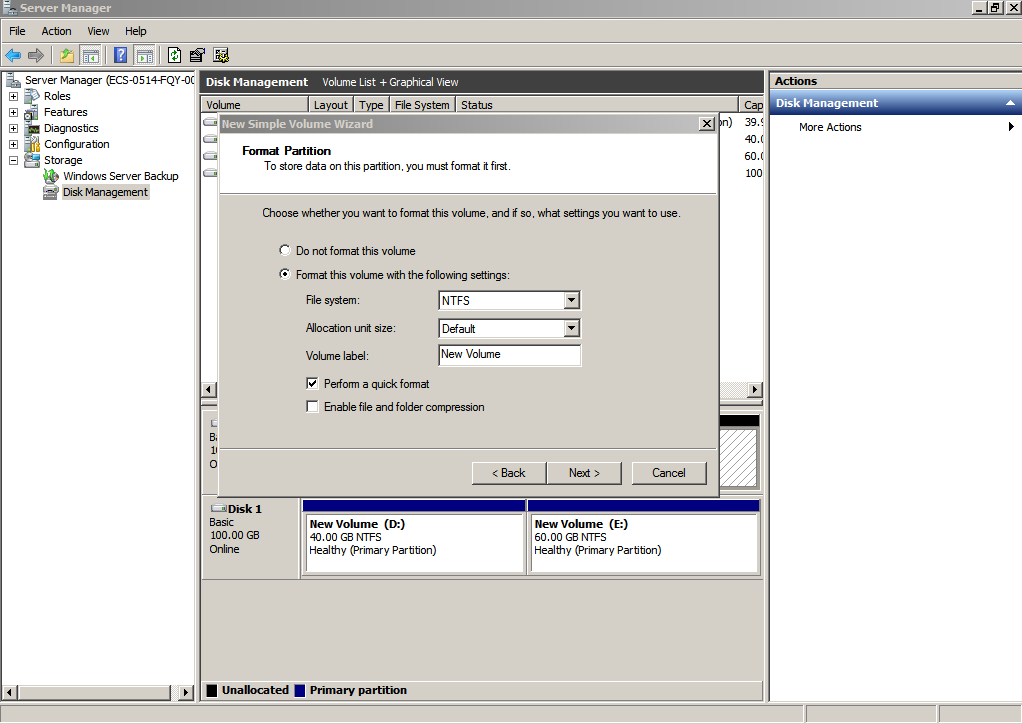
- On the displayed Format Partition page, click Format this volume with the following settings, set parameters based on the requirements, and select Perform a quick format. Then, click Next.
Figure 12 Format Partition (system disk)
- Click Finish.
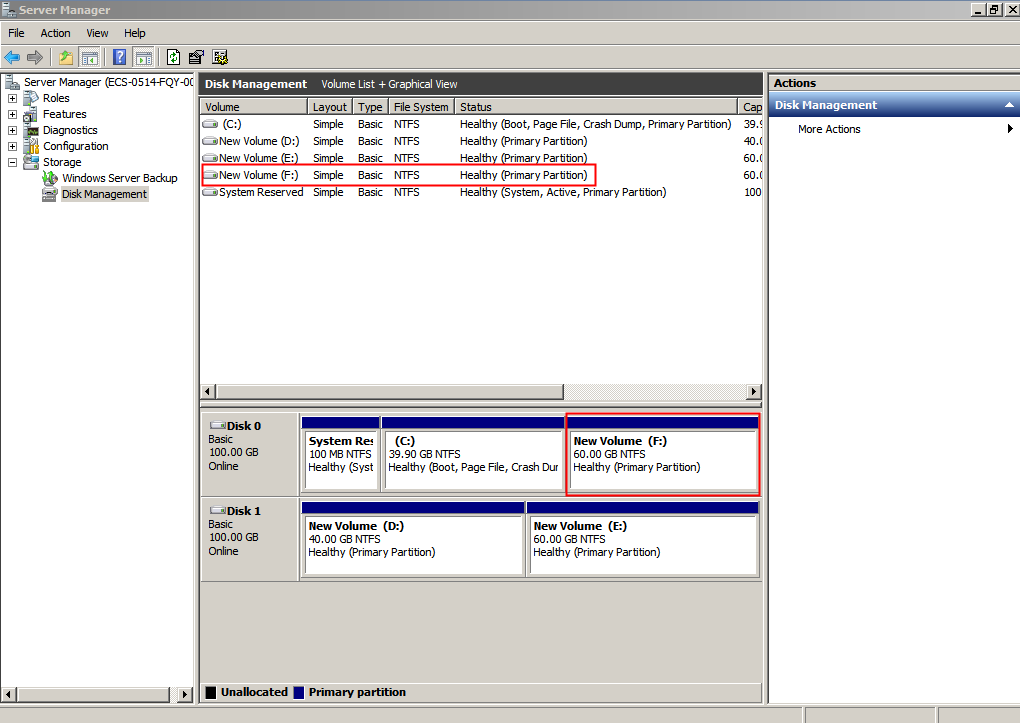
After the expansion succeeded, new volume (F:) is displayed.
Figure 13 Completing the New Simple Volume Wizard (new volume F:)
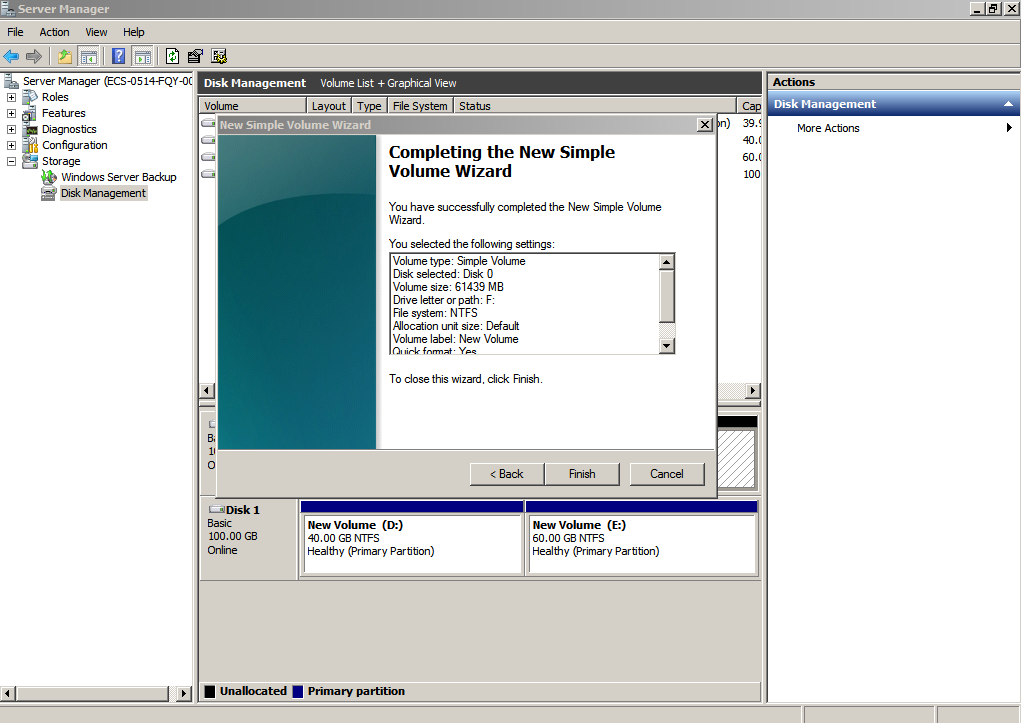
Figure 14 New Volume (F:)
System Disk: Create a New Volume Using the Available Space Shrunk from the Original Volume
In this example, the system disk has 40 GiB originally, and 60 GiB is added on the console and then formatted and added to volume (C:). This 60 GiB has not been used.
The following procedure describes how to use the shrink function to create new volume (D:) with this 60 GiB. After the operation is complete, new volume (D:) can be used as a data volume.
- On the desktop of the server, right-click Computer and choose Manage from the shortcut menu.
The Server Manager window is displayed.
- In the navigation tree, choose Storage > Disk Management.
The Disk Management window is displayed.
Figure 15 Refresh (shrink volume)
- In the (C:) area of Disk 0, right-click the blank area and choose Shrink Volume.
Figure 16 Shrink Volume
- The system automatically queries the available shrink space. In the displayed dialog box, enter the available space and click Shrink.
In this example, the volume available space is 60 GiB. Therefore, enter 61440 (60 × 1024 MiB).
Figure 17 Shrink (shrink volume)

After the operation is complete, Disk 0 has 60 GiB unallocated space.
Figure 18 Unallocated (shrink volume)
- In the Unallocated area of Disk 0, right-click the blank area and choose New Simple Volume.
Figure 19 New Simple Volume (shrink volume)
- On the displayed New Simple Volume Wizard window, click Next.
Figure 20 New Simple Volume Wizard (shrink volume)
- On the displayed Specify Volume Size page, set Simple volume size in MB and click Next. In this example, the default size is used.
Figure 21 Specify Volume Size (shrink volume)
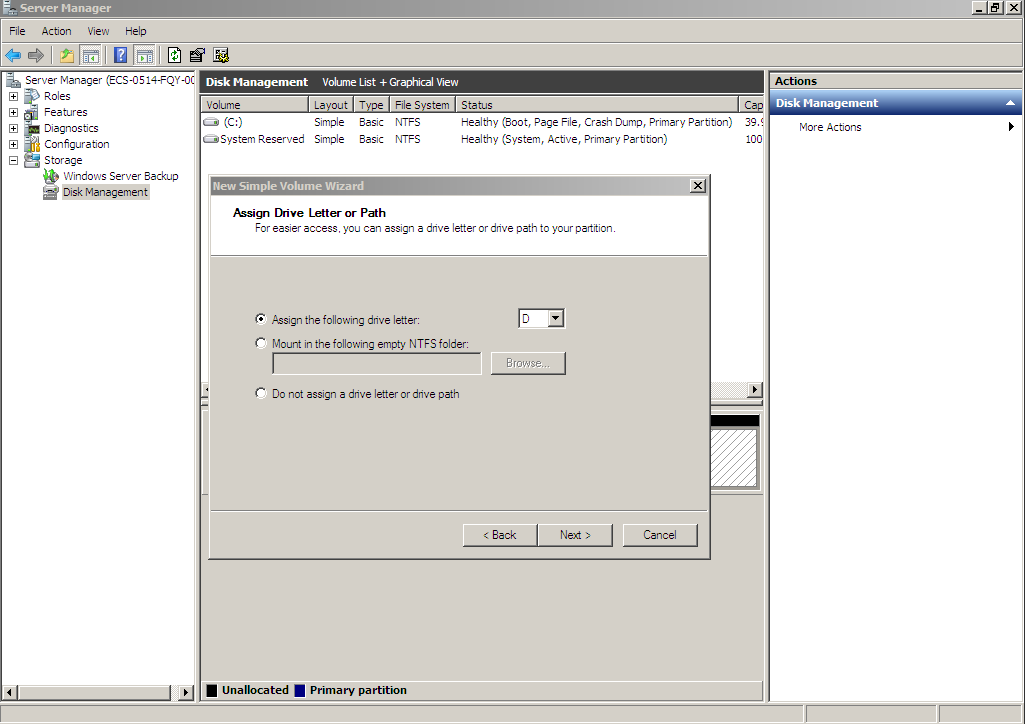
- On the displayed Assign Drive Letter and Path page, click Assign the following drive letter, select a drive letter, and click Next. In this example, drive letter D is selected.
Figure 22 Assign Drive Letter or Path (shrink volume)
- On the displayed Format Partition page, click Format this volume with the following settings, set parameters based on the requirements, and select Perform a quick format. Then, click Next.
Figure 23 Format Partition (shrink volume)

- Click Finish.
After the expansion succeeded, new volume (D:) is displayed.
Figure 24 Completing the New Simple Volume Wizard (new volume D:)
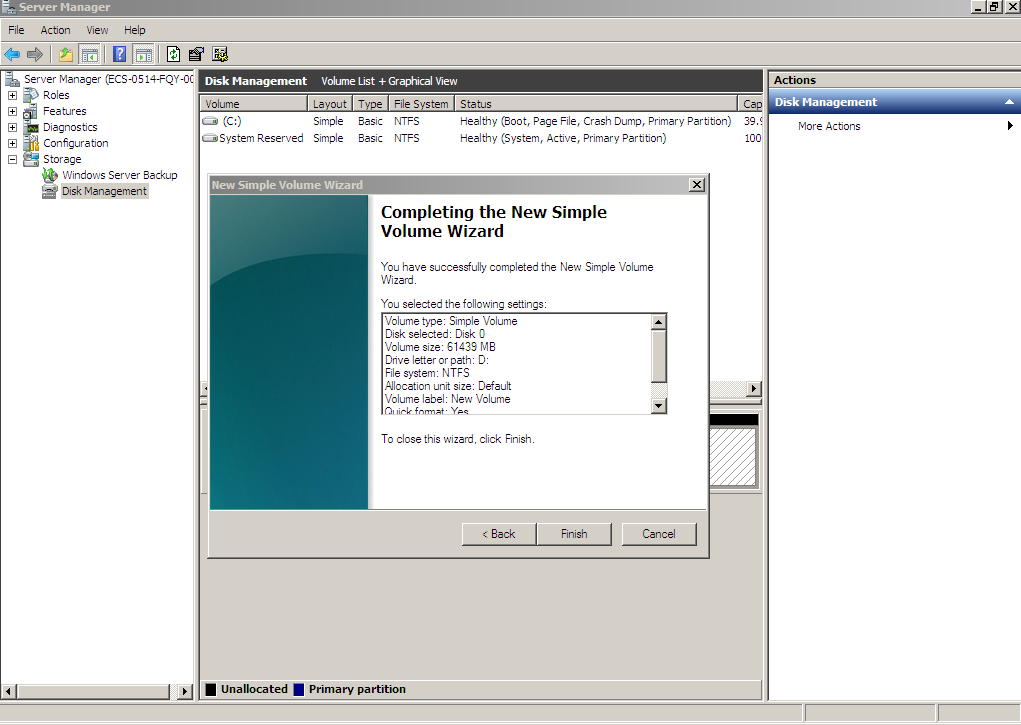
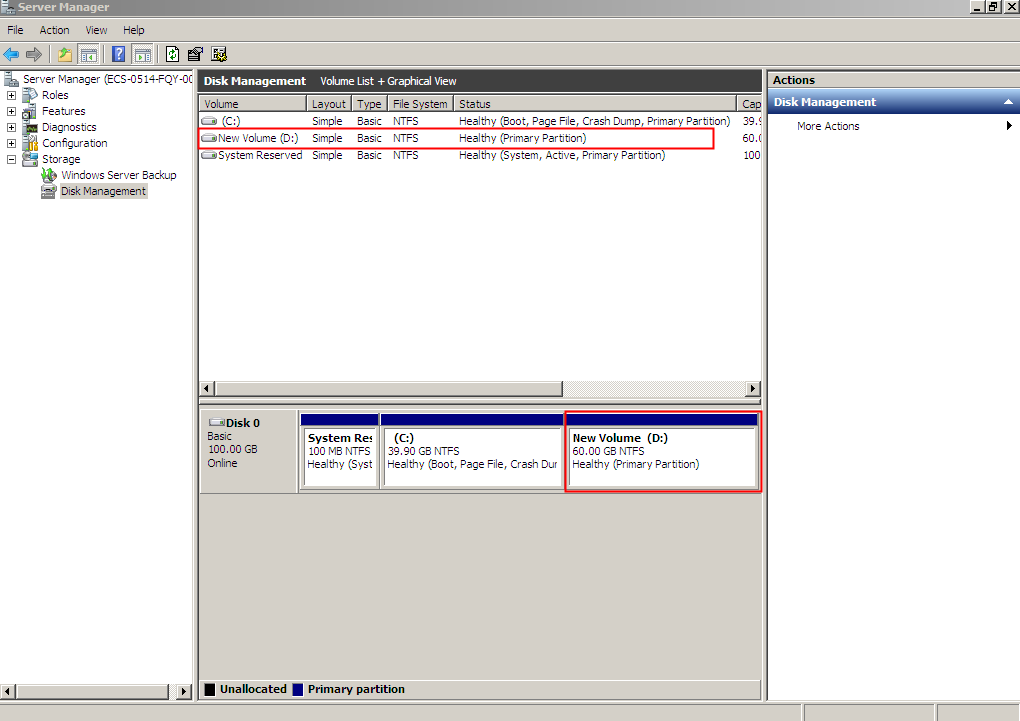
Figure 25 New Volume (D:)
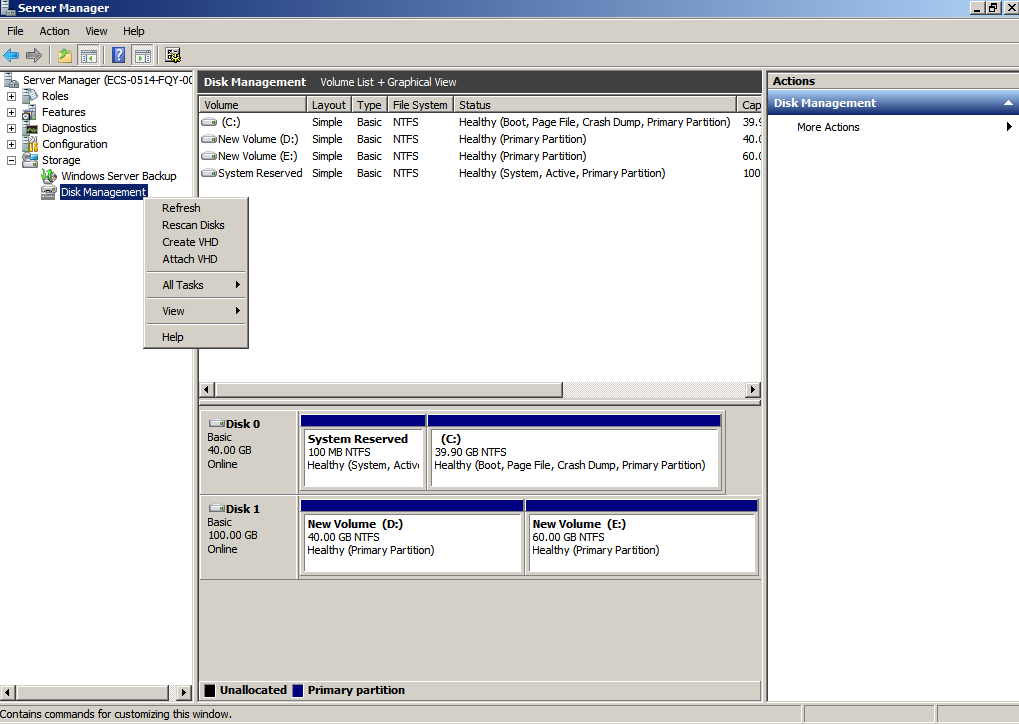
Data Disk: Add the Additional Space to the Original Volume
In this example, the data disk has 100 GiB originally, and 50 GiB is added on the console. The following procedure describes how to add this 50 GiB to volume (D:) on the server. After the operation is complete, volume (D:) has 150 GiB of capacity and can be used as a data volume.
- On the desktop of the server, right-click Computer and choose Manage from the shortcut menu.
The Server Manager window is displayed.
- In the navigation tree, choose Storage > Disk Management.
The Disk Management window is displayed.
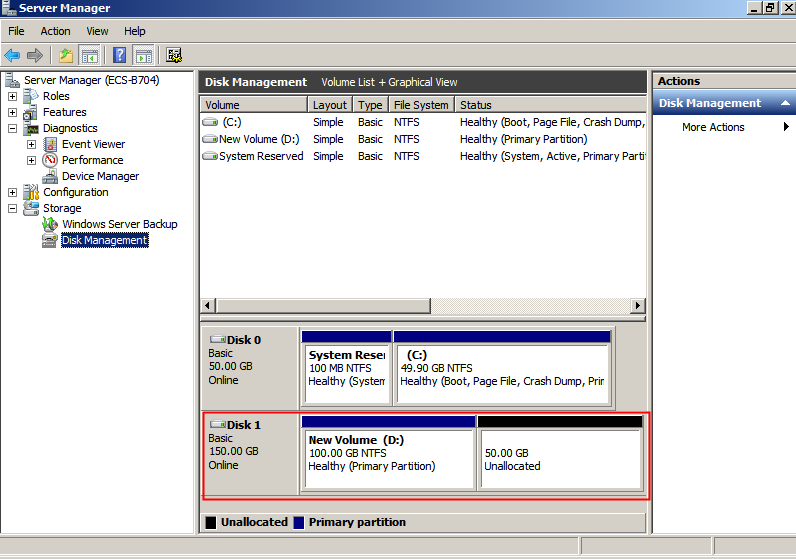
Figure 26 Disk Management (data disk)
 Note
NoteIf you cannot see the additional space, right-click Disk Management and choose Refresh from the shortcut menu.
- On the Disk Management page, select the disk and volume that you want to extend. The current volume size and unallocated space are displayed.
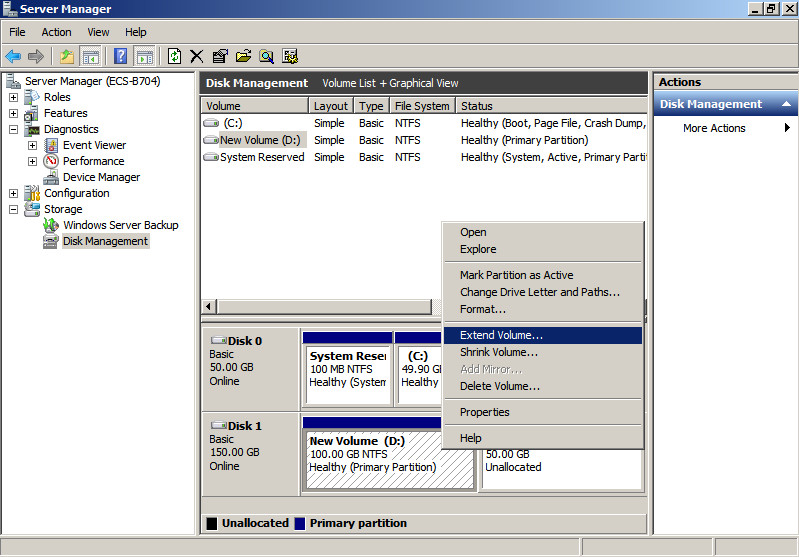
- Right-click the target volume and choose Extend Volume.
Figure 27 Choosing Extend Volume (Windows Server 2008)
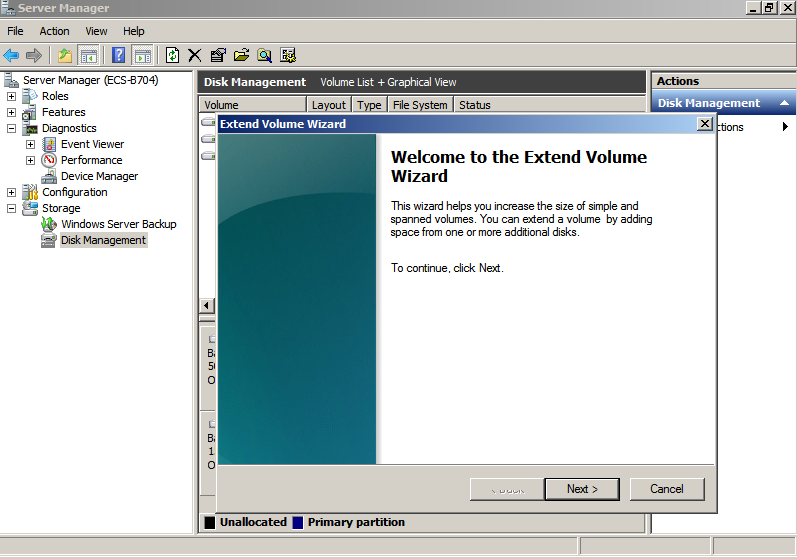
- On the displayed Extend Volume Wizard window, click Next.
Figure 28 Extend Volume Wizard (Windows Server 2008)
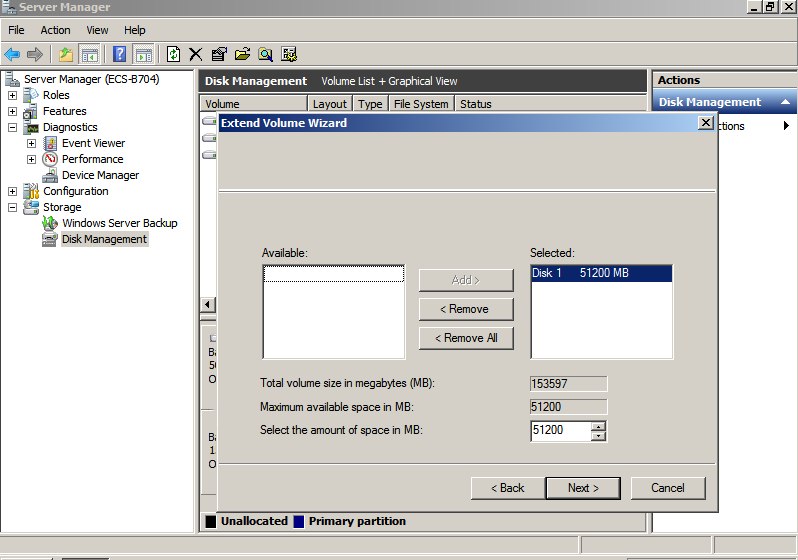
- In the text box to the right of Select the amount of space in MB, enter the amount of the additional space and click Next.
Figure 29 Selecting space (Windows Server 2008)
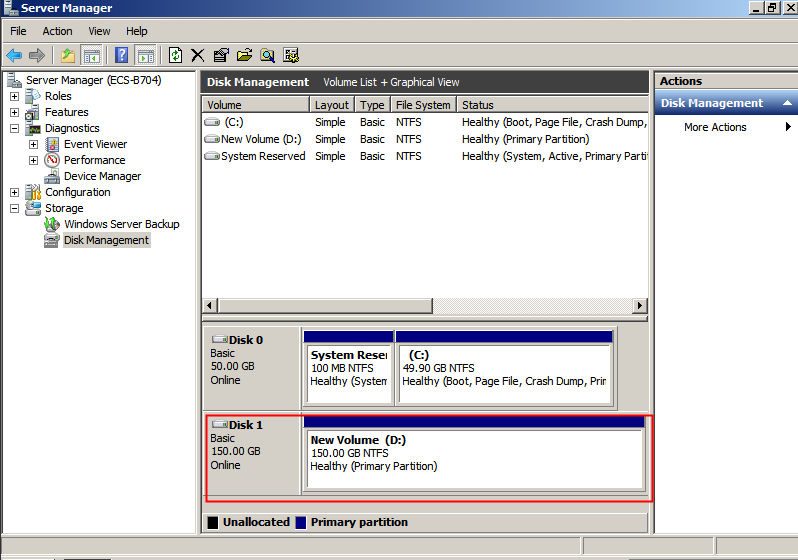
- Click Finish.
After the extension succeeded, the partition size is larger than the original size.
Figure 30 Extension succeeded (Windows Server 2008)
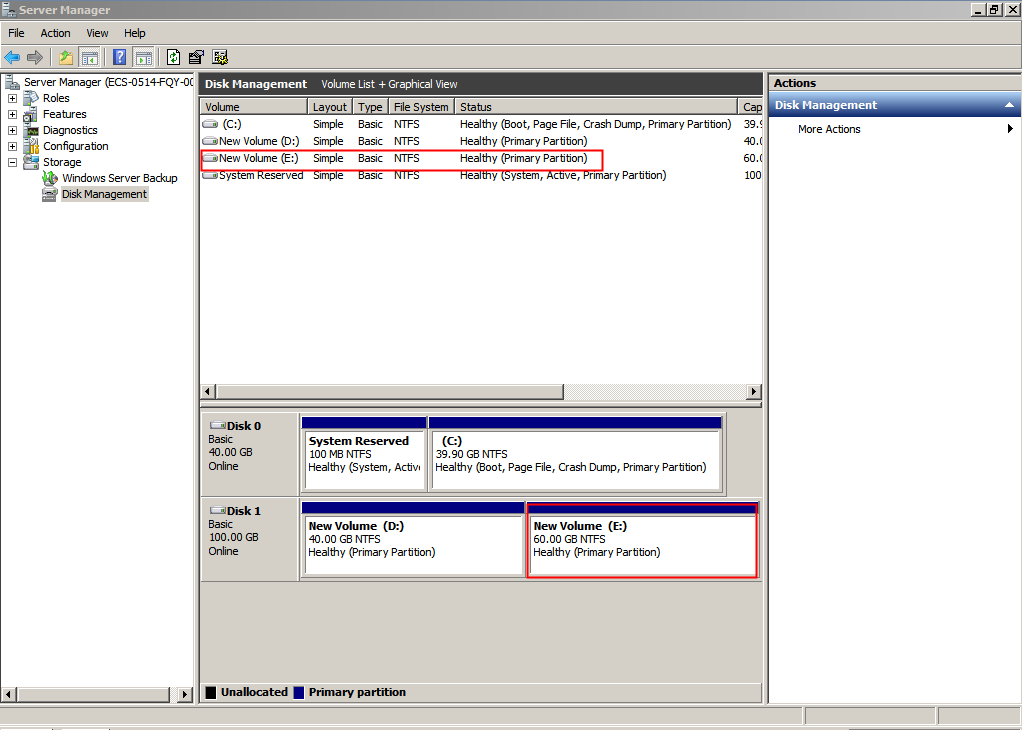
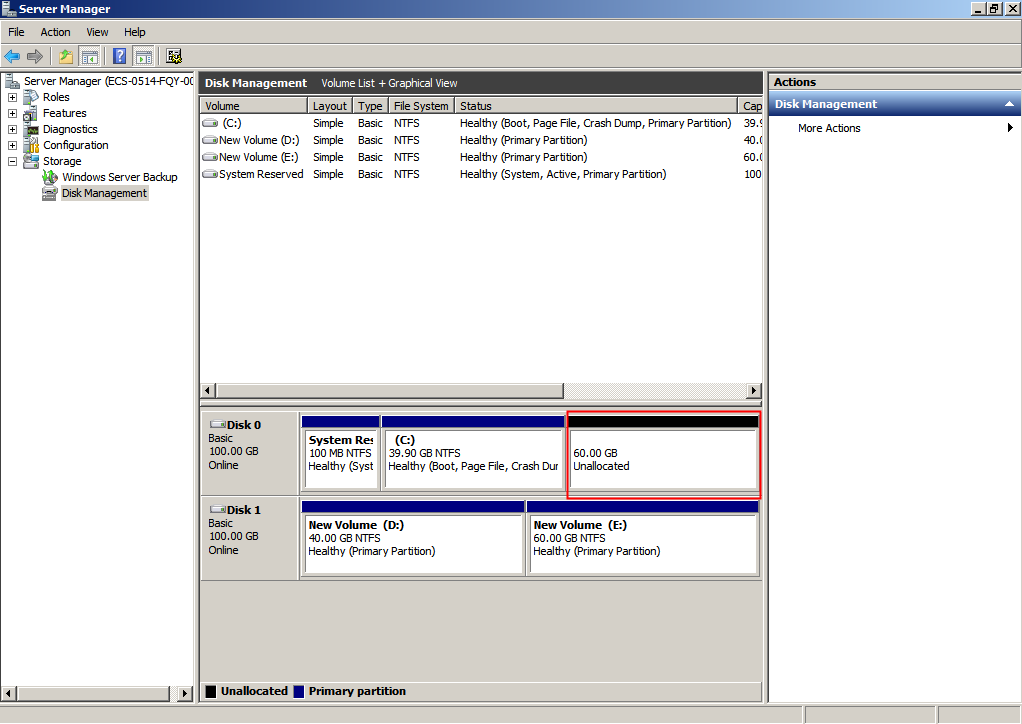
Data Disk: Create a New Volume with the Additional Space
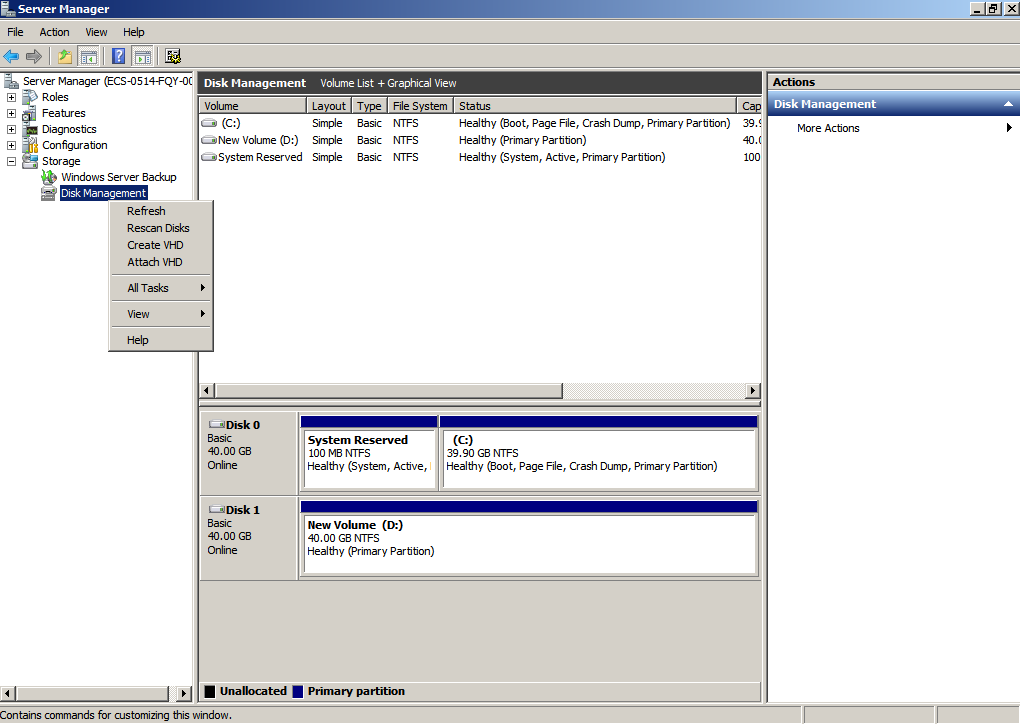
In this example, the data disk has 40 GiB originally, and 60 GiB is added on the console. The following procedure describes how to use this 60 GiB to create a new volume, for example volume (E:), on the server. After the operation is complete, new volume (E:) has 60 GiB of capacity and can be used as a data volume.
- On the desktop of the server, right-click Computer and choose Manage from the shortcut menu.
The Server Manager window is displayed.
- In the navigation tree, choose Storage > Disk Management.
The Disk Management window is displayed.
Figure 31 Refresh (data disk)
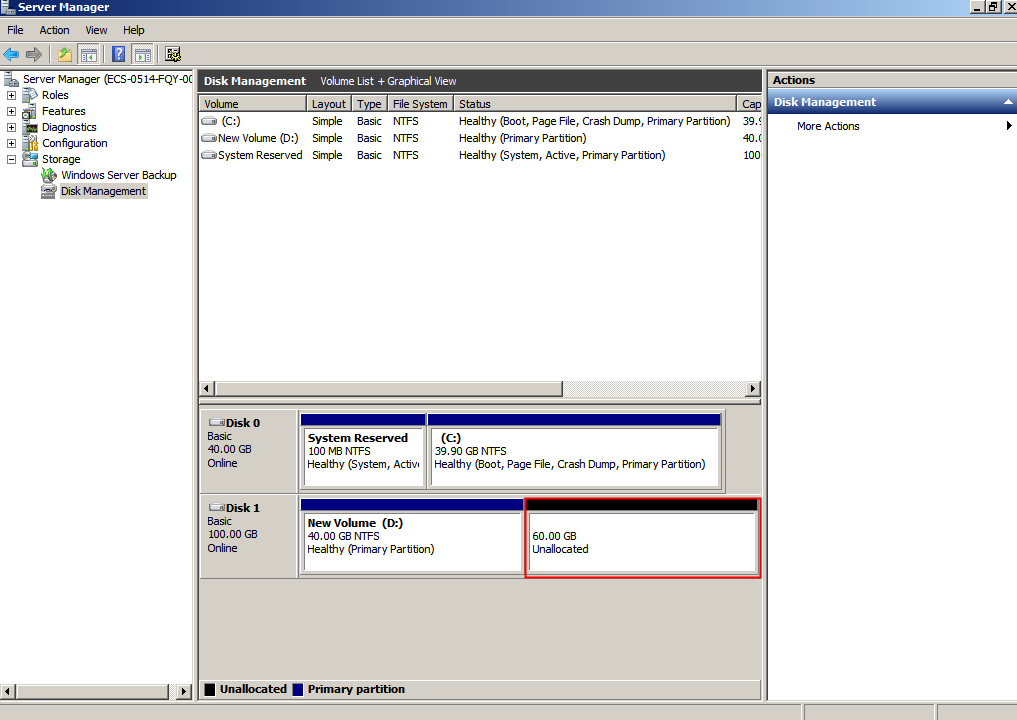
- If you cannot see the additional space, right-click Disk Management and choose Refresh from the shortcut menu.
After the refresh, the additional space is displayed in the right area and is unallocated.
Figure 32 Unallocated disk space (data disk)
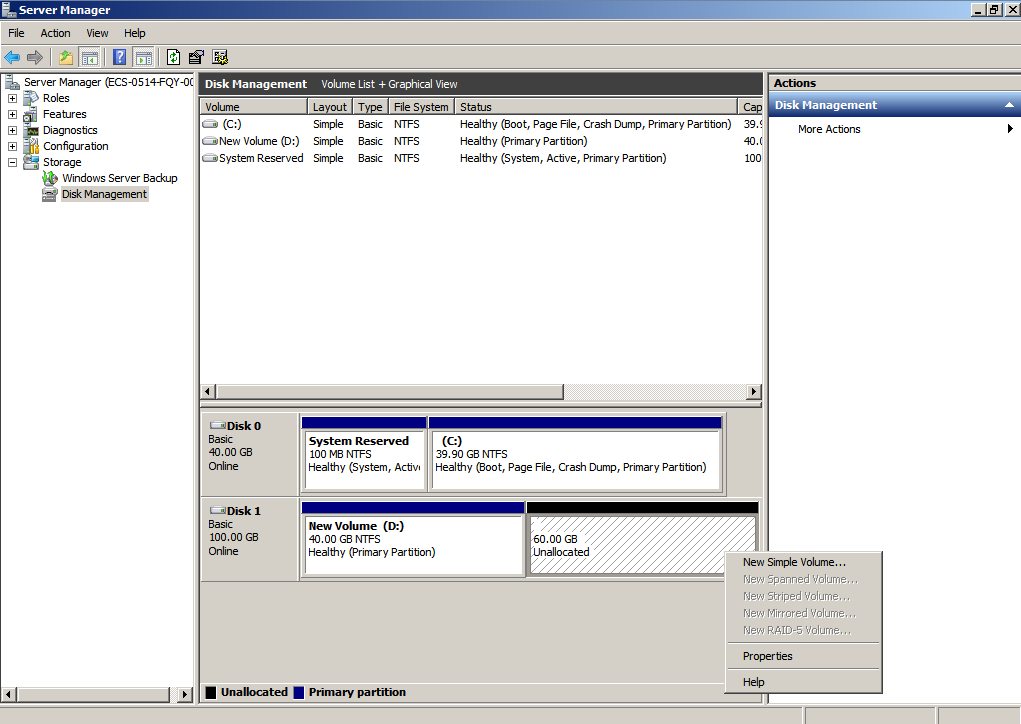
- In the Unallocated area of Disk 1, right-click the blank area and choose New Simple Volume.
Figure 33 New Simple Volume (data disk)
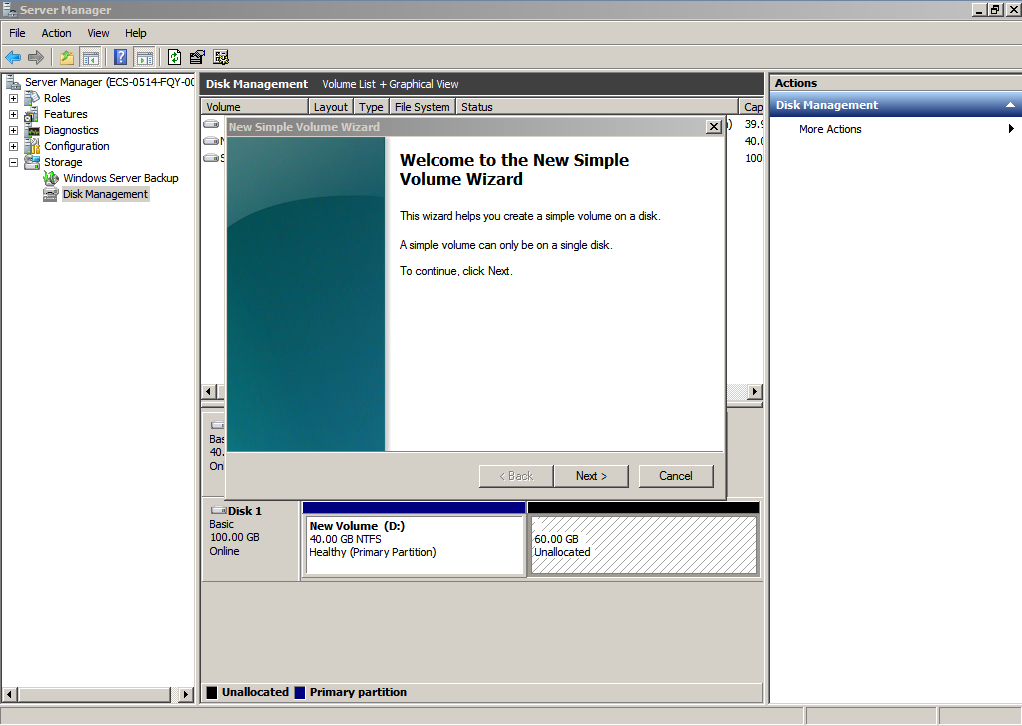
- On the displayed New Simple Volume Wizard window, click Next.
Figure 34 New Simple Volume Wizard (data disk)
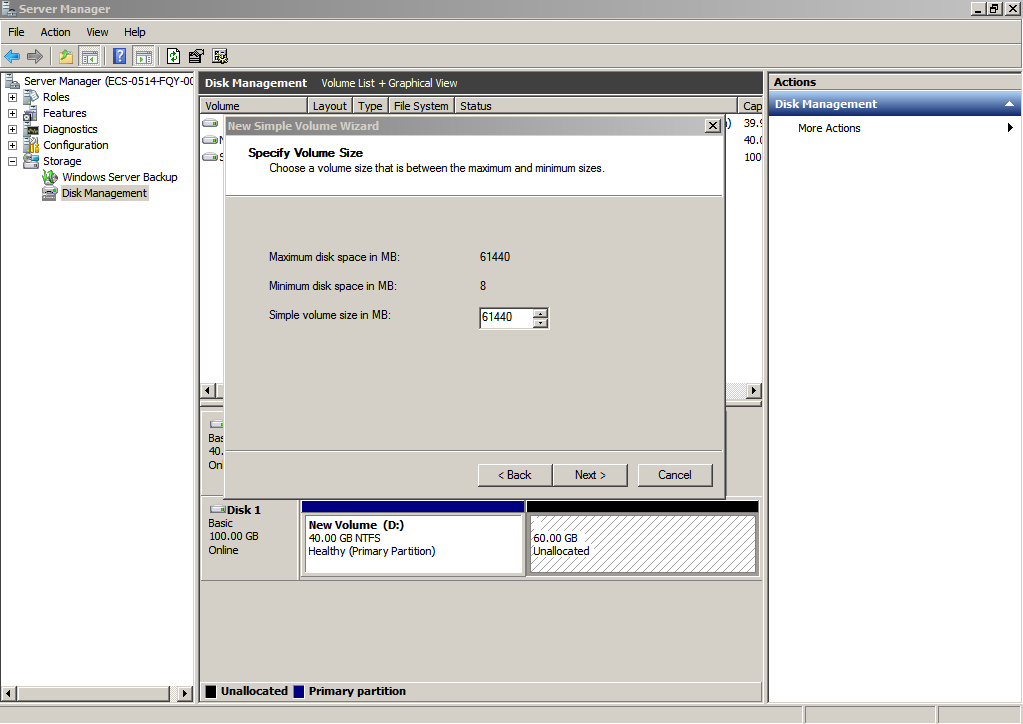
- On the displayed Specify Volume Size page, set Simple volume size in MB and click Next. In this example, the default size is used.
Figure 35 Specify Volume Size (data disk)
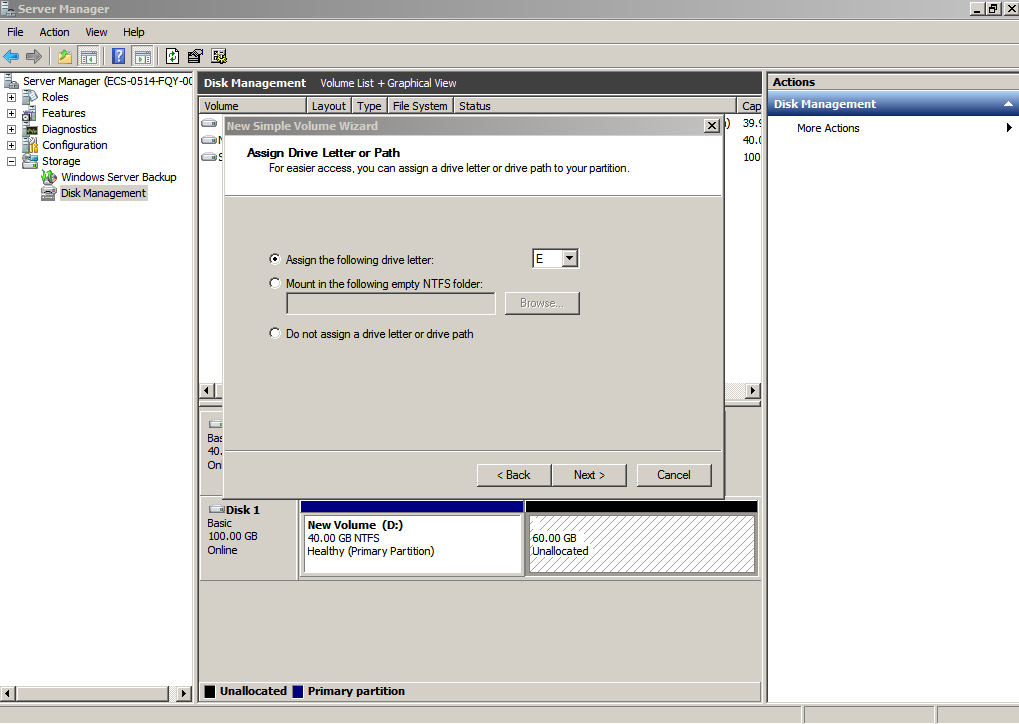
- On the displayed Assign Drive Letter and Path page, click Assign the following drive letter, select a drive letter, and click Next. In this example, drive letter E is selected.
Figure 36 Assign Drive Letter or Path (data disk)
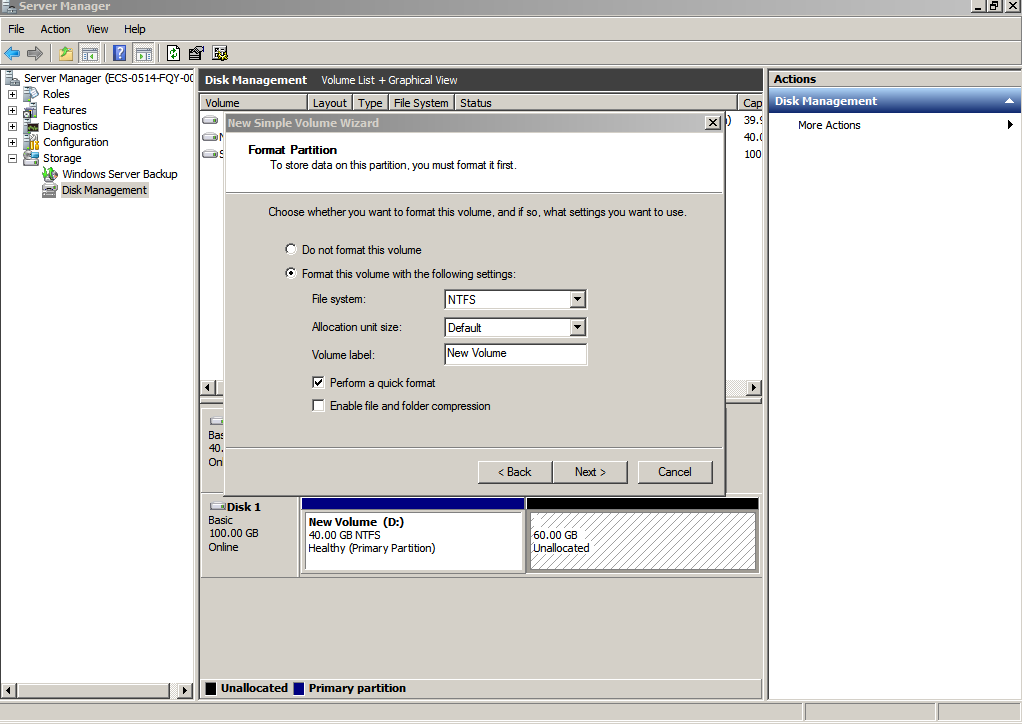
- On the displayed Format Partition page, click Format this volume with the following settings, set parameters based on the requirements, and select Perform a quick format. Then, click Next.
Figure 37 Format Partition (data disk)
- Click Finish.
After the expansion succeeded, new volume (E:) is displayed.
Figure 38 Completing the New Simple Volume Wizard (new volume E:)
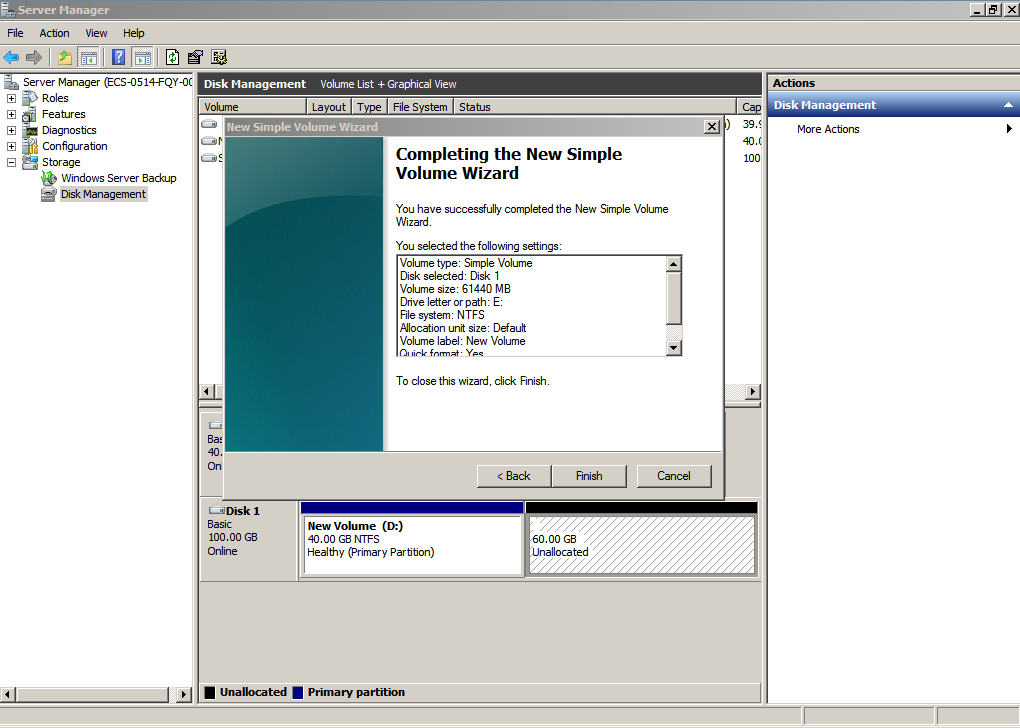
Figure 39 New Volume (E:)