Enabling NIC Multi-Queue
Scenarios
With the increase of network I/O bandwidth, single-core CPUs face bottlenecks in handling network interrupts. NIC multi-queue assigns interrupts to different CPUs for higher packets per second (PPS) and bandwidth.
The ECS described in this section is assumed to comply with the requirements on specifications and virtualization type.
- If the ECS was created using a public image listed in Support of NIC Multi-Queue, NIC multi-queue has been enabled on the ECS by default. Therefore, you do not need to perform the operations described in this section.
- If the ECS was created using a private image and the OS of the external image file is listed in Support of NIC Multi-Queue, perform the following operations to enable NIC multi-queue:
- Importing the External Image File to the IMS Console
- Setting NIC Multi-Queue for the Image
- Creating an ECS Using a Private Image
- Running the Script for Configuring NIC Multi-Queue
After NIC multi-queue is enabled on an ECS, you need to enable this function on the ECS again after you add or delete a NIC or change the VPC for the ECS. For details, see Running the Script for Configuring NIC Multi-Queue.
Support of NIC Multi-Queue
NIC multi-queue can be enabled on an ECS only when the ECS specifications, virtualization type, and image OS meet the requirements described in this section.
- For details about the ECS specifications that support NIC multi-queue, see ECS Specifications.Note
If the number of NIC queues is greater than 1, NIC multi-queue is supported.
- The virtualization type must be KVM.
- The Linux public images listed in Table 2 support NIC multi-queue.Note
- The PV driver of a Windows ECS dynamically adjusts the number of NIC queues based on the number of vCPUs of the ECS, and you do not need to set the number of Windows NIC multi-queues.
- Public images that contain Windows Server 2008 are no longer available. However, you can still use private images that contain Windows Server 2008.
- It is a good practice to upgrade the kernel version of the Linux ECS to 2.6.35 or later. Otherwise, NIC multi-queue is not supported.
Run the uname -r command to obtain the kernel version. If the kernel version is earlier than 2.6.35, contact customer service to upgrade the kernel.
Image | Support of NIC Multi-Queue | NIC Multi-Queue Enabled by Default |
|---|---|---|
Windows Server 2008 R2 Standard/Enterprise/DataCenter 64bit | Yes | Yes |
Windows Server 2008 Enterprise SP2 64bit | Yes | Yes |
Windows Server 2008 Web R2 64-bit | Yes | Yes |
Windows Server 2008 R2 Enterprise 64bit_WithGPUdriver | Yes | Yes |
Windows Server 2012 R2 Standard 64bit_WithGPUdriver | Yes | Yes |
Windows Server 2012 R2 Standard/DataCenter 64 bit | Yes | Yes |
Windows Server 2016 Standard/DataCenter 64 bit | Yes | Yes |
Windows Server 2019 DataCenter 64 bit | Yes | Yes |
Image | Support of NIC Multi-Queue | NIC Multi-Queue Enabled by Default |
|---|---|---|
Ubuntu 14.04/16.04/18.04/20.04 server 64bit | Yes | Yes |
OpenSUSE 42.2/15.* 64bit | Yes | Yes |
SUSE Enterprise 12 SP1/SP2 64bit | Yes | Yes |
CentOS 6.8/6.9/7.*/8.* 64bit | Yes | Yes |
Debian 8.0.0/8.8.0/8.9.0/9.0.0/10.0.0/10.2.0 64bit | Yes | Yes |
Fedora 24/25/30 64bit | Yes | Yes |
EulerOS 2.2/2.3/2.5 64bit | Yes | Yes |
Importing the External Image File to the IMS Console
For details, see "Registering an Image File as a Private Image" in Image Management Service User Guide.
Setting NIC Multi-Queue for the Image
Windows OSs have not commercially supported NIC multi-queue. If you enable NIC multi-queue in a Windows image, starting an ECS created using such an image may be slow.
Use one of the following methods to set the NIC multi-queue attribute:
Method 1:
- Log in to the management console.
- Under Computing, click Image Management Service.
- Click the Private Images tab, locate the row containing the target image, click Modify in the Operation column.
- Set the NIC multi-queue attribute of the image.
Method 2:
- Log in to the management console.
- Under Computing, click Image Management Service.
- Click the Private Images tab. In the image list, click the name of the target image to switch to the page providing details about the image.
- Click Modify in the upper right corner. In the displayed Modify Image dialog box, set the NIC multi-queue attribute.
Method 3: Add hw_vif_multiqueue_enabled to an image through the API.
- For instructions about how to obtain the token, see Calling APIs > Authentication in Image Management Service API Reference.
- For instructions about how to call an API to update image information, see "Updating Image Information (Native OpenStack API)" in Image Management Service API Reference.
- Add X-Auth-Token to the request header.
The value of X-Auth-Token is the token obtained in step 1.
- Add Content-Type to the request header.
The value of Content-Type is application/openstack-images-v2.1-json-patch.
The request URI is in the following format:
PATCH /v2/images/{image_id}
The request body is as follows:
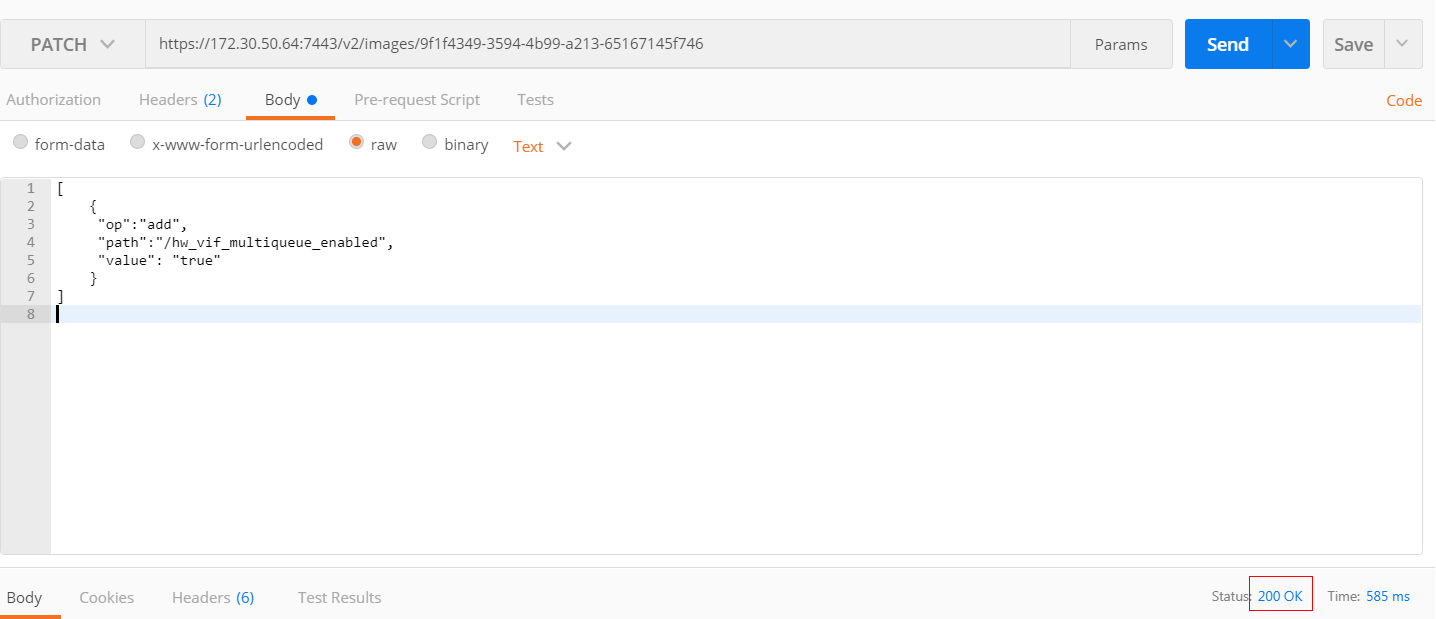
[{"op":"add","path":"/hw_vif_multiqueue_enabled","value": "true"}]Figure 1 shows an example request body for modifying the NIC multi-queue attribute.
Figure 1 Example request body
Creating an ECS Using a Private Image
You can create an ECS using a registered private image. For details, see Creating an ECS. Note the following when setting the parameters:
- Region: Select the region where the private image is located.
- Image: Click Private image and then select the desired image from the drop-down list.
Running the Script for Configuring NIC Multi-Queue
The PV driver of a Windows ECS dynamically adjusts the number of NIC queues based on the number of vCPUs of the ECS, and you do not need to set the number of Windows NIC multi-queues.
A script for automatically enabling NIC multi-queue on a Linux ECS is available. After the script is configured, the ECS supports NIC multi-queue.
The script for automatically enabling NIC multi-queue only supports eth0 NICs.
- Run the following command to download the configuration script "multi-queue-hw":
wget URL to download the script
- Run the following command to assign execution permissions to the script:
chmod +x multi-queue-hw
- Run the following command to move the multi-queue-hw script to the /etc/init.d directory:
mv multi-queue-hw /etc/init.d
- Run the following command to run the script:
/etc/init.d/multi-queue-hw start
The script takes effect immediately after being executed. However, after the ECS is stopped, NIC multi-queue disables automatically.
- Add startup configuration for each OS so that NIC multi-queue automatically enables upon the ECS startup.
- For CentOS, Red Hat, Fedora, EulerOS, SUSE, and OpenSUSE, run the following command:
chkconfig multi-queue-hw on
- For Ubuntu, run the following command:
update-rc.d multi-queue-hw defaults 90 10
- For Debian, run the following command:
systemctl enable multi-queue-hw
- For CentOS, Red Hat, Fedora, EulerOS, SUSE, and OpenSUSE, run the following command:
Viewing the Number of NIC Queues
The following uses a Linux ECS as an example to describe how to view the number of NIC queues.
- Log in to the ECS.
- Run the following command to obtain the number of queues supported by the NIC and the number of queues with NIC multi-queue enabled:
ethtool -l NIC
Example:
[root@localhost ~]# ethtool -l eth0 #View the number of queues used by NIC eth0.Channel parameters for eth0:Pre-set maximums:RX: 0TX: 0Other: 0Combined: 4 #Indicates that a maximum of four queues can be enabled for the NIC.Current hardware settings:RX: 0TX: 0Other: 0Combined: 1 #Indicates that four queues have been enabled.
- Scenarios
- Support of NIC Multi-Queue
- Importing the External Image File to the IMS Console
- Setting NIC Multi-Queue for the Image
- Creating an ECS Using a Private Image
- Running the Script for Configuring NIC Multi-Queue
- Viewing the Number of NIC Queues