Creating a Synchronization Task
Process
A complete real-time synchronization consists of creating a synchronization task, tracking task progress, analyzing synchronization logs, and comparing data consistency. By comparing multiple items and data, you can synchronize data between different service systems in real time.
A complete real-time synchronization involves the following procedures.
Figure 1 Flowchart
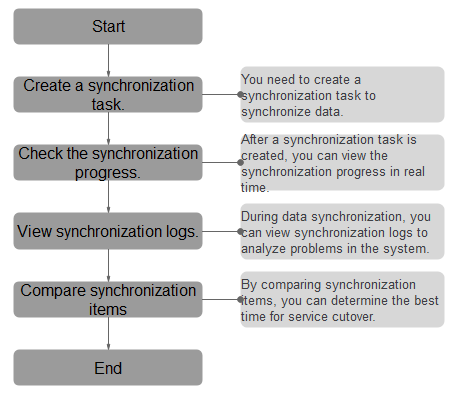
- Step 1: Create a synchronization task. Select the source and destination databases as required and create a synchronization task.
- Step 2: Check the synchronization progress. During synchronization, you can view the synchronization progress.
- Step 3: View synchronization logs. Synchronization logs contain alarms, errors, and prompt information. You can analyze system problems based on such information.
- Step 4: Compare synchronization items. You can compare objects and data to be synchronized to ensure data consistency.
This section describes how to synchronize data from a MySQL database to an RDS for MySQL database. To configure other storage engines, you can refer to the following procedures.
Procedure
- On the Data Synchronization Management page, click Create Synchronization Task.
- On the Create Synchronization Instance page, specify the task name, description, and the synchronization instance details, and click Create Now.
- Task information description
Table 1 Task information Parameter
Description
Task Name
The task name must start with a letter and consist of 4 to 50 characters. It can contain only letters, digits, hyphens (-), and underscores (_).
Description
The description consists of a maximum of 256 characters and cannot contain special characters !=<>'&"\
- Synchronization instance information
Table 2 Synchronization instance settings Parameter
Description
Data Flow
Select To the cloud. The destination database is a database in the current cloud.
Source DB Engine
Select MySQL.
Destination DB Engine
Select MySQL.
Network Type
Public network is used as an example. Available options: Public network, VPC, VPN or Direct Connect
- VPC is suitable for data synchronization between cloud databases of the same account in the same region and VPC.
- Public network is suitable for data synchronization from on-premises or external cloud databases to the destination databases bound with an EIP.
- VPN or Direct Connect is suitable for data synchronization from on-premises databases to cloud databases, between databases of different accounts in the same region on the cloud, or between databases across regions on the cloud using a VPN, Direct Connect, Cloud Connect, VPCEP, or a VPC peering connection.
Destination DB Instance
The RDS DB instance you created.
NOTE:- The destination DB instance cannot be a read replica.
- The source and destination DB instances can be the same DB instance.
Synchronization Instance Subnet
Select the subnet where the synchronization instance is located. You can also click View Subnets to go to the network console to view the subnet where the instance resides.
By default, the DRS instance and the destination DB instance are in the same subnet. You need to select the subnet where the DRS instance resides, and there are available IP addresses for the subnet. To ensure that the synchronization instance is successfully created, only subnets with DHCP enabled are displayed.
Security Group
Select a security group. You can use security group rules to allow or deny access to the instance.
Synchronization Mode
The synchronization mode supported by a DRS task. Full+Incremental is used as an example.
- Full+Incremental
This synchronization mode allows you to synchronize data in real time. After a full synchronization initializes the destination database, an incremental synchronization parses logs to ensure data consistency between the source and destination databases.
NOTE:If you select Full+Incremental, data generated during the full synchronization will be continuously synchronized to the destination database, and the source remains accessible.
- Full
All objects and data in non-system databases are synchronized to the destination database at a time. This mode is applicable to scenarios where service interruption is acceptable.
- Incremental
Through log parsing, incremental data generated on the source database is synchronized to the destination database.
Enable Binlog Cleanup
Indicates whether to enable the function of quickly clearing binlogs of the destination database. After this function is enabled, binlog clearing is enabled for the destination database during the full synchronization and disabled during the incremental synchronization.
Specify EIP
This parameter is available when you select Public network for Network Type. Select an EIP to be bound to the DRS instance. DRS will automatically bind the specified EIP to the DRS instance and unbind the EIP after the task is complete.
- Task Type
Table 3 Task type information Parameter
Description
Specifications
DRS instance specifications. Different specifications have different performance upper limits. For details, see Real-Time Synchronization.
AZ
Select the AZ where you want to create the DRS task. Selecting the one housing the source or destination database can provide better performance.
- Enterprise Project and Tags
Table 4 Enterprise Project and Tags Parameter
Description
Enterprise Project
An enterprise project you would like to use to centrally manage your cloud resources and members. Select an enterprise project from the drop-down list. The default project is default.
Tags
- Tags a task. This configuration is optional. Adding tags helps you better identify and manage your tasks. Each task can have up to 20 tags.
- After a task is created, you can view its tag details on the Tags tab. For details, see Tag Management.
NoteIf a task fails to be created, DRS retains the task for three days by default. After three days, the task automatically stops.
- Task information description
- After the synchronization instance is created, on the Configure Source and Destination Databases page, specify source and destination database information. Then, click Test Connection for both the source and destination databases to check whether they have been connected to the synchronization instance. After the connection tests are successful, select the check box before the agreement and click Next.
- Source database information
Table 5 Source database settings Parameter
Description
IP Address or Domain Name
The IP address or domain name of the source database.
Port
The port of the source database. Range: 1 – 65535
Database Username
The username for accessing the source database.
Database Password
The password for the database username. You can change the password if necessary. To change the password, perform the following operation after the task is created:
If the task is in the Starting, Full synchronization, Incremental synchronization, or Incremental synchronization failed status, in the Connection Information area on the Basic Information tab, click Modify Connection Details. In the displayed dialog box, change the password.
SSL Connection
If SSL connection is required, enable SSL on the source database, ensure that related parameters have been correctly configured, and upload an SSL certificate.
NOTE:- The maximum size of a single certificate file that can be uploaded is 500 KB.
- If SSL is disabled, your data may be at risk.
NoteThe IP address, port, username, and password of the source database are encrypted and stored in the database and the synchronization instance, and will be cleared after the task is deleted.
- Destination database information
Table 6 Destination database settings Parameter
Description
DB Instance Name
The RDS DB instance selected during synchronization task creation. This parameter cannot be changed.
Database Username
The username for accessing the destination database.
Database Password
The password for the database username. You can change the password if necessary. To change the password, perform the following operation after the task is created:
If the task is in the Starting, Full synchronization, Incremental synchronization, or Incremental synchronization failed status, in the Connection Information area on the Basic Information tab, click Modify Connection Details. In the displayed dialog box, change the password.
SSL Connection
If SSL connection is required, enable SSL on the destination database, ensure that related parameters have been correctly configured, and upload an SSL certificate.
NOTE:- The maximum size of a single certificate file that can be uploaded is 500 KB.
- If SSL is disabled, your data may be at risk.
NoteThe username and password of the destination database are encrypted and stored in the database and the synchronization instance during the synchronization. After the task is deleted, the username and password are permanently deleted.
- Source database information
- On the Set Synchronization Task page, select the conflict policy and synchronization objects, and then click Next.
Table 7 Synchronization mode and object Parameter
Description
Flow Control
You can choose whether to control the flow. Flow Control takes effect in the full phase only.
- Yes
You can customize the maximum synchronization speed. During the full synchronization, the synchronization speed of each task (or each subtask in multi-task mode) does not exceed the value of this parameter.
In addition, you can set the time range based on your service requirements. The traffic rate setting usually includes setting of a rate limiting time period and a traffic rate value. Flow can be controlled all day or during specific time ranges. The default value is Always. A maximum of 10 time ranges can be set, and they cannot overlap.
The flow rate must be set based on the service scenario and cannot exceed 9,999 MB/s.
- No
The synchronization speed is not limited and the outbound bandwidth of the source database is maximally used, which will increase the read burden on the source database. For example, if the outbound bandwidth of the source database is 100 MB/s and 80% bandwidth is used, the I/O consumption on the source database is 80 MB/s.
NOTE:- The flow control mode takes effect only in the full synchronization phase.
- You can also change the flow control mode after creating a task. For details, see Modifying the Flow Control Mode.
Incremental Conflict Policy
The conflict policy refers to the conflict handling policy during incremental synchronization. By default, conflicts in the full synchronization phase are ignored. Select any of the following conflict policies:
- Ignore
The system will skip the conflicting data and continue the subsequent synchronization process. If you select Ignore, data in the source database may be inconsistent with that in the destination database.
- Overwrite
Conflicting data will be overwritten.
Filter DROP DATABASE
During real-time synchronization, executing DDL operations on the source database may affect the synchronization performance. To reduce the risk of synchronization failure, DRS allows you to filter out DDL operations. Currently, only the delete operations on databases can be filtered by default.
- If you select Yes, the database deletion operation performed on the source database is not synchronized during data synchronization.
- If you select No, related operations are synchronized to the destination database during data synchronization.
Synchronize
Normal indexes and incremental DDLs can be synchronized. You can determine whether to synchronize normal indexes and DDLs based on service requirements.
Create Indexes Along With Table Structure
Indicates whether to create indexes along with the table structure in the full synchronization phase.
- Yes: Indexes are migrated when the table structure is migrated in the full synchronization phase.
- No: Indexes are migrated separately after data synchronization.
Synchronize DML
Select the DML operations to be synchronized. By default, all DML operations are selected.
If you do not select Delete, DELETE statements in the incremental data of the source database will not be synchronized, which may cause a data inconsistency. As a result, there may be a data conflict or the task may fail.
Start Point
This option is available if you select Incremental in 2. The logs of the source database are obtained from the position after the start point during an incremental synchronization.
Run show master status to obtain the start point of the source database and set File, Position, and Executed_Gtid_Set as prompted.
Online DDL
If table-level synchronization is selected, you can choose whether to synchronize Online DDL. By default, Online DDL is not synchronized.
- Yes: Table-level synchronization supports Online DDL synchronization. You can select three Online DDL tools including PT-OSC, GH-OST, and DMS. The regular expressions can be configured for shadow tables and useless tables in PT-OSC and GH-OST. (Default values are provided. You are advised not to change the regular expressions unless otherwise specified.)
- No: Table-level synchronization does not support Online DDL synchronization.
Synchronization Object
The left pane displays the source database objects, and the right pane displays the selected objects. You can select Tables or Databases for Synchronization Object as required.
- If the synchronization objects in source and destination databases have different names, you can map the source object name to the destination one in the right pane. For details, see Changing Object Names (Mapping Object Names).
- If the database table name contains characters other than letters, digits, and underscores (_), or the mapped database table name contains hyphens (-) and number signs (#), the name length cannot exceed 42 characters.
NOTE:- To quickly select the desired database objects, you can use the search function.
- If there are changes made to the source databases or objects, click
 in the upper right corner to update the objects to be synchronized.
- If an object name contains spaces, the spaces before and after the object name are not displayed. If there are two or more consecutive spaces in the middle of the object name, only one space is displayed.
- The name of the selected synchronization object cannot contain spaces.
- Yes
- On the Process Data page, set the filtering rules for data processing.
- If data processing is not required, click Next.
- If data processing is required, select Data filtering, Additional Columns, or Processing Columns. For details about how to configure related rules, see Processing Data.
- On the Check Task page, check the synchronization task.
- If any check fails, review the cause and rectify the fault. After the fault is rectified, click Check Again.
- If all check items are successful, click Next.Note
You can proceed to the next step only when all checks are successful. If there are any items that require confirmation, view and confirm the details first before proceeding to the next step.
- On the displayed page, specify Start Time, Send Notifications, SMN Topic, Delay Threshold (s), and Stop Abnormal Tasks After, confirm that the configured information is correct, and click Submit to submit the task.
Table 8 Task startup settings Parameter
Description
Start Time
Set Start Time to Start upon task creation or Start at a specified time based on site requirements.
NOTE:After a synchronization task is started, the performance of the source and destination databases may be affected. You are advised to start a synchronization task during off-peak hours.
Send Notifications
This parameter is optional. If the status, latency metric, or data of the migration task is abnormal, DRS will send you a notification.
SMN Topic
This parameter is available only after you enable Send Notifications and create a topic on the SMN console and add a subscriber.
- After the task is submitted, you can view and manage it on the Data Synchronization Management page.
- You can view the task status. For more information about task status, see Task Statuses.
- You can click
 in the upper right corner to view the latest task status.
 - By default, DRS retains a task in the Configuration state for three days. After three days, DRS automatically deletes background resources, but the task status remains unchanged. When you configure the task again, DRS applies for resources for the task again. In this case, the IP address of the DRS instance changes.
- For a public network task, DRS needs to delete background resources after you stop the task. The EIP bound to the task cannot be restored to the Unbound state until background resources are deleted.
- Process
- Procedure