Authorization based on user tags is useful when dealing with a large number of users or user groups. This approach enables authorization for users who share the same label. This simplifies authorization for a large number of users and implements more efficient and convenient field-level authorization management.
Procedure
- Add a user or user group tag and assign a value.
This tag is used for authorization based on user tags when setting row permissions.
After adding a user tag, select one or more users and assign values to the user tag.
- Use the user tag for authorization.
After authorization, managing the tag values in the tag table apply to all datasets. The users who have the permission can view only the data within the permission scope.
Step 1: Add a User or User Group Tag
- Click
 in the upper left corner to select a region.
 - Click System Settings on the left of the console.
- In the navigation pane on the left, choose Organization Management > Tag Management. On the displayed tab page, click Add Tag.
- Set Tag Name and Description.
- Click Confirm to save the tag.
- After the tag is set, assign a tag value to the user or user group.
Double-click the text box of the tag value, enter the tag value, and press Enter.
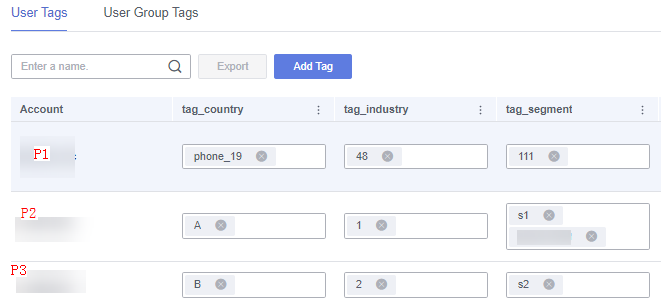
Example: Add user tags country, industry, and segment based on dataset authorization requirements.
Assign tags to users P1, P2, and P3, as shown in Figure 1.
Figure 1 Example of user tags
Step 2: Use the Tag for Authorization
- Click
 in the upper left corner to select a region.
 - In the lower left corner of the navigation pane, select an enterprise project from Enterprise Project.
- In the project list on the console, click a project to go to the project page.
- Choose Data Management > Dataset.
- Click More > Row Permissions in the Operation column of the target dataset.
- Enable the row permission switch.
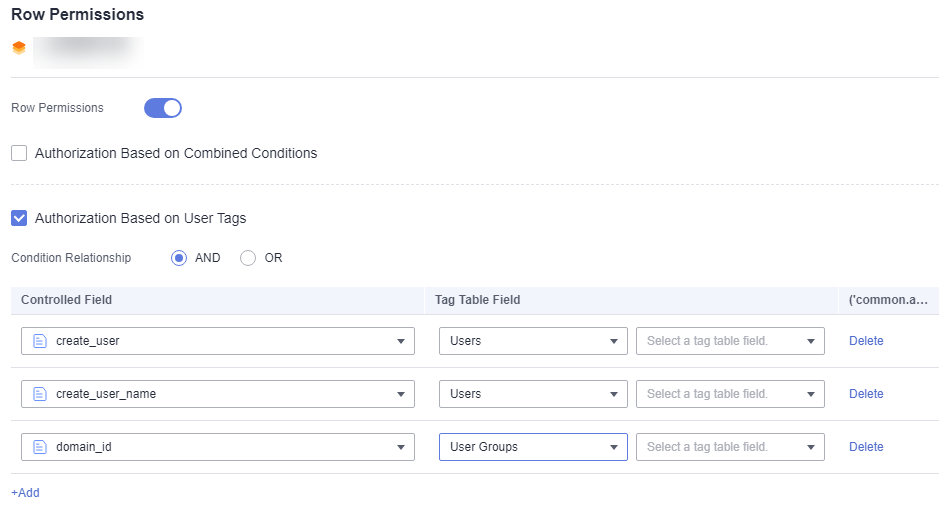
- Select Authorization Based on User Tags.
- Select a condition relationship.
- AND: If multiple user tag authorization rules are configured, user P1 can view the data that falls under the intersection of country=A, industry=1, and segment=s1.
- OR: If multiple user tag authorization rules are configured, user P1 can view the data that falls under the union set of country=A, industry=1, and segment=s1.
- Click Add to edit a user tag authorization rule.
- Select the Controlled Field.
- Select the Tag Table Field.
As shown in Figure 2, after a user tag authorization rule is configured for the country field, users with the tag_country tag can view only the data of the country field of the tag value.
For example, if tag_country of user P1 is A, user P1 can view only the data whose country is A in the country field.
- After editing the rules, click OK to save them.
Figure 2 Example of user tag authorization rules
Querying Data with and Without Row Permission Configuration for a User Group
- Row permissions are not set.
To query a dataset, follow these steps:
- Click
 in the upper left corner to select a region.
 - In the lower left corner of the navigation pane, select an enterprise project from Enterprise Project.
- In the My Projects area on the right of the console, click the target project.
- Choose Datasets and click the target dataset.
- If row permissions are not set, different cities and provinces are displayed in the city and province columns in the data preview table.
- Click
- The row permissions are set and the condition relationship is set to OR.
To query a dataset, follow these steps:
- Click
 in the upper left corner to select a region.
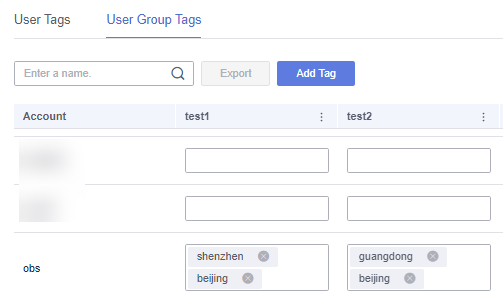
 - On the System Settings page, choose Tag Management > User Group Tags to set the city and province. Double-click the text box of the tag value in the city and province columns, enter the tag value, and press Enter.
Figure 3 User group tag settings
- In the lower left corner of the navigation pane, select an enterprise project from Enterprise Project.
- In the My Projects area on the right of the console, click the target project.
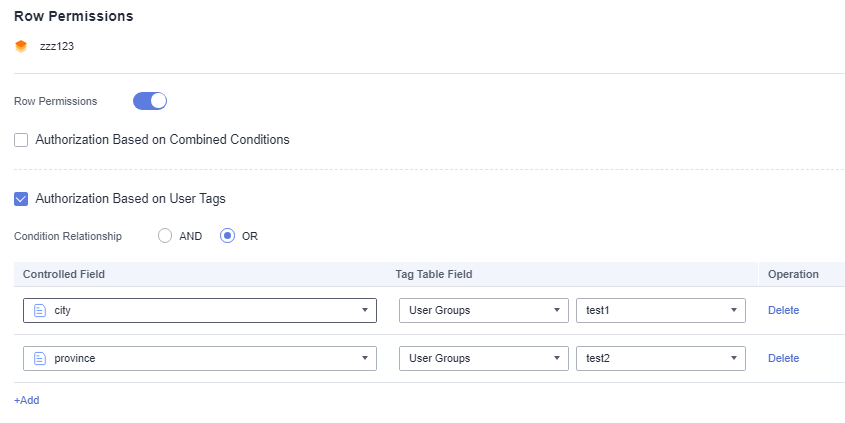
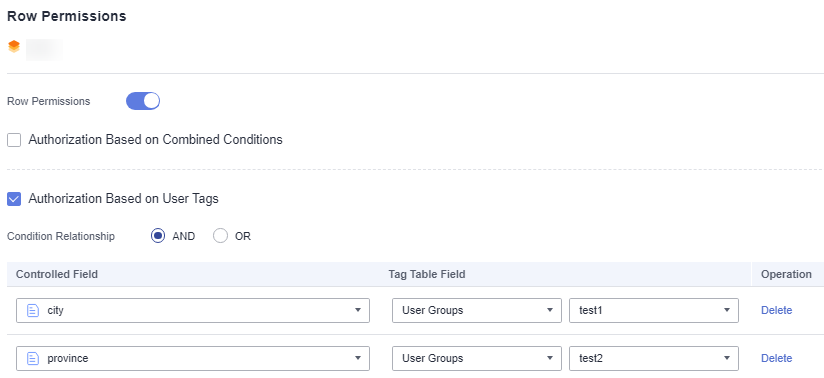
- On the project homepage, click Datasets, choose More > Row Permissions in the Operation column of the target dataset, and set the controlled fields city and province.
Figure 4 Row permission settings
- Return to the dataset page and view the target dataset.
- View the query result. You can see that only the configured province data is displayed in the data preview table of the dataset with row permissions configured
- Click
- The row permissions are set and the condition relationship is set to AND.
To query a dataset, follow these steps:
- Click
 in the upper left corner to select a region.
 - On the System Settings page, choose Tag Management > User Group Tags to set the city and province. Double-click the text box of the tag value in the city and province columns, enter the tag value, and press Enter.
Figure 5 User group tag settings

- In the lower left corner of the navigation pane, select an enterprise project from Enterprise Project.
- In the My Projects area on the right of the console, click the target project.
- On the project homepage, click Datasets, choose More > Row Permissions in the Operation column of the target dataset, and set the controlled fields city and province.
Figure 6 Row permission settings
- Return to the dataset page and view the target dataset.
- View the query result. You can see that only the configured province data is displayed in the data preview table of the dataset with row permissions configured
- Click