Migrating ClickHouse Data
This section describes the data migration capability.
Application Scenarios
Once you have performed a node scale-out in ClickHouse, a data migration is necessary.
Precautions
- Tables with partitions exceeding 50 GB do not support migration on the GUI and require manual migration.
- The table intended for migration must contain data, and a unique partitioning key must be defined. Empty tables or tables with multiple partitioning keys cannot be selected when creating a migration task.
- Each data table is limited to a single task. A cluster can only execute one task at a time.
- The local table's database must be either atomic (the default) or ordinary, and the table itself should be from the Mergetree family of engine tables, which includes both replicated and non-replicated types. Materialized view charts are not compatible.
- The backup relationship for local tables mirrors that of clusters. In the context of shards, distributed tables are utilized.
- By default, the original table becomes read-only during data migration.
- Initially, data is moved to a temporary table. Subsequently, the original table is swapped with the table containing the migrated data. This transition, which may result in reading incorrect data, is completed within seconds.
- Should cluster issues arise, the data migration process can be paused. After addressing the reported error in the cluster, the migration task can resume.
- The source and redistribution nodes involved in data migration must share identical tables.
- Data migration is not supported on a single node system.
Creating a Data Migration Task for Automatic Data Migration
Prerequisite: The data volume of the partitioned table is less than 50 GB.
- Log in to the CloudTable console.
- Select a region in the upper left corner.
- Go to the Cluster Management page and click a cluster name to go to the cluster details page.
- In the navigation pane, choose Data Migration.
Table 1 Data migration parameters Parameter
Description
Task ID/Name
ID or name of the new migration task.
Logical Cluster
Name of the selected logical cluster.
Source Nodes
Node where data is stored.
Distribution Nodes
Node where data is distributed.
Status/Progress
Status/Progress of data distribution.
The task can be in the initializing, running, or completed state.
Created
Task creation time.
Start Time
Task start time.
Update Time
Task modification time.
Operation
- Start: Start the task.
- Edit: Edit task information.
- Cancel: Cancel the task.
- Details: View task details.
- Delete: Delete the task.
- Click New Task in the upper left corner.
- Enter a task name (starting with a letter).
- Select a logical cluster.
- Select the migration percentage.
- Select the source node.
- Select a redistribution node.
- Select the data table to be migrated.
- Click OK to create the task.
- Click Start in the Operation column to start the created task.
Manually Migrating Data
Prerequisites: The data volume of the partitioned table is greater than 50 GB.
- Step 1: Create a distributed table and a local table.
- Use the SSH tool to access the target cluster. For details, see Installing the ClickHouse Client.
- Go to the command window and create a database.CREATE DATABASE IF NOT EXISTS test_fetch on cluster default_cluster;
- Use the database.USE test_fetch;
- Create a local table.CREATE TABLE IF NOT EXISTS test_fetch.example_table on cluster default_cluster (d DateTime, a Int) ENGINE = ReplicatedMergeTree('/clickhouse/tables/{shard}/test_fetch/example_table', '{replica}') PARTITION BY toYYYYMM(d) ORDER BY d;
- Create a distributed table.CREATE TABLE IF NOT EXISTS test_fetch.example_table_dist ON CLUSTER default_cluster (d DateTime, a Int) ENGINE = Distributed('default_cluster', 'test_fetch', 'example_table', rand());
- Insert data into the distributed table and local table on shard 1. Consequently, all shards now contain data of 202306, 202307, and 202308, while only shard 1 contains data of 202309 and 2023010.INSERT INTO test_fetch.example_table_dist select '2023-06-20',rand64() from numbers(1000);INSERT INTO test_fetch.example_table_dist select '2023-07-20',rand64() from numbers(1000);INSERT INTO test_fetch.example_table_dist select '2023-08-20',rand64() from numbers(1000);INSERT INTO test_fetch.example_table select '2023-09-20',rand64() from numbers(1000);INSERT INTO test_fetch.example_table select '2023-10-20',rand64() from numbers(1000);
- Step 2: Migrate data between partitions using the fetch partition command. (Migrate data from partition 1 to partition 2.)
- Select the shard and partition of the data to be migrated.SELECTpartition AS `Partition name`,formatReadableSize(sum(data_uncompressed_bytes)) AS `Uncompressed size`,formatReadableSize(sum(data_compressed_bytes)) AS `Compressed size`,sum(rows) AS `Total number of rows`FROM system.partsWHERE (active = 1) AND (database = 'test_fetch') AND (table = 'example_table')GROUP BY partitionORDER BY partition DESC;
The execution result is displayed.
┌─Partition Name─┬─Uncompressed Size─┬─Compressed Size─┬─Rows─┐│ 202308 │ 3.81 KiB │ 1.98 KiB │ 488 ││ 202307 │ 4.12 KiB │ 2.14 KiB │ 527 ││ 202306 │ 3.88 KiB │ 2.02 KiB │ 496 │└──────────┴────────────┴────────────┴────────┘ - Execute the fetch partition command on any node within the target shard to retrieve the partition data. Subsequently, execute the attach partition command to incorporate the partition 202309 from the source shard and synchronize the data with the corresponding partition on the current shard.ALTER TABLE test_fetch.example_table FETCH PARTITION '202309' FROM '/clickhouse/tables/1/test_fetch/example_table/';
1 in '/clickhouse/tables/1/test_fetch/example_table/ indicates shard 1. You can change the value as required.
Load the data obtained from the source shard to the current shard.
ALTER TABLE test_fetch.example_table ATTACH PARTITION '202309';NoteDuring the migration process, if the target partition node displays a message indicating the presence of an existing detached partition, you can query the detached_parts system table to verify the partition's existence. If the partition already exists and contains redundant or inconsistent data, proceed to delete it. If the partition is required for other purposes, skip the migration of this specific partition and continue with the remaining partitions.
SELECT * FROM system.detached_parts WHERE table = 'example_table' AND partition_id = '202309';ALTER TABLE test_fetch.example_table DROP DETACHED PARTITION '202309' SETTINGS allow_drop_detached = 1;
- Select the shard and partition of the data to be migrated.
- Step 3: Verify the result.
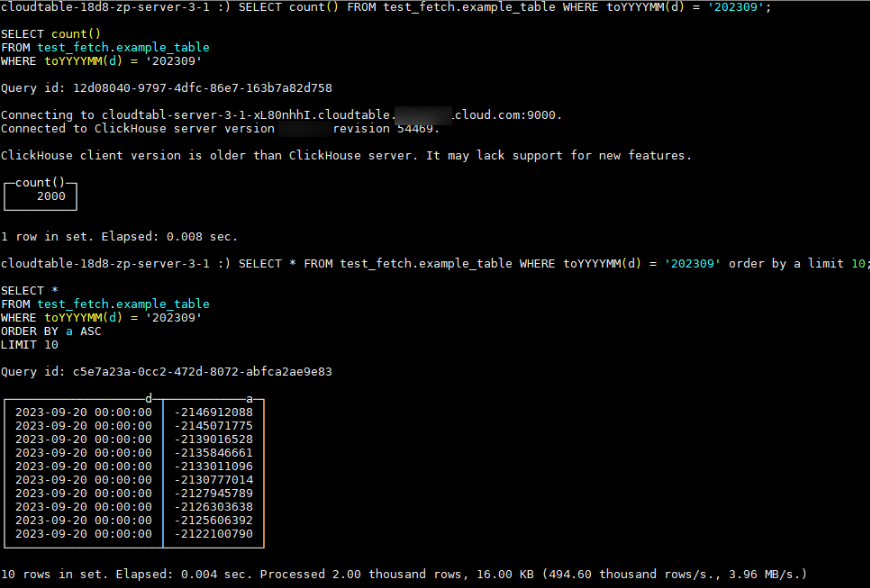
- Check the number of data rows and sample data content.SELECT count() FROM test_fetch.example_table WHERE toYYYYMM(d) = '202309';SELECT * FROM test_fetch.example_table WHERE toYYYYMM(d) = '202309' order by a limit 10;
Results display
- Delete the corresponding partition on the source shard to deduplicate data.
- Method 1: Connect to the source shard to delete the data partition.ALTER TABLE test_fetch.example_table DROP PARTITION '202309';
- Method 2: Detach the data.ALTER TABLE test_fetch.example_table DETACH PARTITION '202309';Note
If a message appears indicating that the partition data cannot be deleted due to its size exceeding 50 GB, configure the following parameters and attempt to delete the partition again.
set max_table_size_to_drop=0;set max_partition_size_to_drop=0;
- Following the deletion of the partition on the source shard, query the distributed table within the source shard and the local table within the target shard.SELECT count() FROM test_fetch.example_table_dist WHERE toYYYYMM(d) = '202309';SELECT count() FROM test_fetch.example_table WHERE toYYYYMM(d) = '202309';
- Method 1: Connect to the source shard to delete the data partition.
- Check the number of data rows and sample data content.
Modifying a Data Migration Task
- Log in to the CloudTable console.
- Go to the Cluster Management page and click a cluster name to go to the cluster details page.
- Choose Data Migration.
- Click Edit in the Operation column.
- After modifying the parameters, click OK.
Viewing Migration Task Details
- Log in to the CloudTable console.
- Go to the Cluster Management page and click a cluster name to go to the cluster details page.
- Choose Data Migration.
- Click Details in the Operation column to access the task details page.
- View task information.
Deleting a Migration Task
- Log in to the CloudTable console.
- Go to the Cluster Management page and click a cluster name to go to the cluster details page.
- Choose Data Migration.
- Click Delete in the Operation column. In the displayed dialog box, click OK to delete the task.
- Application Scenarios
- Precautions
- Creating a Data Migration Task for Automatic Data Migration
- Manually Migrating Data
- Modifying a Data Migration Task
- Viewing Migration Task Details
- Deleting a Migration Task