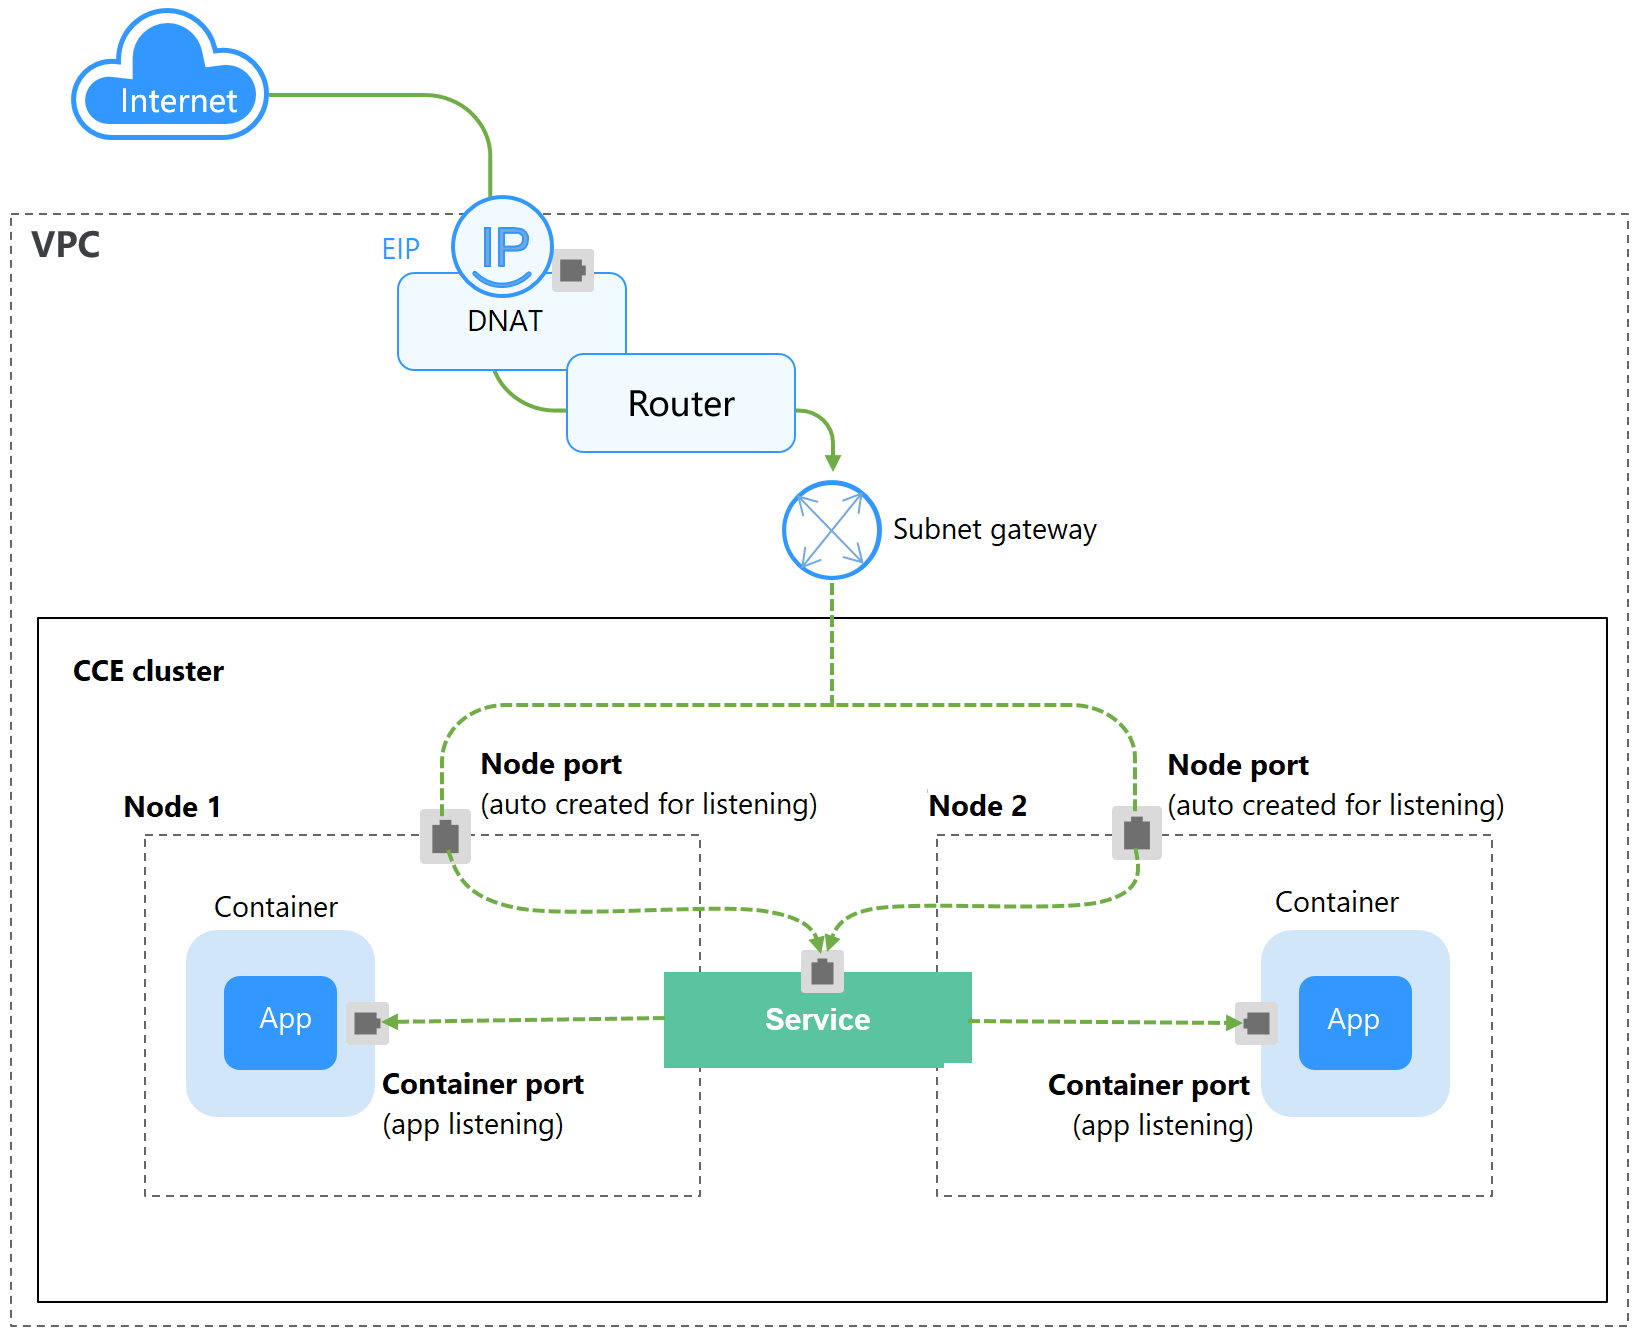
A DNAT Service provides Network Address Translation (NAT) for all nodes in a cluster so that multiple nodes can share an EIP. The access address of a DNAT Service is in the format of <EIP-of-the-NAT-gateway>:<access-port>, for example, 10.117.117.117:80.
If pods require temporary access from the Internet or the traffic is low, you can create a DNAT Service. DNAT Services provide higher reliability than NodePort Services. With a DNAT Service, there is no need to bind an EIP to a single node, and requests can still be distributed to the workload even any of the nodes inside is down.
Figure 1 DNAT Service
Constraints
Observe the following constraints when using the NAT Gateway service:
- DNAT rules do not support enterprise project authorization.
- Containers in the cluster cannot access the DNAT Service whose externalTrafficPolicy is Local.
- Multiple rules for one NAT gateway can use the same EIP, but the rules for different NAT gateways must use different EIPs.
- Each VPC can have only one NAT gateway.
- Users cannot manually add the default route in a VPC.
- Only one SNAT rule can be added to a subnet in a VPC.
- SNAT and DNAT rules are designed for different functions. If SNAT and DNAT rules use the same EIP, resource preemption will occur. An SNAT rule cannot share an EIP with a DNAT rule with Port Type set to All ports.
- DNAT rules do not support binding an EIP to a virtual IP address.
- When both the EIP and NAT Gateway services are configured for a server, data will be forwarded through the EIP.
- The custom CIDR block must be a subset of the VPC subnet CIDR blocks.
- The custom CIDR block must be a CIDR block of Direct Connect and cannot conflicts with VPC's existing subnet CIDR blocks.
- When you perform operations on underlying resources of an ECS, for example, changing its specifications, the configured NAT gateway rules become invalid. Delete the rules and reconfigure them.
- After a Service is created, if the affinity setting is switched from the cluster level to the node level, the connection tracing table will not be cleared. Do not modify the Service affinity setting after the Service is created. To modify it, create a Service again.
- If the node subnet is associated with a custom route table, add the NAT route to the custom route table when using the DNAT Service.
Preparations: Creating a NAT Gateway and an EIP
You have purchased a NAT gateway and an EIP. The specific procedure is as follows:
- Log in to the NAT Gateway console and click Buy Public NAT Gateway in the upper right corner.
After purchasing a NAT gateway, you do not need to add SNAT or DNAT rules.
NoteWhen purchasing a NAT gateway, ensure that the NAT gateway belongs to the same VPC and subnet as the CCE cluster where the workload is running.
- Log in to the EIP console and click Buy EIP in the upper right corner.
Using the CCE Console
- Log in to the CCE console and click the cluster name to access the cluster console.
- In the navigation pane, choose Services & Ingresses. In the upper right corner, click Create Service.
- Configure DNAT gateway parameters.
Parameter
Description
Service Name
Enter a name, which can be the same as the workload name.
Service Type
Select DNAT.
Namespace
Select the namespace that the workload belongs to.
Service Affinity
Whether to route external traffic to a local node or a cluster-wide endpoint. For details, see Service Affinity (externalTrafficPolicy).
- Cluster-level: The IP addresses and ports of all nodes in a cluster can access the workload associated with the Service. However, accessing the Service may result in a performance decrease due to route redirection, and the client's source IP address may not be obtainable.
- Node-level: Only the IP address and port of the node where the workload is located can access the workload associated with the Service. Accessing the Service will not result in a performance decrease due to route redirection, and the client's source IP address can be obtained.
Selector
The Service will be associated with the workload pods based on the label and direct traffic to the pods with this label.
You can add a key and value for the pod label and click Confirm.
You can also click Reference Workload Label to use the label of an existing workload. In the dialog box displayed, select a workload and click OK.
DNAT
Select the DNAT gateway and EIP purchased in Preparations: Creating a NAT Gateway and an EIP.
Port
- Protocol: the protocol supported by the Service.
- Container Port: the listening port of the service containers. The port ranges from 1 to 65535. You need to determine the port based on the container image. For example, the default port of Nginx is 80, and the default port of MySQL is 3306.
- Service Port: the port used to access the DNAT Service. You can customize the port as required. The port ranges from 1 to 65535.
- Click OK.
Using kubectl
You can configure Service access when creating a workload using kubectl. This section uses an Nginx workload as an example to describe how to implement intra-cluster access using kubectl.
- Use kubectl to access the cluster. For details, see Accessing a Cluster Using kubectl.
- Create and edit the nginx-deployment.yaml file to configure the sample workload. For details, see Creating a Deployment. nginx-deployment.yaml is an example file name. You can rename it as needed.vi nginx-deployment.yaml
File content:
apiVersion: apps/v1kind: Deploymentmetadata:name: nginxspec:replicas: 1selector:matchLabels:app: nginxtemplate:metadata:labels:app: nginxspec:containers:- image: nginx:latestname: nginximagePullSecrets:- name: default-secret - Create and edit the nginx-nat-svc.yaml file to configure Service parameters. nginx-nat-svc.yaml is an example file name. You can rename it as needed.vi nginx-nodeport-svc.yaml
File content:
apiVersion: v1kind: Servicemetadata:name: nginx-natannotations:kubernetes.io/elb.class: dnatkubernetes.io/natgateway.id: e4a1cfcf-29df-4ab8-a4ea-c05dc860f554spec:loadBalancerIP: 10.78.42.242ports:- name: service0port: 80protocol: TCPtargetPort: 80selector:app: nginxtype: LoadBalancerTable 1 Key parameters Parameter
Mandatory
Type
Description
kubernetes.io/elb.class
Yes
String
This parameter is set to dnat, which is used to access the NAT Gateway service and add DNAT rules. This parameter cannot be modified after the resource is created.
kubernetes.io/natgateway.id
Yes
String
ID of a NAT gateway. This parameter cannot be modified after the resource is created.
How to obtain:
On the management console, click Service List and choose Networking > NAT Gateway. Click the name of the target NAT gateway to access its details page. On the Basic Information tab, find and copy the ID.
loadBalancerIP
Yes
String
Enter the EIP associated with the NAT gateway.
port
Yes
Integer
The port used to access the DNAT Service. You can customize the port as required. The port ranges from 1 to 65535.
targetPort
Yes
String
The listening port of the service containers. The port ranges from 1 to 65535. You need to determine the port based on the container image. For example, the default port of Nginx is 80, and the default port of MySQL is 3306.
type
Yes
String
NAT gateway service type must be set to LoadBalancer.
- Create a workload.kubectl create -f nginx-deployment.yaml
If information similar to the following is displayed, the workload has been created:
deployment/nginx createdCheck the created workload.
kubectl get podIf information similar to the following is displayed, the workload is running:
NAME READY STATUS RESTARTS AGEnginx-2601814895-znhbr 1/1 Running 0 15snginx-2601814895-znhbr 1/1 Running 0 15s - Create the Service.kubectl create -f nginx-nat-svc.yaml
If information similar to the following is displayed, the Service is being created:
service/nginx-nat createdCheck the created Service.
kubectl get svcIf information similar to the following is displayed, the Service has been created:
NAME TYPE CLUSTER-IP EXTERNAL-IP PORT(S) AGEkubernetes ClusterIP 10.247.0.1 <none> 443/TCP 3dnginx-nat LoadBalancer 10.247.226.2 **.**.**.** 80:30589/TCP 5snginx-nat LoadBalancer 10.247.226.2 **.**.**.** 80:30589/TCP 5s - Enter the URL, which is in the format of <EIP>:<port>, in the address bar of a browser.