This section describes how to upload local files to OBS over the Internet. These files can be texts, images, videos, or any other type of files.
Constraints
- OBS Console allows you to upload files in a batch. Up to 100 files can be uploaded at a time, with the total size of no more than 5 GB. If the file size exceeds 5 GB, but no larger than 48.8 TB, use tools (such as OBS Browser+ and obsutil) or the multipart upload of OBS SDKs and APIs for upload.
- If versioning is disabled for your bucket and you upload a new file with the same name as the one you previously uploaded to your bucket, the new file automatically overwrites the previous one and does not retain its ACL information. If you upload a new folder using the same name that was used with a previous folder in the bucket, the two folders will be merged, and files in the new folder will overwrite those with the same name in the previous folder.
- After versioning is enabled for your bucket, if the new file you upload has the same name as the one you previously uploaded to the bucket, a new file version will be added in the bucket. For details, see Versioning Overview.
Prerequisites
- At least one bucket has been created.
- If you want to classify files, you can create folders and upload files to different folders. For details, see Creating a Folder.
Procedure
- In the bucket list of OBS Console, click the required bucket to go to the Objects page.
- Go to the folder where you want to upload files and click Upload Object. The Upload Object dialog box is displayed.
- Specify the read and write permissions for the object.
- Select a storage class. If you do not specify a storage class, the objects you upload inherit the default storage class of the bucket.Note
An object can have a different storage class from its bucket. You can specify a storage class for an object when uploading it, or you can change the object storage class after the object is uploaded.
- In the Upload Object area, drag and drop the files or folders you want to upload.
You can also click add files to select files.
- Server-Side Encryption: Choose SSE-KMS or Disable. For details, see Enabling Server-Side Encryption When Uploading an Object.Note
If the bucket has server-side encryption configured, the object you upload will inherit encryption from the bucket by default.
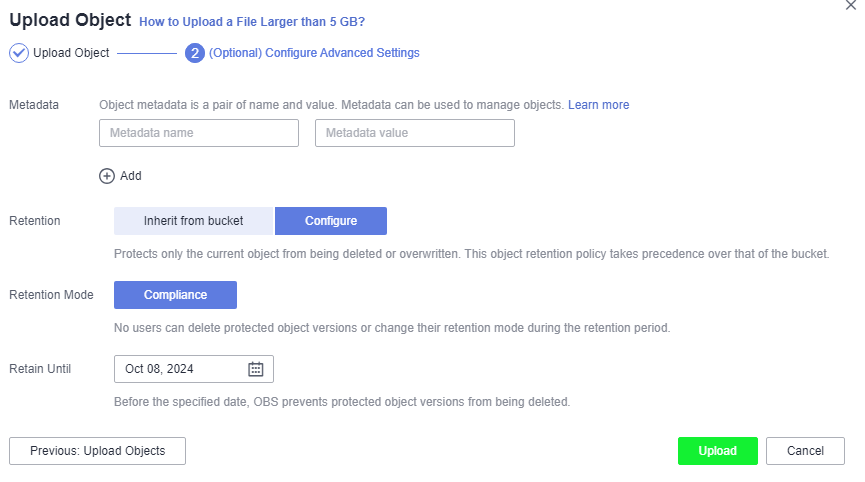
- (Optional) To configure metadata, or WORM retention policies, click Next: (Optional) Configure Advanced Settings.Note
WORM retention policies can be configured in the advanced settings only when WORM is enabled for the bucket.
Configuring metadata: Add metadata ContentDisposition, ContentLanguage, WebsiteRedirectLocation, ContentEncoding, or ContentType as needed. For more information, see Object Metadata. Metadata is a set of name-value pairs. The metadata value cannot be left blank. You can add two or more metadata entries by clicking Add.
Configuring WORM retention: Choose Inherit from bucket, or choose Configure and then specify a retention period, to automatically protect new objects uploaded to the bucket from being deleted.
Figure 1 Configuring metadata or WORM retention
- Click Upload.
Related Operations
When uploading an object, you can specify a storage class for it. After the object is uploaded, you can also change its storage class by doing as follows:
- In the bucket list of OBS Console, click the required bucket to go to the Objects page.
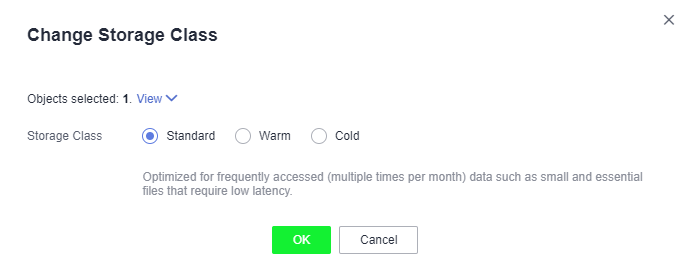
- Select the target object and choose More > Change Storage Class on the right.
You can also select multiple objects at a time and choose More > Change Storage Class above the object list, to batch change their storage classes.
- Select the desired storage class and click OK.
Figure 2 Changing a storage class
- You can manually change objects between storage classes.
- From Standard to Warm or Cold
- From Warm to Standard or Cold
- From Cold to Standard or Warm. Before changing Cold objects, you must restore them first.
- After an object is changed to Cold, its restore status changes to Unrestored.
- You can also configure a lifecycle rule to change the storage class of an object. For details, see Configuring a Lifecycle Rule.
Follow-up Procedure
You can click Copy Path on the right of an object to copy its path.
You can share the path with others. Then they can open the bucket where the object is stored and enter the path in the search box above the object list to find the object.