This section takes the example of creating a Kafka instance (ciphertext access and SASL_SSL) and accessing it on the client (private network, within a virtual private cloud (VPC)) for message production and consumption to get you quickly started with Distributed Message Service (DMS) for Kafka.
Figure 1 Procedure for using DMS for Kafka
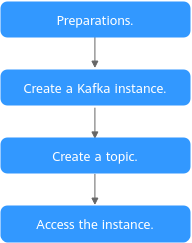
- Step 1: Preparations
A Kafka instance runs in a virtual private cloud (VPC). Before creating a Kafka instance, ensure that a VPC is available.
After a Kafka instance is created, download and install the Kafka open-source client on your ECS before producing and consuming messages.
- Step 2: Create a Kafka Instance
You can select the specification and quantity, and enable ciphertext access and SASL_SSL when creating a Kafka instance.
When connecting to a Kafka instance with SASL_SSL enabled, SASL is used for authentication. Data is encrypted with SSL certificates for high-security transmission.
- Step 3: Create a Topic
Topics store messages created by producers and subscribed by consumers.
This section uses the example of creating a topic on the console.
- Step 4: Connect to a Kafka Instance to Produce and Consume Messages
Before connecting to a Kafka instance with SASL_SSL enabled, download the certificate and configure the connection in the client configuration file.
Step 1: Preparations
- Grant Kafka instance permissions.
To achieve fine-grained management of your cloud resources, create Identity and Access Management (IAM) user groups and users and grant specified permissions to the users. For more information, see Creating an IAM User and Granting DMS for Kafka Permissions.
- Create a VPC and subnet.
Before creating a Kafka instance, ensure that a VPC and a subnet are available. For details about how to create a VPC and a subnet, see Creating a VPC.
The VPC must be created in the same region as the Kafka instance.
- Create a security group and add security group rules.
Before creating a Kafka instance, ensure that a security group is available. For details about how to create a security group, see Creating a Security Group.
The security group must be created in the same region as the Kafka instance.
To connect to Kafka instances, add the security group rules described in Table 1. Other rules can be added based on site requirements.
Table 1 Security group rulesDirection
Protocol
Port
Source address
Description
Inbound
TCP
9093
0.0.0.0/0
Accessing a Kafka instance over a private network within a VPC (in ciphertext)
NoteAfter a security group is created, it has a default inbound rule that allows communication among ECSs within the security group and a default outbound rule that allows all outbound traffic. If you access your Kafka instance using the private network within a VPC, you do not need to add the rules described in Table 1.
- Construct a client for message production and consumption.
This section uses a Linux elastic cloud server (ECS) as the client. Before creating a Kafka instance, create an ECS with an EIP, install the JDK, configure environment variables, and download an open-source Kafka client.
- Log in to the console, click
 in the upper left corner, click Elastic Cloud Server under Computing, and then create an ECS.
For details about how to create an ECS, see Creating an ECS. If you already have an available ECS, skip this step.
- Log in to an ECS as user root.
- Install Java JDK and configure the environment variables JAVA_HOME and PATH.
- Download a JDK.Note
Use Oracle JDK instead of ECS's default JDK (for example, OpenJDK), because ECS's default JDK may not be suitable. Obtain Oracle JDK 1.8.111 or later from Oracle's official website.
- Decompress the JDK.tar -zxvf jdk-8u321-linux-x64.tar.gz
Change jdk-8u321-linux-x64.tar.gz to your JDK version.
- Open the .bash_profile file.vim ~/.bash_profile
- Press i and add the following content.export JAVA_HOME=/root/jdk1.8.0_321export PATH=$JAVA_HOME/bin:$PATH
Change /root/jdk1.8.0_321 to the path where you install JDK.
- Press Esc. Enter the following line and press Enter. Save the .bash_profile file and exit.:wq
- Run the following command to make the change take effect:source .bash_profile
- Check whether the JDK is installed.java -version
If the following message is returned, the JDK is installed.
java version "1.8.0_321"
- Download a JDK.
- Download an open-source Kafka client.wget https://archive.apache.org/dist/kafka/2.7.2/kafka_2.12-2.7.2.tgz
- Run the following command to decompress the package:tar -zxf kafka_2.12-2.7.2.tgz
- Log in to the console, click
Step 2: Create a Kafka Instance
- Log in to the Kafka console, then click Buy Kafka Instance in the upper right corner of the page.
- Specify the basic instance settings. For details, see Table 2.Table 2 Basic instance settings
Parameter
Description
Billing Mode
Select Pay-per-use, which is a postpaid mode. You can pay after using the service, and will be billed for your usage duration. The fees are calculated in seconds and settled by hour.
Region
DMS for Kafka in different regions cannot communicate with each other over an intranet. Select a nearest location for low latency and fast access.
Select RU-Moscow.
Project
Projects isolate compute, storage, and network resources across geographical regions. For each region, a preset project is available.
Select RU-Moscow (default).
AZ
An AZ is a physical region where resources use independent power supply and networks. AZs are physically isolated but interconnected through an internal network.
Select AZ1, AZ2, and AZ3.
Instance Name
You can customize a name that complies with the rules: 4–64 characters; starts with a letter; can contain only letters, digits, hyphens (-), and underscores (_).
Enter kafka-test.
Enterprise Project
This parameter is for enterprise users. An enterprise project manages project resources in groups. Enterprise projects are logically isolated.
Select default.
Version
Kafka version. Cannot be changed once the instance is created.
Select 2.7.
Broker Flavor
Select a broker flavor as required.
Select kafka.2u4g.cluster.
Brokers
Specify the number of brokers as required.
Enter 3.
Storage Space per Broker
Select the disk type and specify the disk size as required. Note: The disk capacity can only be set to an integer multiple of 100.
Total storage space = Storage space per broker × Broker quantity. After the instance is created, you cannot change the disk type.
Select Ultra-high I/O and enter 100.
Capacity Threshold Policy
Select Automatically delete: When the disk reaches the disk capacity threshold (95%), messages can still be produced and consumed, but the earliest 10% of messages will be deleted to ensure sufficient disk space. Use this policy for services intolerant of interruptions. However, data may be lost.
- Configure the instance network. For details, see Table 3.
- Set the instance access mode. For details, see Table 4.Table 4 Setting the instance access mode
Parameter
Sub-Parameter
Description
Private Network Access
Plaintext Access
Skip it.
Ciphertext Access
When this parameter is enabled, SASL authentication is required when a client connects to the Kafka instance.
- Ciphertext Access is enabled.
- SASL_SSL is selected. Username and Password can be set. Enter "test" for the username. The username cannot be changed once ciphertext access is enabled.
A username should contain 4 to 64 characters, start with a letter, and contain only letters, digits, hyphens (-), and underscores (_).
A password must meet the following requirements:
- Contains 8 to 32 characters.
- Contains at least three types of the following characters: uppercase letters, lowercase letters, digits, and special characters `~!@#$%^&*()-_=+\|[{}];:'",<.>? and spaces, and cannot start with a hyphen (-).
- Cannot be the username spelled forwards or backwards.
- SASL/PLAIN is enabled.
Private IP Addresses
Select Auto: The system automatically assigns IP addresses from the subnet.
Public Network Access
-
Skip it.
- Skip Advanced Settings.
- Click Buy.
- Confirm the instance information and then submit the request.
- Click Back to DMS for Kafka List and check whether the instance has been created.
It takes 3 to 15 minutes to create an instance. During this period, the instance status is Creating.
- If the instance is created successfully, its status changes to Running.
- If the instance is in the Failed state, delete it and try creating another one. If the instance creation fails again, contact customer service.Note
Instances that fail to be created do not occupy other resources.
- After the instance is created, click its name to go to the instance details page.
- In the Connection area, hover over the connection domain name to view and record the IP address.
Figure 2 Kafka instance addresses (private network) for intra-VPC access

Step 3: Create a Topic
- On the Kafka Instances page, click a Kafka instance.
- In the navigation pane, choose Instance > Topics.
- Click Create Topic.
- Enter the topic name, specify other parameters by referring to Table 5, and click OK.Table 5 Topic parameters
Parameter
Description
Topic Name
Customize a name that contains 3 to 200 characters, starts with a letter or underscore (_), and contains only letters, digits, periods (.), hyphens (-), and underscores (_).
The name must be different from preset topics:
- __consumer_offsets
- __transaction_state
- __trace
- __connect-status
- __connect-configs
- __connect-offsets
- __cloud_event
- __site_event
- __dms_dial_test
- __remote_log_metadata
- __remote_log_compact_metadata
- __remote_log_metadata_offset
Cannot be changed once the topic is created.
Enter topic-01.
Partitions
If the number of partitions is the same as that of consumers, the larger the partitions, the higher the consumption concurrency.
Enter 3.
Replicas
Data is automatically backed up to each replica. When one Kafka broker becomes faulty, data is still available. A higher number of replicas delivers higher reliability.
Enter 3.
Aging Time (h)
How long messages will be preserved in the topic. Messages older than this period cannot be consumed. They will be deleted, and can no longer be consumed.
Enter 72.
Synchronous Replication
Skip it. When this option is disabled, leader replicas are independent from follower replica synchronization. They receive messages and write them to local logs, then immediately send the successfully written ones to the client.
Synchronous Flushing
Skip it. When this option is disabled, messages are produced and stored in memory instead of written to the disk immediately.
Message Timestamp
Select CreateTime: time when the producer created the message.
Max. Message Size (bytes)
Maximum batch processing size allowed by Kafka. If message compression is enabled in the client configuration file or code of producers, this parameter indicates the size after compression.
Enter 10,485,760.
Description
Skip it.
Step 4: Connect to a Kafka Instance to Produce and Consume Messages
- Prepare the file for production and consumption configuration.
- Log in to a Linux ECS.
- Download the client.jks certificate and upload it to the /root directory on the ECS.
To obtain the certificate: On the Kafka console, click the Kafka instance to go to the Basic Information page. Click Download next to SSL Certificate in the Connection area. Decompress the package to obtain the client certificate file client.jks.
Note/root is the path for storing the certificate. Change it to the actual path if needed.
- Go to the /config directory on the Kafka client.cd kafka_2.12-2.7.2/config
- Add the following commands in both the consumer.properties and producer.properties files (PLAIN is used as an example).sasl.jaas.config=org.apache.kafka.common.security.plain.PlainLoginModule required \username="**********" \password="**********";sasl.mechanism=PLAINsecurity.protocol=SASL_SSLssl.truststore.location={ssl_truststore_path}ssl.truststore.password=dms@kafkassl.endpoint.identification.algorithm=
Description:
- username and password are specified when enabling ciphertext access during instance creation.
- ssl.truststore.location is the path for storing the certificate obtained in 1.b.
- ssl.truststore.password is certified by the server, which must be set to dms@kafka and cannot be changed.
- ssl.endpoint.identification.algorithm decides whether to verify the certificate domain name. In this example, leave this parameter blank, which indicates disabling domain name verification.
- Go to the /bin directory on the Kafka client.cd ../bin
- Produce messages../kafka-console-producer.sh --broker-list {connection address} --topic {topic name} --producer.config ../config/producer.properties
Description:
For example, 192.xxx.xxx.xxx:9093, 192.xxx.xxx.xxx:9093, 192.xxx.xxx.xxx:9093 are the connection addresses of the Kafka instance.
After running this command, you can send messages to the Kafka instance by entering the information as prompted and pressing Enter. Each line of content will be sent as a message.
[root@ecs-kafka bin]#./kafka-console-producer.sh --broker-list 192.xxx.xxx.xxx:9093,192.xxx.xxx.xxx:9093,192.xxx.xxx.xxx:9093 --topic topic-01 --producer.config ../config/producer.properties>Hello>DMS>Kafka!>^C[root@ecs-kafka bin]#Press Ctrl+C to cancel.
- Consume messages../kafka-console-consumer.sh --bootstrap-server {connection address} --topic {topic name} --from-beginning --consumer.config ../config/consumer.properties
Description:
Sample:
[root@ecs-kafka bin]# ./kafka-console-consumer.sh --bootstrap-server 192.xxx.xxx.xxx:9093,192.xxx.xxx.xxx:9093,192.xxx.xxx.xxx:9093 --topic topic-01 --from-beginning --consumer.config ../config/consumer.propertiesHelloKafka!DMS^CProcessed a total of 3 messages[root@ecs-kafka bin]#Press Ctrl+C to cancel.