Scenarios
IPv6 addresses are used to deal with IPv4 address exhaustion. If an ECS uses an IPv4 address, the ECS can run in dual-stack mode after IPv6 is enabled for it. Then, the ECS will have two IP addresses to access the intranet and Internet: an IPv4 address and an IPv6 address.
In some cases, an ECS cannot dynamically acquire an IPv6 address even if it meets all the requirements in Constraints. You need to configure the ECS to dynamically acquire IPv6 addresses. For public images:
- By default, dynamic IPv6 address assignment is enabled for Windows public images. You do not need to configure it. The operations in Windows Server 2012 and Windows Server 2008 are for your reference only.
- By default, Linux public images support the IPv6 protocol stack. You need to check whether dynamic assignment of IPv6 addresses is enabled. If not, enable it by referring to Linux (Automatically Enabling Dynamic Assignment of IPv6 Addresses) and Linux (Manually Enabling Dynamic Assignment of IPv6 Addresses).
Constraints
- Ensure that IPv6 has been enabled on the subnet where the ECS works.
If IPv6 is not enabled, enable it by referring to Enabling IPv6 for an ECS. Once enabled, IPv6 cannot be disabled.
- Ensure that Automatically-assigned IPv6 address is selected during ECS creation.
- After the ECS is started, its hot-swappable NICs cannot automatically acquire IPv6 addresses.
- Only one IPv6 address can be bound to a NIC.
Procedure
- Windows: Windows Server 2012/2008 is used as an example to describe how to enable dynamic assignment of IPv6 addresses in Windows, as shown in Table 1.
- Linux: Dynamic assignment of IPv6 addresses can be enabled automatically (recommended) or manually, as shown in Table 1.
If you use a private image from a CentOS 6.x or Debian ECS with IPv6 auto-assignment enabled to create an ECS in a non-IPv6 environment, the ECS may experience slow startup due to an IPv6 address assignment timeout. You can set the timeout duration for assigning IPv6 addresses by referring to Setting the Timeout Duration for IPv6 Address Assignment.
OS | Auto/Manual | Reference |
|---|---|---|
Windows Server 2012 | Auto | |
Windows Server 2008 | Auto | |
Linux | Auto (recommended) | |
Linux | Manual |
Enabling IPv6 for an ECS
After IPv6 is enabled on the subnet where the ECS works, an IPv6 CIDR block is automatically assigned to the subnet. IPv6 cannot be disabled once it is enabled.
- Log in to the management console.
- Under Computing, click Elastic Cloud Server.
- Click the target ECS to go to the ECS details page.
- In the ECS Information area, click the VPC name. The VPC list is displayed.
- Click the number in the Subnets column.
The Subnets page is displayed.
- In the subnet list, locate the target subnet and click its name.
The subnet details page is displayed.
- In the Subnet Information area, click Enable for IPv6 CIDR Block.
- Click OK.
Windows Server 2012
- Check whether IPv6 is enabled for the ECS.
Run the following command in the CMD window:
ipconfig
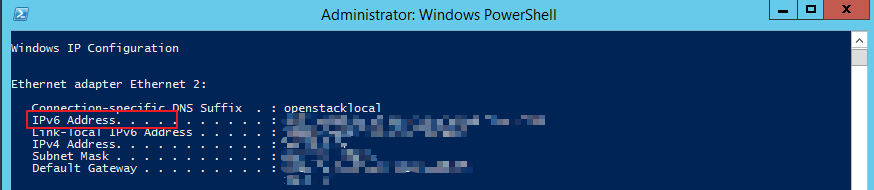
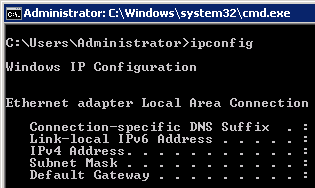
- If an IPv6 address and a link-local IPv6 address are displayed, IPv6 is enabled and dynamic IPv6 assignment is also enabled.
Figure 1 Querying the IPv6 address
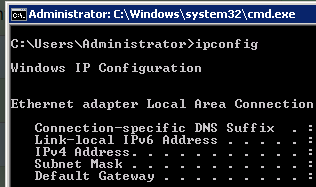
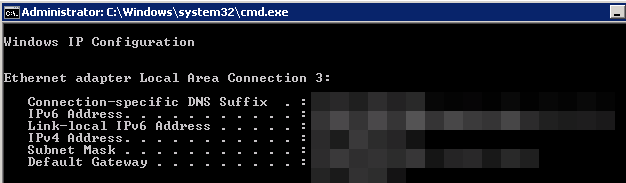
- If only a link-local IPv6 address is displayed, IPv6 is enabled but dynamic IPv6 assignment is not enabled. Go to 2.
Figure 2 Link-local IPv6 address

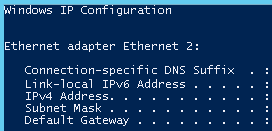
- If neither an IPv6 address nor link-local IPv6 address is displayed, IPv6 is disabled. Go to 3.
Figure 3 IPv6 disabled
 Note
NoteBy default, dynamic IPv6 address assignment is enabled for Windows public images, as shown in Figure 1. No additional configuration is required.
- If an IPv6 address and a link-local IPv6 address are displayed, IPv6 is enabled and dynamic IPv6 assignment is also enabled.
- Enable dynamic IPv6 address assignment.
- Choose Start > Control Panel.
- Click Network and Sharing Center.
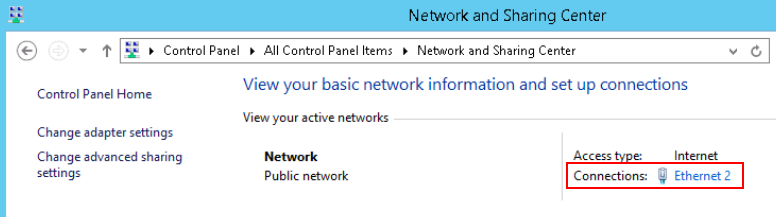
- Click the Ethernet connection.
Figure 4 Ethernet connection
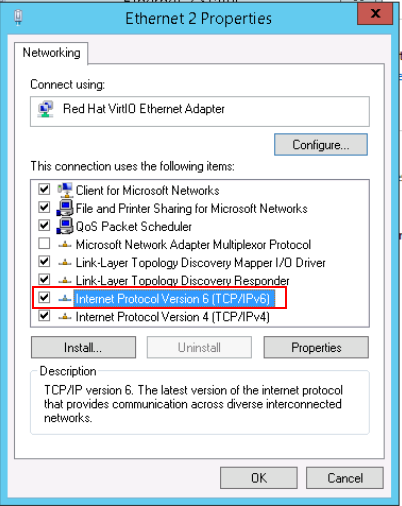
- In the Ethernet Status dialog box, click Properties in the lower left corner.
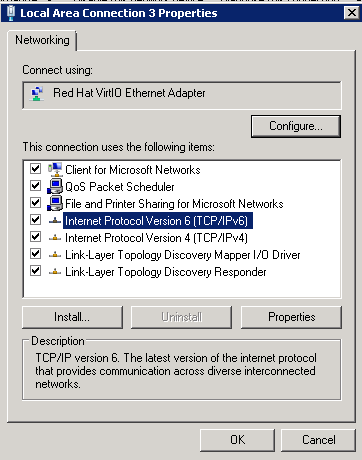
- Select Internet Protocol Version 6 (TCP/IPv6) and click OK.
Figure 5 Configuring dynamic IPv6 address assignment
- Perform 1 to check whether dynamic IPv6 address assignment is enabled.
- Enable and configure IPv6.
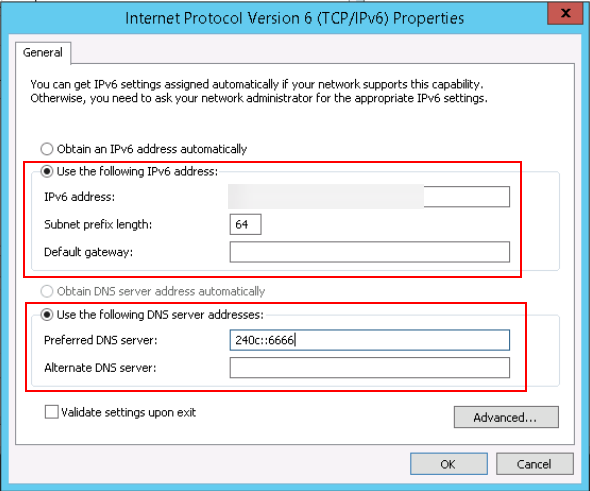
- In the Internet Protocol Version 6 (TCP/IPv6) Properties dialog box, configure an IPv6 address and a DNS server address.
- IPv6 address: IPv6 address allocated during ECS creation. Obtain the value from the ECS list on the console.
- Subnet prefix length: 64
- Preferred DNS server: 240c::6666 (recommended)
Figure 6 Configuring an IPv6 address and a DNS server address
- (Optional) Run the following command depending on your ECS OS.
For Windows Server 2012, run the following command in PowerShell or CMD:
Set-NetIPv6Protocol -RandomizeIdentifiers disabled
- Perform 1 to check whether dynamic IPv6 address assignment is enabled.
- In the Internet Protocol Version 6 (TCP/IPv6) Properties dialog box, configure an IPv6 address and a DNS server address.
Windows Server 2008
- Check whether IPv6 is enabled for the ECS.
Run the following command in the CMD window:
ipconfig
- If an IPv6 address and a link-local IPv6 address are displayed, IPv6 is enabled and dynamic IPv6 assignment is also enabled.
Figure 7 Querying the IPv6 address
- If only a link-local IPv6 address is displayed, IPv6 is enabled but dynamic IPv6 assignment is not enabled. Go to 2.
Figure 8 Link-local IPv6 address
- If neither an IPv6 address nor link-local IPv6 address is displayed, IPv6 is disabled. Go to 3.
Figure 9 IPv6 disabled
 Note
NoteBy default, dynamic IPv6 address assignment is enabled for Windows public images, as shown in Figure 7. No additional configuration is required.
- If an IPv6 address and a link-local IPv6 address are displayed, IPv6 is enabled and dynamic IPv6 assignment is also enabled.
- Enable dynamic IPv6 address assignment.
- Choose Start > Control Panel.
- Click Network and Sharing Center.
- Click Change adapter settings.
- Right-click the local network connection and choose Properties.
- Select Internet Protocol Version 6 (TCP/IPv6) and click OK.
Figure 10 Configuring dynamic IPv6 address assignment
- Perform 1 to check whether dynamic IPv6 address assignment is enabled.
- Enable and configure IPv6.
- Choose Start > Control Panel > Network Connection > Local Connection.
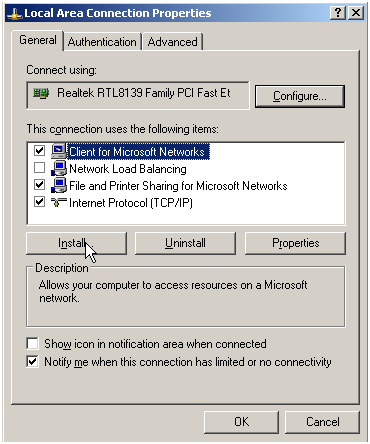
- Select Properties, select the following options, and click Install.
Figure 11 Enabling and configuring IPv6
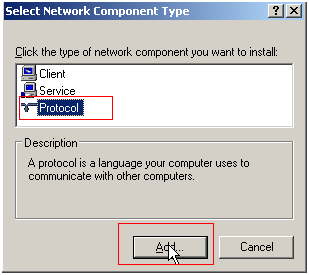
- Select Protocol and click Add.
Figure 12 Adding the protocol
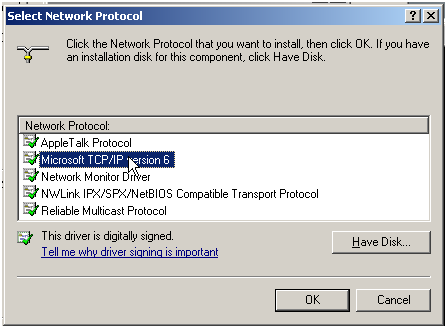
- Select Microsoft TCP/IP Version 6 and click OK.
Figure 13 Network protocols
- (Optional) Run the following commands depending on your ECS OS.
For Windows Server 2008, run the following command in PowerShell or CMD:
netsh interface ipv6 set global randomizeidentifiers=disable
Disable the local connection and then enable it again.
To disable the local connection, choose Start > Control Panel > Network and Internet > Network and Sharing Center > Change Adapter Options. Right-click the local connection and choose Disable from the shortcut menu.
To enable the local connection, choose Start > Control Panel > Network and Internet > Network and Sharing Center > Change Adapter Options. Right-click the local connection and choose Enable from the shortcut menu.
- Perform 1 to check whether dynamic IPv6 address assignment is enabled.
Linux (Automatically Enabling Dynamic Assignment of IPv6 Addresses)
The ipv6-setup-xxx tool can be used to enable Linux OSs to automatically acquire IPv6 addresses. xxx indicates a tool, which can be rhel or debian.
You can also enable dynamic IPv6 address assignment by following the instructions in Linux (Manually Enabling Dynamic Assignment of IPv6 Addresses).
- When you run ipv6-setup-xxx, the network service will be automatically restarted. As a result, the network is temporarily disconnected.
- If you use a private image from a CentOS 6.x or Debian ECS with IPv6 auto-assignment enabled to create an ECS in a non-IPv6 environment, the ECS may experience slow startup due to an IPv6 address assignment timeout. You can set the timeout duration for assigning IPv6 addresses to 30s by referring to Setting the Timeout Duration for IPv6 Address Assignment and try to create a new private image again.
- Run the following command to check whether IPv6 is enabled for the ECS:
ip addr
- If only an IPv4 address is displayed, IPv6 is disabled. Enable it by referring to Setting the Timeout Duration for IPv6 Address Assignment.
Figure 14 IPv6 disabled

- If a link-local address (starting with fe80) is displayed, IPv6 is enabled but dynamic assignment of IPv6 addresses is not enabled.
Figure 15 IPv6 enabled

- If the following address is displayed, IPv6 is enabled and an IPv6 address has been assigned:
Figure 16 IPv6 enabled and an IPv6 address assigned

NoteIPv6 is enabled for Linux public images by default, as shown in Figure 15.
- If only an IPv4 address is displayed, IPv6 is disabled. Enable it by referring to Setting the Timeout Duration for IPv6 Address Assignment.
- Enable IPv6 for the ECS.
- Run the following command to check whether IPv6 is enabled for the kernel:
sysctl -a | grep ipv6
- If a command output is displayed, IPv6 is enabled.
- If no information is displayed, IPv6 is disabled. Go to 2.b to load the IPv6 module.
- Run the following command to load the IPv6 module:
modprobe ipv6
- Add the following content to the /etc/sysctl.conf file:
net.ipv6.conf.all.disable_ipv6=0
- Save the configuration and exit. Then, run the following command to load the configuration:
sysctl -p
- Run the following command to check whether IPv6 is enabled for the kernel:
- Enable dynamic IPv6 address assignment for the ECS.
- Download ipv6-setup-rhel or ipv6-setup-debian with a required version and upload it to the target ECS.
ipv6-setup-xxx modifies the configuration file of a NIC to enable dynamic IPv6 address assignment or adds such a configuration file for a NIC, and then restarts the NIC or network service.
Contact the administrator to obtain the download paths of ipv6-setup-rhel and ipv6-setup-debian.
- Run the following command to make ipv6-setup-xxx executable:
chmod +x ipv6-setup-xxx
- Run the following command to enable dynamic IPv6 address assignment for a NIC:
./ipv6-setup-xxx --dev [dev]
Example:
./ipv6-setup-xxx --dev eth0
Note- To enable dynamic IPv6 address assignment for all NICs, run the ./ipv6-setup-xxx command.
- To learn how to use ipv6-setup-xxx, run the ./ipv6-setup-xxx --help command.
- Download ipv6-setup-rhel or ipv6-setup-debian with a required version and upload it to the target ECS.
Linux (Manually Enabling Dynamic Assignment of IPv6 Addresses)
If you use a private image from a CentOS 6.x or Debian ECS with IPv6 auto-assignment enabled to create an ECS in a non-IPv6 environment, the ECS may experience slow startup due to an IPv6 address assignment timeout. You can set the timeout duration for assigning IPv6 addresses to 30s by referring to Setting the Timeout Duration for IPv6 Address Assignment and try to create a new private image again.
- Run the following command to check whether IPv6 is enabled for the ECS:
ip addr
- If only an IPv4 address is displayed, IPv6 is disabled. Enable it by referring to 2.
Figure 17 IPv6 disabled

- If a link-local address (starting with fe80) is displayed, IPv6 is enabled but dynamic assignment of IPv6 addresses is not enabled.
Figure 18 IPv6 enabled

- If the following address is displayed, IPv6 is enabled and an IPv6 address has been assigned:
Figure 19 IPv6 enabled and an IPv6 address assigned

NoteIPv6 is enabled for Linux public images by default, as shown in Figure 18.
- If only an IPv4 address is displayed, IPv6 is disabled. Enable it by referring to 2.
- Enable IPv6 for the ECS.
- Run the following command to check whether IPv6 is enabled for the kernel:
sysctl -a | grep ipv6
- If a command output is displayed, IPv6 is enabled.
- If no information is displayed, IPv6 is disabled. Go to 2.b to load the IPv6 module.
- Run the following command to load the IPv6 module:
modprobe ipv6
- Add the following content to the /etc/sysctl.conf file:
net.ipv6.conf.all.disable_ipv6=0
- Save the configuration and exit. Then, run the following command to load the configuration:
sysctl -p
- Run the following command to check whether IPv6 is enabled for the kernel:
- Enable dynamic IPv6 address assignment for the ECS.
- Ubuntu 18.04/20.04
- Run the following command to access /etc/netplan/:
cd /etc/netplan
- Run the following command to list the configuration file:
ls
Figure 20 Configuration file name

- Run the following command to edit the configuration file 01-network-manager-all.yaml:
vi 01-network-manager-all.yaml
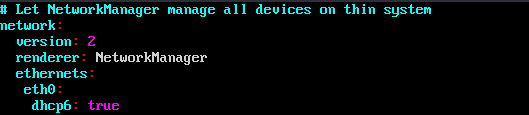
- Append the following content to the configuration file 01-network-manager-all.yaml (pay attention to the YAML file format and text indentation):ethernets:eth0:dhcp6: true
Figure 21 Edited configuration file
Save the changes and exit.
- Run the following command to make the changes take effect:
sudo netplan apply
- Run the following command to access /etc/netplan/:
- Ubuntu 22.04
- Run the following command to access /etc/netplan/:
cd /etc/netplan
- Run the following command to list the configuration file:
ls
Figure 22 Configuration file name

- Run the following command to edit the configuration file 01-netcfg.yaml:
vi 01-netcfg.yaml
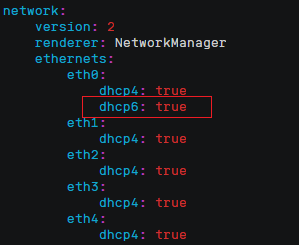
- Append the following content to the configuration file 01-netcfg.yaml (pay attention to the YAML file format and text indentation):ethernets:eth0:dhcp6: true dhcp6: true
Figure 23 Edited configuration file
Save the changes and exit.
- Run the following command to make the changes take effect:
sudo netplan apply
- Run the following command to edit /etc/NetworkManager/NetworkManager.conf:
vi /etc/NetworkManager/NetworkManager.conf
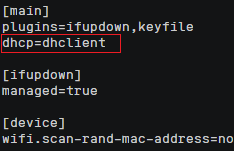
- Append the following content to the configuration file NetworkManager.conf (pay attention to the file format and indentation):[main]plugins=ifupdown,keyfiledhcp=dhclient dhcp=dhclient[ifupdown]managed=true[device]wifi.scan-rand-mac-address=no
Figure 24 Modification result
- Run the following command for the configuration to take effect:
systemctl restart NetworkManager
- Run the following command to access /etc/netplan/:
- Debian
- Add the following content to the /etc/network/interfaces file:auto loiface lo inet loopbackauto eth0 eth0iface eth0 eth0 inet dhcpiface eth0 inet6 dhcppre-up sleep 3
- Add configurations for each NIC to the /etc/network/interfaces file. The following uses eth1 as an example:auto eth1iface eth1 inet dhcpiface eth1 inet6 dhcppre-up sleep 3
- Run the following command to restart the network service:
service networking restart
NoteIf no IPv6 address is assigned after the NICs are brought down and up, you can run this command to restart the network.
- Perform 1 to check whether dynamic IPv6 address assignment is enabled.
- Add the following content to the /etc/network/interfaces file:
- CentOS, EulerOS, Fedora, or openEuler
- Open the configuration file /etc/sysconfig/network-scripts/ifcfg-eth0 of the primary NIC.
Add the following configuration items to the file:
IPV6INIT=yesDHCPV6C=yes - Edit the /etc/sysconfig/network file to add or modify the following line:NETWORKING_IPV6=yes
- For an ECS running CentOS 6, you need to edit the configuration files of its extension NICs. For example, if the extension NIC is eth1, you need to edit /etc/sysconfig/network-scripts/ifcfg-eth1.
Add the following configuration items to the file:
IPV6INIT=yesDHCPV6C=yesIn CentOS 6.3, dhcpv6-client requests are filtered by ip6tables by default. So, you also need to add a rule allowing the dhcpv6-client request to the ip6tables file.
- Run the following command to add the rule to ip6tables:
ip6tables -A INPUT -m state --state NEW -m udp -p udp --dport 546 -d fe80::/64 -j ACCEPT
- Run the following command to save the rule in ip6tables:
service ip6tables save
Figure 25 Example command

- Run the following command to add the rule to ip6tables:
- (Optional) For CentOS 7/CentOS 8/openEuler, change the IPv6 link-local address mode of extension NICs to EUI64.
- Run the following command to query the NIC information:
nmcli con
Figure 26 Querying NIC information

- Run the following command to change the IPv6 link-local address mode of eth1 to EUI64:
nmcli con modify "Wired connection 1" ipv6.addr-gen-mode eui64
NoteThe NIC information varies depending on the CentOS series. In the command, Wired connection 1 needs to be replaced with the value in the NAME column of the queried NIC information.
- Run the following commands to bring eth1 down and up:
ifdown eth1
ifup eth1
- Run the following command to query the NIC information:
- Restart the network service.
- For CentOS 6, run the following command to restart the network service:
service network restart
- For CentOS 7/EulerOS/Fedora/openEuler, run the following command to restart the network service:
systemctl restart NetworkManager
- For CentOS 6, run the following command to restart the network service:
- Perform 1 to check whether dynamic IPv6 address assignment is enabled.
- Open the configuration file /etc/sysconfig/network-scripts/ifcfg-eth0 of the primary NIC.
- SUSE, openSUSE, or CoreOS
SUSE 11 SP4 does not support dynamic IPv6 address assignment.
No additional configuration is required for SUSE 12 SP1 or SUSE 12 SP2.
No additional configuration is required for openSUSE 13.2 or openSUSE 42.2.
No additional configuration is required for CoreOS 10.10.5.
- Ubuntu 18.04/20.04
Setting the Timeout Duration for IPv6 Address Assignment
If you use a private image from a CentOS 6.x or Debian ECS with IPv6 auto-assignment enabled to create an ECS in a non-IPv6 environment, the ECS may experience slow startup due to an IPv6 address assignment timeout. You can set the timeout duration for assigning IPv6 addresses to 30s and try to create a new private image again.
- CentOS 6.x:
- Run the following command to edit the dhclient.conf file:
vi /etc/dhcp/dhclient.conf
- Press i to enter editing mode and add the timeout attribute to the file.timeout 30;
- Enter :wq to save the settings and exit.
- Run the following command to edit the dhclient.conf file:
- Debian 7.5:
- Run the following command to edit the networking file:
vi /etc/init.d/networking
- Press i to enter editing mode and add the timeout attribute.
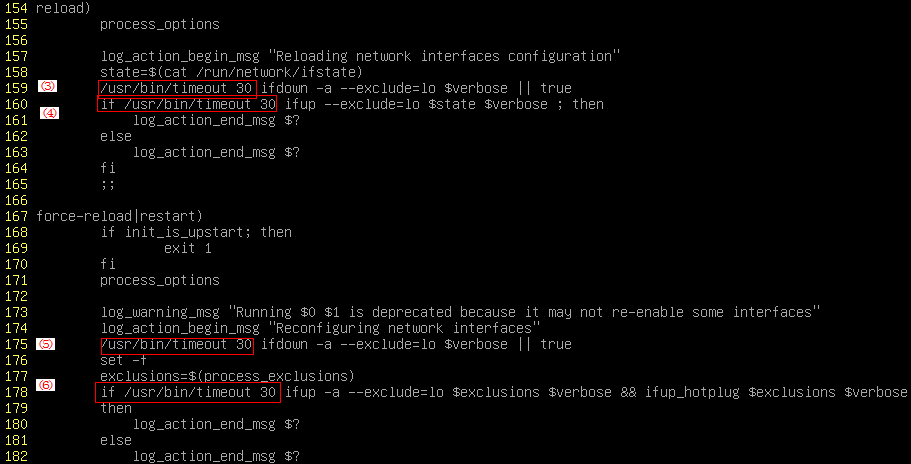
Figure 27 Modification 1
Figure 28 Modification 2
- Run the following command to edit the networking file:
- Debian 8.2.0/8.8.0
- Run the following command to edit the network-pre.conf file:
vi /lib/systemd/system/networking.service.d/network-pre.conf
- Press i to enter editing mode and add the timeout attribute to the file.[Service]TimeoutStartSec=30
- Run the following command to edit the network-pre.conf file:
- Debian 9.0
- Run the following command to edit the networking.service file:
vi /etc/system/system/network-online.target.wants/networking.service
- Press i to enter editing mode and change TimeoutStartSec=5min to TimeoutStartSec=30.
- Run the following command to edit the networking.service file: