This topic describes how to add the DNS server address and security group rules to a Linux ECS or BMS to ensure successful download of the Agent installation package and successful monitoring data collection. This topic takes an ECS as an example. The operations for BMSs are similar.
You can modify the DNS configuration of an ECS in either of the following ways: command line and management console. Choose a method based on your habits.
DNS and security group configuration are intended for the primary NIC.
Modifying the DNS Server Address (Command Lines)
The following describes how to add the DNS server address to the resolv.conf file using command lines.
To use the management console, see Modifying the DNS Server Address (Management Console).
The value of nameserver varies depending on the region.
ru-moscow: 100.125.13.59
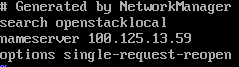
- Log in to an ECS as user root.
- Run the vi /etc/resolv.conf command to open the file.
- Add the DNS server address, for example, nameserver 100.125.13.59 to the file. Press Esc and enter :wq. Then, press Enter to save the change.
Figure 1 Adding DNS server addresses (Linux)
Modifying the DNS Server Address (Management Console)
The following describes how to modify the DNS server address of an ECS in the region on the management console. The operations for BMSs are similar.
- In the upper left corner, select a region and project.
- Click Service List in the upper left corner. Choose Compute > Elastic Cloud Server.
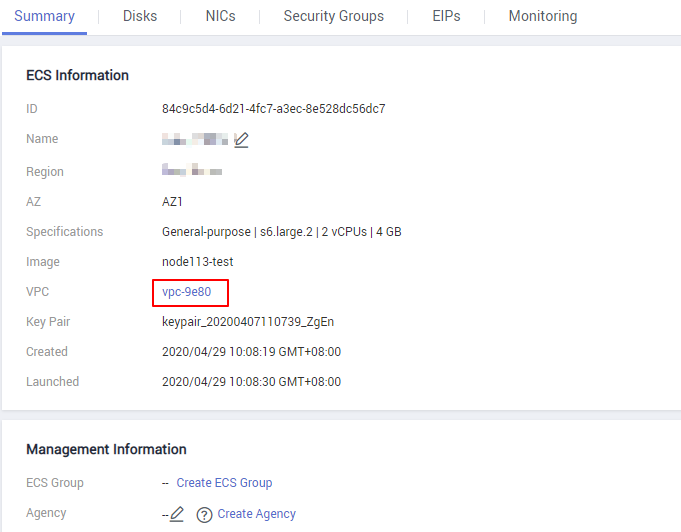
On the ECS console, click the target ECS name to view its details.
- In the ECS Information area of the Summary tab, click the VPC name. See Figure 2.
The Virtual Private Cloud page is displayed.
Figure 2 VPC
- Locate the target VPC and click the number of subnets.
- In the subnet list, locate the subnet of the ECS and click its name.
- On the subnet details page, click
 next to DNS Server Address in the Gateway and DNS Information area.
 - In the Edit DNS Server Address dialog box, enter a DNS server address.Note
Set the DNS server address to the value of nameserver in 3.
- Click OK.Note
The new DNS server address is applied after the ECS or BMS is restarted.
Modifying the ECS Security Group Rules (Management Console)
The following describes how to modify security group rules for an ECS on the management console. The operations for BMSs are similar.
- On the ECS details page, click the Security Groups tab.
The security group list is displayed.
- Click a security group name.
- On the security group details page, click Outbound Rules.Note
For BMSs:
- Click the security group ID on the upper left.
- Locate the security group and click Manage Rule in the Operation column.
- On the Outbound Rules page, click Add Rule.
- Add rules based on Table 1.
Table 1 Security group rules Priority
Action
Type
Protocol & Port
Destination IP Address
Description
1
Allow
IPv4
TCP
80
100.125.0.0/16
Used to download the Agent installation package from an OBS bucket to an ECS or BMS and obtain the ECS or BMS metadata and authentication information.
1
Allow
IPv4
TCP
53
100.125.0.0/16
Used by DNS to resolve domain names, for example, resolve the OBS domain name when you are downloading the Agent installation package, and resolve the Cloud Eye endpoint when the Agent is sending monitoring data to Cloud Eye.
1
Allow
IPv4
UDP
53
100.125.0.0/16
Used by DNS to resolve domain names, for example, resolve the OBS domain name when you are downloading the Agent installation package, and resolve the Cloud Eye endpoint when the Agent is sending monitoring data to Cloud Eye.
1
Allow
IPv4
TCP
443
100.125.0.0/16
Used to collect monitoring data to Cloud Eye.