Model Definition
A container tunnel network creates a separate network plane for containers by using tunnel encapsulation on the host network plane. This network model uses VXLAN for tunnel encapsulation and Open vSwitch as the virtual switch backend. VXLAN is a protocol that encapsulates Ethernet packets into UDP packets to transmit them through tunnels. Open vSwitch is an open-source virtual switch that provides functions such as network isolation and data forwarding.
While there may be some performance costs, packet encapsulation and tunnel transmission allow for greater interoperability and compatibility with advanced features, such as network policy-based isolation, in most common scenarios.
Figure 1 Container tunnel network
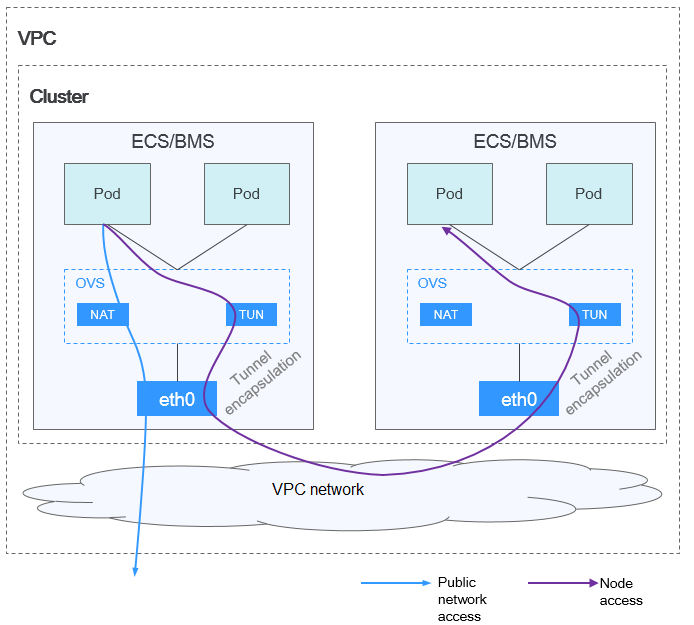
In a cluster using the container tunnel model, the communication paths between pods on the same node and between pods on different nodes are different.
- Inter-pod communication on the same node: Packets are directly forwarded via the OVS bridge on the node.
- Inter-pod communication on different nodes: Packets are encapsulated in the OVS bridge and then forwarded to the target pod on the peer node through the host network interface.
Advantages and Disadvantages
Advantages
- The container network is decoupled from the node network and is not limited by the VPC quotas and response speed (such as the number of VPC routes, number of network·interfaces, and creation speed).
- Network isolation is supported. For details, see Configuring Network Policies to Restrict Pod Access.
- Bandwidth limits are supported.
- Large-scale networking with a maximum of 2000 nodes is supported.
Disadvantages
- High encapsulation overhead results in poor performance and makes it difficult to locate network faults.
- Pods cannot directly use features like EIPs and security groups.
- Pod IP addresses cannot be directly accessed by external networks.
Application Scenarios
- Low requirements on performance: As the container tunnel network requires additional VXLAN tunnel encapsulation, it has about 5% to 15% of performance loss when compared with the other two container network models. Therefore, the container tunnel network applies to the scenarios that do not have high performance requirements, such as web applications, and middle-end and back-end services with a small number of access requests.
- Large-scale networking: Different from the VPC network that is limited by the VPC route quota, the container tunnel network does not have any restriction on the infrastructure. In addition, the container tunnel network controls the broadcast domain to the node level. The container tunnel network supports a maximum of 2000 nodes.
Pod IP Address Management
The container tunnel network allocates pod IP addresses according to the following rules:
- Separate CIDR blocks: The container CIDR block is completely separated from the node CIDR blocks. They do not overlap. This avoids IP address conflicts between nodes and pods. Additionally, these CIDR blocks can be adjusted separately.
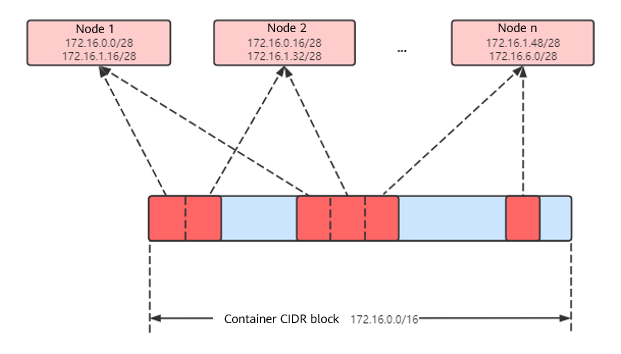
- CIDR blocks dynamically assigned to nodes by block: Pod CIDR blocks with a fixed size (16 IP addresses by default, that is, mask /28) are allocated from the container CIDR block. These CIDR blocks are assigned to nodes in the cluster in sequence.
- Pod IP addresses added after exhaustion: After the pod CIDR block assigned to a node is used up, a new pod CIDR block is automatically applied for from the container CIDR block to ensure that there are sufficient pod IP addresses for creating pods.
- Cyclic allocation of container CIDR block: Pod CIDR blocks are assigned to new or existing nodes in a cyclic manner based on the sequence in the container CIDR block to prevent some pod CIDR blocks from being excessively occupied.
- Pod IP addresses allocated from the CIDR blocks assigned to nodes: After pods are scheduled to a node, they obtain IP addresses from one or more pod CIDR blocks assigned to the node in sequence to ensure that their IP addresses are allocated in sequence and are unique. For example, if the pod CIDR blocks allocated to a node are 172.16.0.0/28 and 172.16.1.16/28 and IP addresses in 172.16.0.0/28 are used up, pod IP addresses will then be allocated from 172.16.1.16/28.
Figure 2 IP address allocation of the container tunnel network
Maximum number of nodes that can be created in the cluster using the container tunnel network = Number of IP addresses in the container CIDR block/Size of the IP CIDR block allocated to the node by the container CIDR block at a time (16 by default)
For example, if the container CIDR block is 172.16.0.0/16, the number of IP addresses is 65,536. If the mask of the container CIDR block allocated to each node is 28 (a total of 16 pod IP addresses allocated each time), a maximum of 4,096 (65536/16) nodes can be created. This is an extreme case. If 4,096 nodes are created, a maximum of 16 pods can be created for each node because only a CIDR block with 16 IP addresses is allocated to each node. The number of nodes that can be added to a cluster is also determined by the available IP addresses in the node subnet and the scale of the cluster.
Recommendation for CIDR Block Planning
As explained in Cluster Network Structure, there are three networks in a cluster: cluster network, container network, and Service network. When planning network addresses, consider the following:
- The three CIDR blocks cannot overlap. Otherwise, a conflict occurs.
- Ensure that each CIDR block has sufficient IP addresses.
- The IP addresses in cluster CIDR blocks must match the cluster scale. Otherwise, nodes cannot be created due to insufficient IP addresses.
- The IP addresses in container CIDR blocks must match the service scale. Otherwise, pods cannot be created due to insufficient IP addresses. The number of pods that can be created on each node also depends on other parameter settings.
Example of Container Tunnel Network Access
The following is an example of creating a workload in a cluster using the container tunnel network model:
- Use kubectl to access the cluster. For details, see Accessing a Cluster Using kubectl.
- Create a Deployment in the cluster.
Create the deployment.yaml file. The following shows an example:
kind: DeploymentapiVersion: apps/v1metadata:name: examplenamespace: defaultspec:replicas: 4selector:matchLabels:app: exampletemplate:metadata:labels:app: examplespec:containers:- name: container-0image: 'nginx:perl'resources:limits:cpu: 250mmemory: 512Mirequests:cpu: 250mmemory: 512MiimagePullSecrets:- name: default-secretCreate the workload.
kubectl apply -f deployment.yaml - Check the running pods.kubectl get pod -owide
Command output:
NAME READY STATUS RESTARTS AGE IP NODE NOMINATED NODE READINESS GATESexample-5bdc5699b7-5rvq4 1/1 Running 0 3m28s 10.0.0.20 192.168.0.42 <none> <none>example-5bdc5699b7-984j9 1/1 Running 0 3m28s 10.0.0.21 192.168.0.42 <none> <none>example-5bdc5699b7-lfxkm 1/1 Running 0 3m28s 10.0.0.22 192.168.0.42 <none> <none>example-5bdc5699b7-wjcmg 1/1 Running 0 3m28s 10.0.0.52 192.168.0.64 <none> <none> - Use a cloud server in the same VPC to directly access a pod's IP address from outside the cluster. The access failed.
You can access a pod using its IP address within the pod or from a node in the cluster. In the following example, access a pod's IP address within the pod. example-5bdc5699b7-5rvq4 is the pod name, and 10.0.0.21 is the pod IP address.
kubectl exec -it example-5bdc5699b7-5rvq4 -- curl 10.0.0.21If the following information is displayed, the workload can be accessed:
<!DOCTYPE html><html><head><title>Welcome to nginx!</title><style>body {width: 35em;margin: 0 auto;font-family: Tahoma, Verdana, Arial, sans-serif;}</style></head><body><h1>Welcome to nginx!</h1><p>If you see this page, the nginx web server is successfully installed andworking. Further configuration is required.</p><p>For online documentation and support please refer to<a href="http://nginx.org/">nginx.org</a>.<br/>Commercial support is available at<a href="http://nginx.com/">nginx.com</a>.</p><p><em>Thank you for using nginx.</em></p></body></html>
Helpful Links
- For details about the maximum number of pods that can run on a node in a cluster with different network models, see Maximum Number of Pods That Can Be Created on a Node.